This project has only been on my list for two years. From the day we put together our IKEA BORGJSO bookshelves, we’ve known that we wanted to do something different for the backing.
Wallpaper, wrapping paper, paint and fabric were all on the table as options.
Fabric was my first choice, but I wasn’t sure if I could find something at the right price. I went to JoAnn to do some fabric scouting, and if you follow me on Instagram, you know what happened next. I fell in LOVE…with the most perfect new line of fabric designed by Nate Berkus. AND it was 50% off.
I resisted every temptation to buy it before I went home to measure the bookcase. Silly me forgot that part before the scouting trip. Do what I say, not what I do!
Once I had the measurements, I used the tip from week #2 of Low Budget, High Design and came up with an extra 20% off my entire purchase (including sale items!) coupon on my phone. It was a good day.
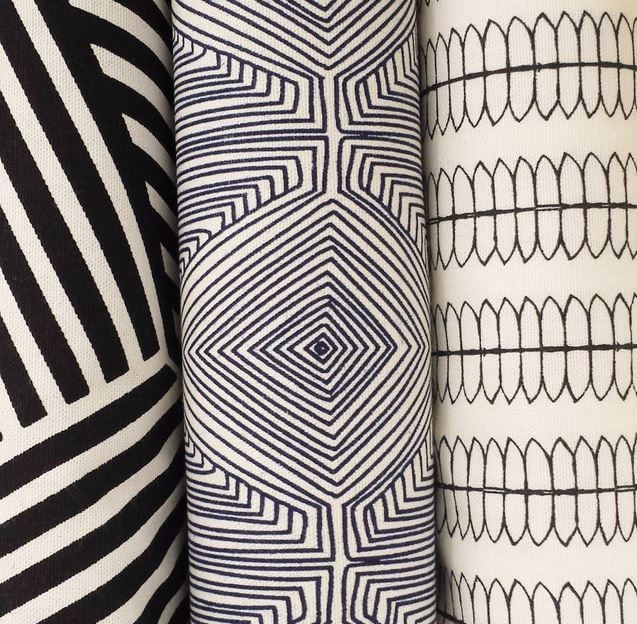
DIY Bookshelf Backing Supplies
In addition to fabric, you’ll also need the following supplies. I added affiliate links to Amazon in case you don’t have something on hand.
Foam Board (I get mine at the Dollar Tree!)
Sharp Utility Knife
Tape Measure (Link to my girly Toolkit)
Old Scissors
Long Level or Yard Stick
Fabric Scissors (Optional, but SO helpful)
Gorilla Glue Shipping Tape
You’ll need enough foam board to fill the back of each shelf.
For fabric, you’ll need the size of back you want to cover, plus 3-4″. So if your shelf back is 10 x 28, your fabric would need to be 13×31.
How to Cover the Back of a Bookcase
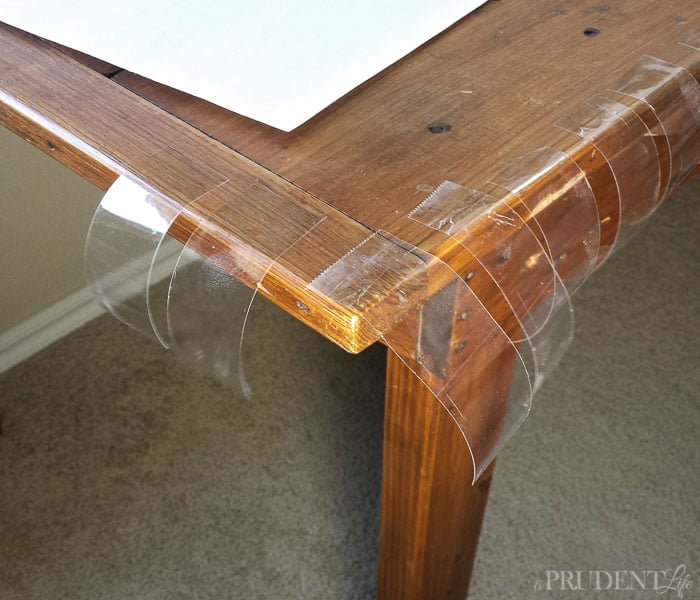
To get started, measure the back of your first shelf and subtract 1/8″ to give yourself a little wiggle room. Mark your foam board with the measurements and use the utility knife to cut the board down to size.
Hang the board over the edge of a table so you don’t cut your actual table. I like using a level between my free hand and the cutting hand as a protective device. Utility knives can be mean. Safety first!

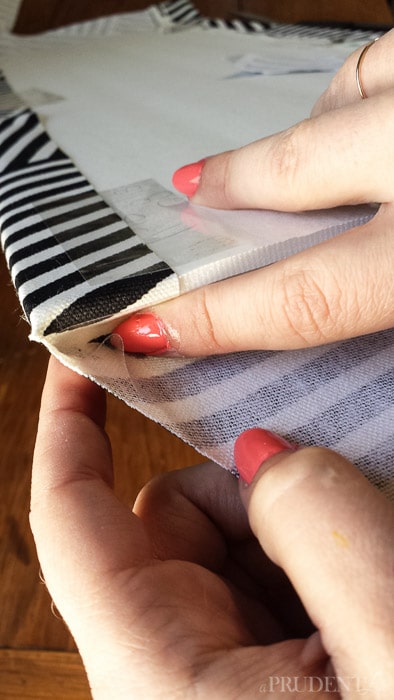
There are various ways you could attach the fabric to your new backer board, including spray glue, but it was too dang hot outside for that.
I wanted to tape it if possible, so I could switch out my fabric later without re-cutting all the backer boards.
I dug through our adhesive drawer and came up with some Gorilla Glue shipping tape that I think came in a swag bag at a conference. I tested it out and holy cow was it strong.
I pre-cut lots of pieces so I could grab them quickly. I found it easier to pull a LONG piece off the roll and then cut it into smaller pieces with old scissors. The tape will gum up the scissors, so be careful that you don’t use your fabric scissors for this part!
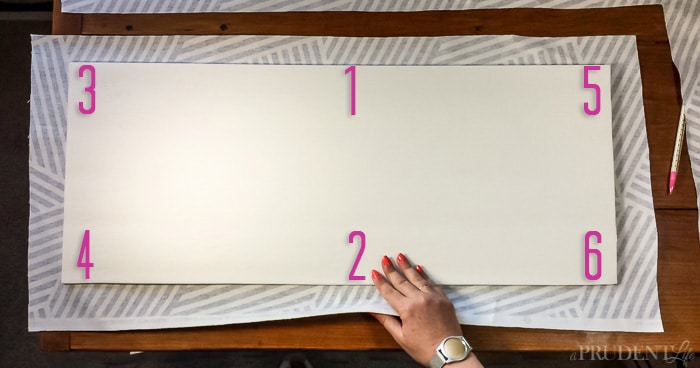
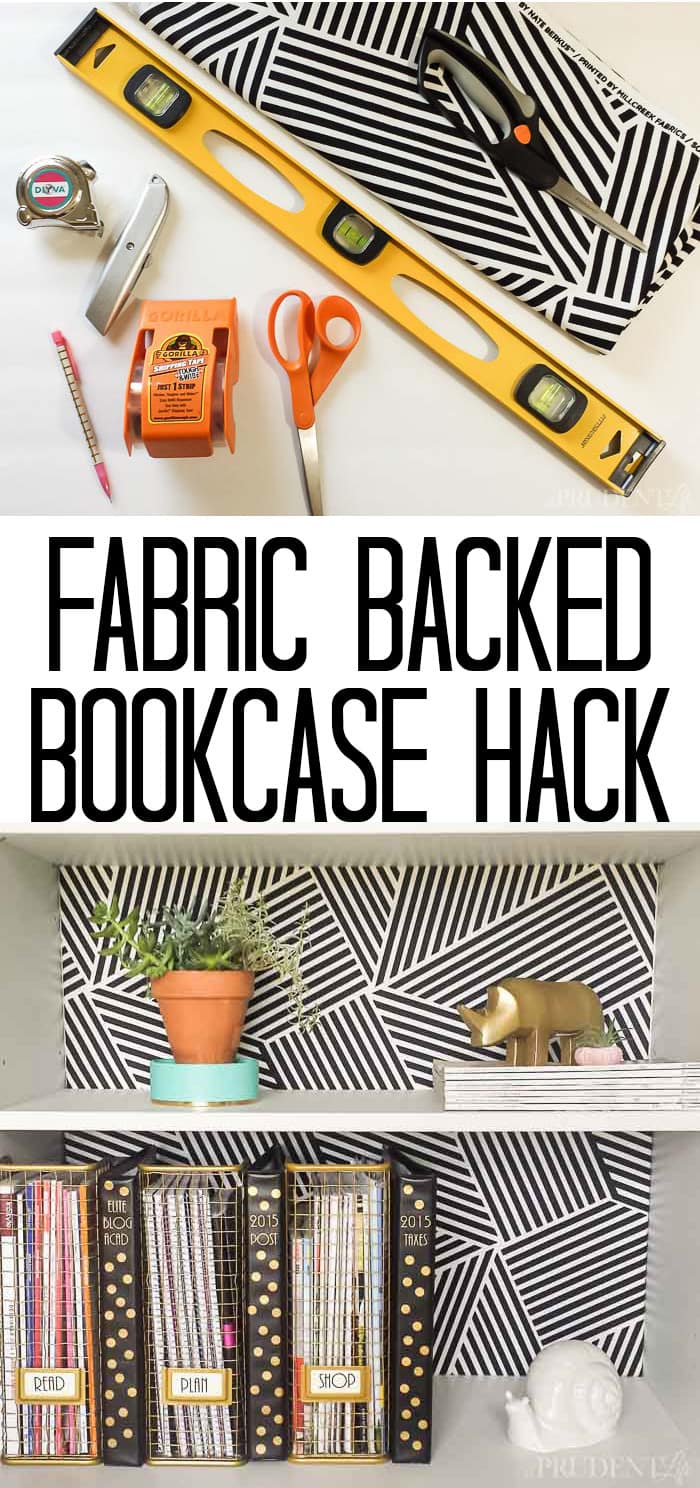
With the foam board and tape ready, it was finally time for the fun part! I used the board as a template and cut the fabric with 1 1/2 excess all the way around.
Following the numbers below, fold the fabric over, pull it snug, and tape the long sides in the order below. You are NOT taping the short ends at this point, all six pieces of tape are on the long sides.
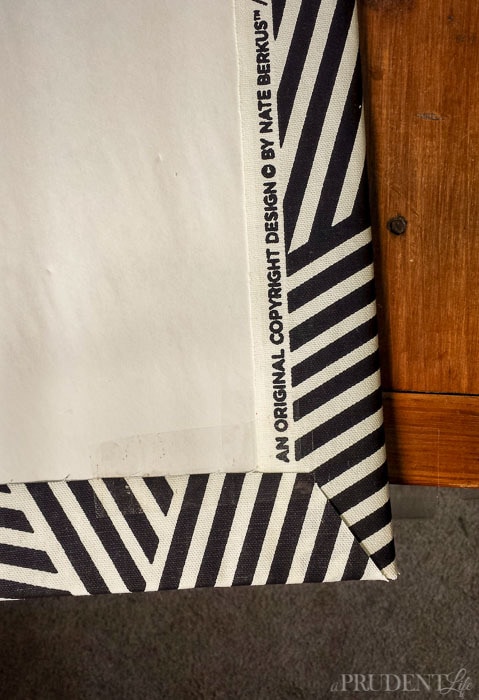
All four corners should now look like the below picture. To get really crisp corners, I came up with a little trick.
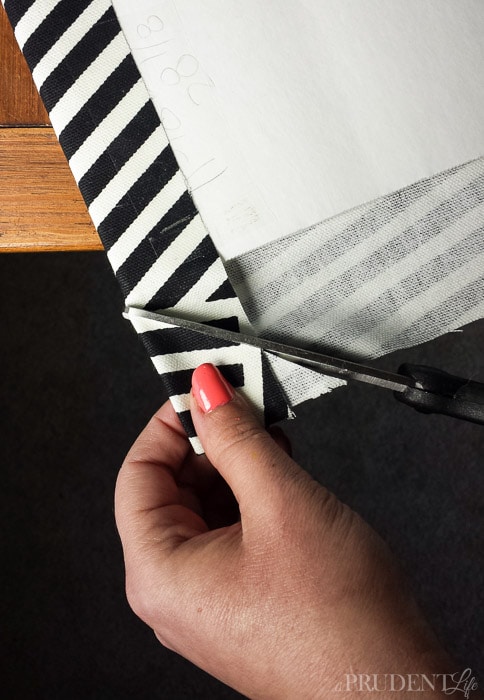
Pick a corner and cut the fabric at an angle, aiming to end your cut right around the foam board.
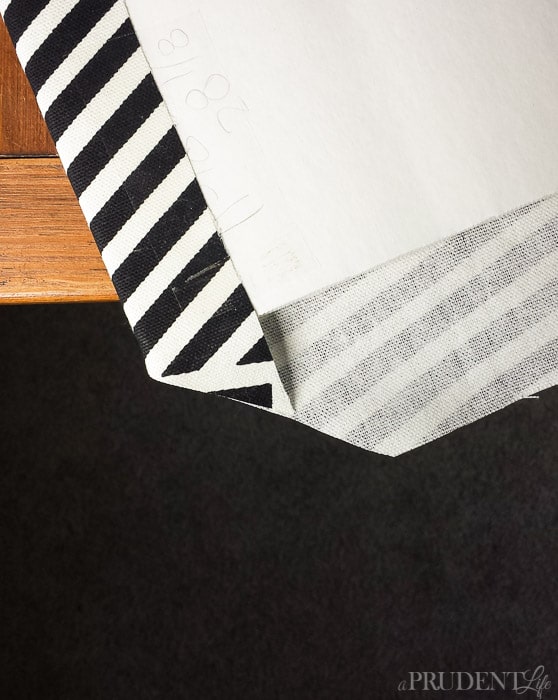
Now there is a flap that we can tuck over the foam board, like this:
So then it will look like this:
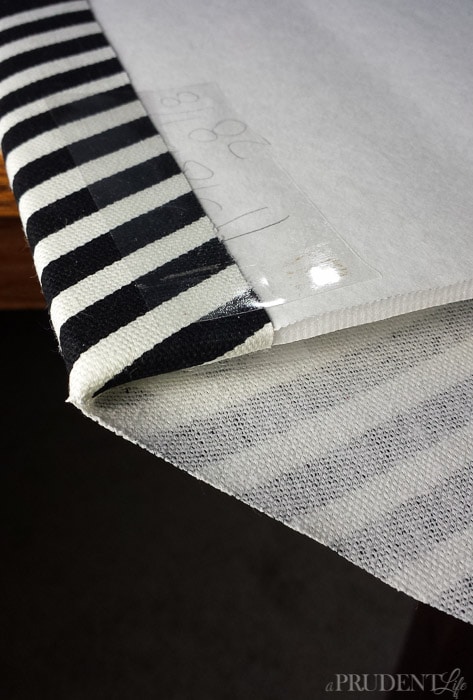
Once you’ve done the tucking on both sides, the end is near! Just pull the remaining fabric tight and tape it down.
Booyah – a perfectly crisp corner!
When all the sides are done, place the pretty board at the back of your shelf and take a moment to admire it. It should fit tight enough that pressure holds it in place.
Once you are done admiring your first shelf, measure for the next one. It’ll go way faster, I promise!
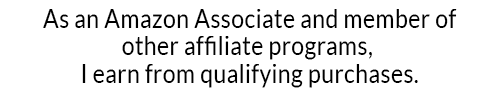
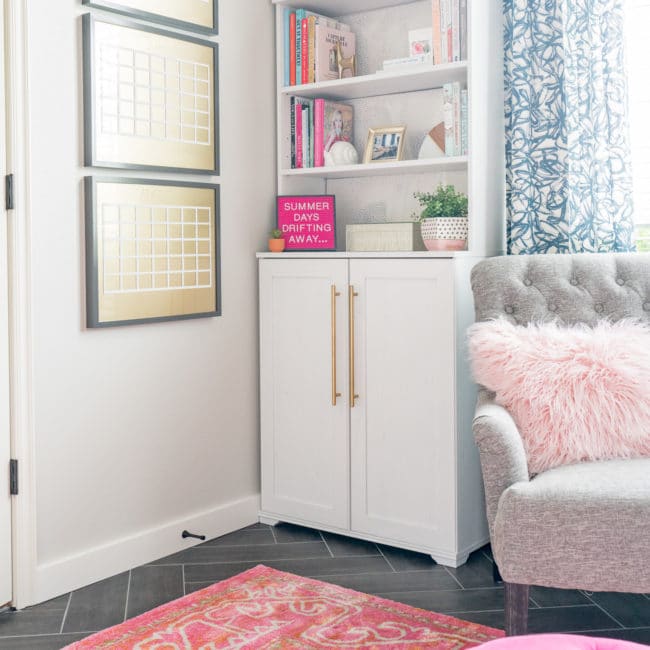
Here’s what mine look like now. Yep, I’m still in love with the fabric.
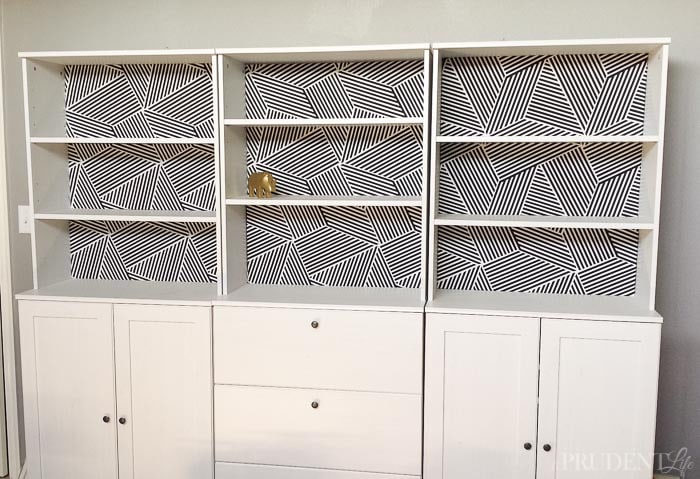
I’m still working out all the styling as we finish the rest of the office, but here’s a peek at two shelves.

I posted the above picture on Instagram as I was styling and a few hours later the craziest thing happened. I got a notification on my phone that about caused my heart to stop.
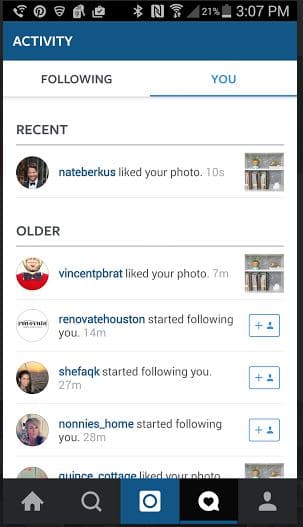
Yep, at 3:07 with 21% battery remaining, Nate Berkus liked my photo. Life is good!
Wallpaper or Wrapping Paper Backing for a Bookshelf
Update: As much as I still LOVE this fabric, it didn’t work when I created a more feminine office. Instead, I used this exact technique to recover the same bookshelves with a pretty white wrapping paper with gold spots!
We also swapped out the hardware to gold bar pulls.
The fabric has a richer look overall, but the wrapping paper was a free fix (I already owned it). I’ll eventually find the perfect new fabric. Until then, they still look good!
Here’s a handy pin if you want to remember this fabric backed bookcase hack for future projects!

Corey @ TinySidekick says
Oh my goodness this is sooooo good. What a cool update and you know me I would love to change it up every so often so this is a cool solution. Of course Nate himself loved it!!! (so cool)
Melissa George says
Thank you!! I’m in that phase between “I love it so much why would I ever change it? AND” Oh, this is like playing dress up for decor, what other fabrics can I try?”
Katie @ Addicted 2 DIY says
I LOVE the way this looks! And I feel giddy for you over the Instagram “like”! How cool is that!?
Melissa George says
Thanks, Giddy was the perfect word for how I felt as well 🙂
Stephanie says
I LOVE it!
Quick question – Did you paint your bookcases white? The “white” bookcases on the IKEA website look very gray and show a lot of grain. Yours look much nicer (IMO) and I don’t see the grain.
Thanks!!!
Melissa George says
We had the same exact concern before we ordered them. Ours are still the IKEA finish and definitely have some of the grain up close, but you don’t see from a distance and it probably helps that our room is super bright because of the huge window. We’re talking about adding trim at the top and between the units to make them one piece, but if we did that we’d definitely have to paint since the white isn’t solid. Other than that potential issue, we’re way happier with the finish than we expected.
Laura says
Wow- these turned out so well! Great fabric choice. Nice job with the coupon, too. 😉 I just had to share this idea on my Facebook page. I’m already trying to figure out where I can use it in my own house. . .
Melissa George says
Thank you Laura! I have another bookcase we were going to get rid of, but now I’m thinking of all the fabrics I could use with it!
Sarah Vogel says
What can I say….you are brilliant, just brilliant.! And Nate thinks so too!!! Get ready for a HUGE surge in your popularity!!
🙂
Melissa George says
Thanks you so much! You’re the best!!!
Rita McKenzie says
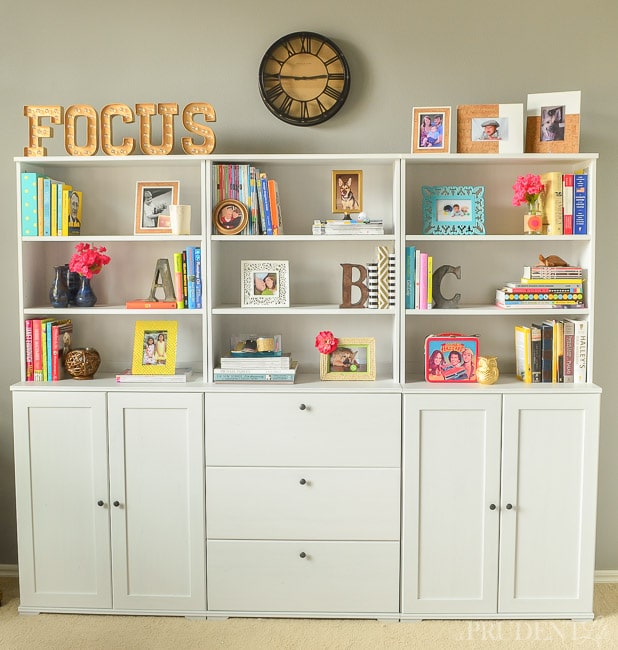
It’s much too strong for me. It hurts my eyes. I was hoping you’d pick the fabric on the right.
Melissa George says
I love the one on the right too, but the black and white should look better with the rest of the room. Hopefully when books and other items are on the shelves, it won’t hurt eyes!
Rita Jannusch McKenzie says
I guess I prefer a lighter palette. But you are right, it all depends on the rest of the room. I’m sure it will look great. Look forward to seeing it all together.
Tania // Run to Radiance says
OMG. NATE. LIKED. YOUR. PIC.
:O
I basically feel like my heart stopped when I read that!! hahahah! Keep that pic forever, ya’ll are basically besties now. 😀
I’ve been wanting to cover the back of my bookshelves but still lpaying with options—I have some left over Anthro wall paper that might be just the thing, but I’m hoarding it like gold until I know for sure 😀
Melissa George says
Ha – I know! I’m on my way to NYC, where I feel I’m much more likely to run into him than Tulsa . You know, other than all the other millions people there. But in my mind, I’d totally act like we were BFF’s. And then he’d call security. It would be awesome.
Lauren English says
Gorgeous! I loved them before and they’re pretty darn cute after too. 🙂 Ha and congrats on the like from the one and only Nate Berkus! How fun is that?
JaneEllen says
I was just going to paint back of book shelves but now will do what you have so I can change when mood strikes me. And mood will strike me, get tired of things after little while. My gallery wall is hanging in limbo now til I decide what really want to do, what theme. Was going to do bees but thinking travel with maps of places we’ve lived and gone to. Hubs used to be trucker so we got to see so much of US and some of Canada at different times, when we lived in San Diego we saw some of Mexico also. That would kind of carry over into Fall til I decide what else I’d like. Your tutorial was great and love idea of buying foam board at $tree. Now for fabric, don’t think Nate Berkus is in my budget but will find something I love. Thank heavens for coupons. Back of your book case looks great. Kind of abstract pattern to go with anything, great job. So much inspiration on this party and love working with fabric.
Happy week
Melissa George says
So glad it was inspiring! The Nate Berkus fabric was surprisingly affordable at Joann… at least with the 50% coupon and then 20% off the entire purchase on top of that.
Rachel says
I love the fabric you choose. It’s bold but simple and clean. WOW on the instagram like. I probably would have fainted!
Stephanie @ Mommyzoid says
LOVE this idea! WOW! What a punch of colour. Thanks so much for the tape trick. I was going to do this on my book shelves with wall paper but this seems like a way smarter idea! Afterward you could use to fabric to do a whole new DIY when it’s time to switch things up!
Stephanie @ Mommyzoid.ca
PS: You should come over at share this at the Ladies Collective Linkup <3 Hope to have you!
Melissa George says
Thanks so much Stepahnie! The tape was SO easy and is holding up great.
Colleen says
Your bookcase looks amazing! And how cool is it that THE Nate Berkus liked your instagram post. Love love love that guy!
Melissa George says
Thanks Colleen, It was the coolest thing ever when I saw that notification! I’m so glad I got a screenshot to remember it! 🙂
Kate says
Question! How did you get be fabric covered board to stick in the shelves and not fall out? Did it just wedge in or did you nail
Into place? Thank you!
Melissa George says
They are just wedged in. They are still going strong without falling out!
Jackie Pratt says
Your bookcases look great. My question is I want to cover my Tall 8 ft X 3 ft bookcases. Does any foam board come in that large of a size? What could I use. I would like to use one big piece so I don’t have to piece them together.
Thanks for your input, Jackie
Melissa George says
Hi Jackie,
Home Depot carries some 4ft x 8 ft large foam sheets that are generally used for insulation but would work the same way. I believe you can score and snap like them like smaller craft foam board. I’d see if you could find an employee to check that with though because I’ve never done it myself. Here’s a link to one brand so you get an idea of what I’m talking about. https://www.homedepot.com/p/Owens-Corning-FOAMULAR-150-1-in-x-4-ft-x-8-ft-R-5-Scored-Square-Edge-Insulating-Sheathing-20WE/207179253
Laura Foye says
I just used this today to take a perfectly fine book case that we’ve owned for…ohmygoodness…28 years (!) and while it was fine before, it looks updated now, without painting or otherwise altering it! Thank you for a really useful tutorial – my shelf wasn’t built exactly the same, but the tip for making the corners nice was so helpful! This was a great transformation for less thatn $7 – we are really happy with it. 🙂
Melissa George says
That’s fabulous to hear, Laura! I’m so glad the tutorial was helpful!
erin says
Question – when cutting the foam board…you say to subtract 1/8 of an inch. Is that on all 4 sides?
And then with the fabric…you say to add length. Is that on all 4 sides as well?
Melissa George says
Hi Erin,
The 1/8″ is just a total of 1/8″ shorter to make sure the board will fit in with the fabric one it. For the fabric, you’ll want to add 1.5 inches all the way around, so your total piece of fabric will be 3 inches wider and 3 inches longer than your board. Does that help?
Erin says
Thanks for the quick reply! Fabric I got! My shelf that I am doing is approx 36” by 36”. So, when I cut the foam board, what do you recommend? I’m a little confused about the subtracting 1/8” direction. Thanks so much!! 🙂
Melissa George says
Good morning! If the shelf is 36 x 36, you want to cut the foam board just a smidge smaller than than. So 35 7/8 x 35 7/8.
I’m guess that’s the whole back with the shelves removed, right? One you cut the foam board, make sure it fits with the shelves back in before moving to to fabric. Depending on the piece of furniture, you may have do individual pieces to go between each shelf versus the whole back at once. Hopefully there’s enough clearance that you can just do the one big piece though!