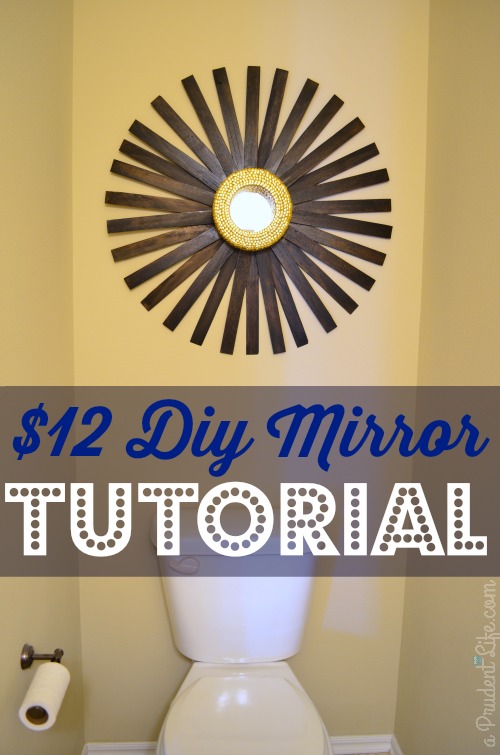
I wasn’t sure I was EVER going to finish this project! It wasn’t really HARD, but I definitely learned some lessons along the way. I’m really glad I stuck it out though, because the end result is an awesome 30″ sunburst mirror that cost TWELVE DOLLARS!
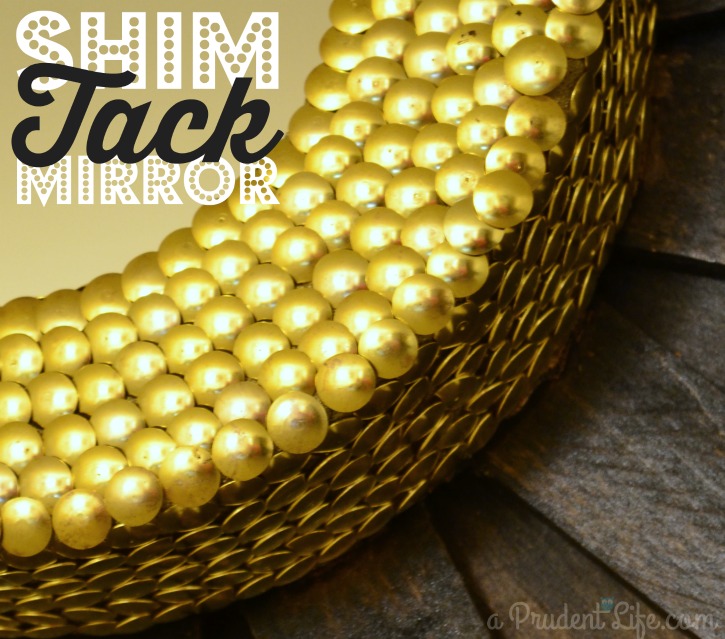
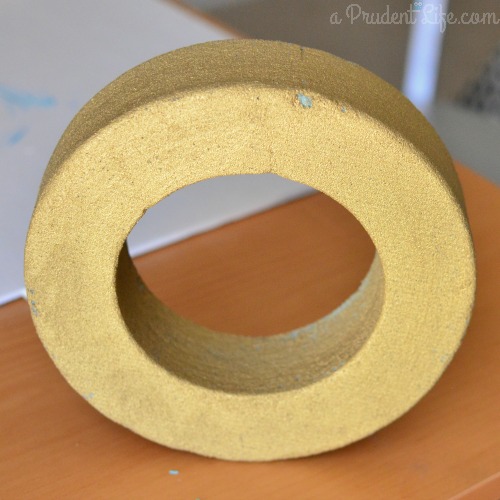
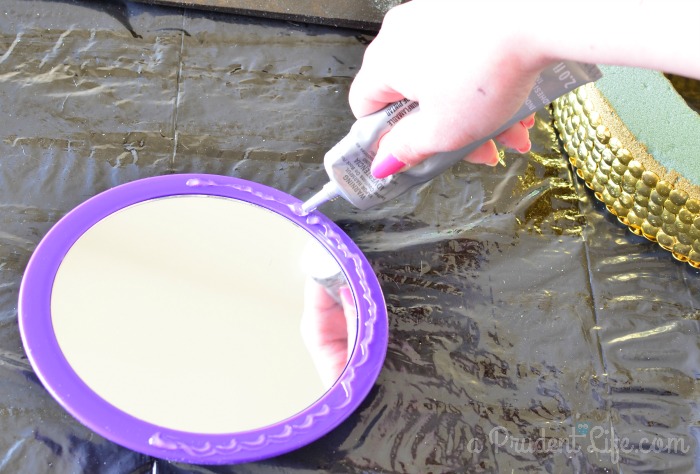
It all started with a floral foam I picked up at the Dollar Tree several months ago. I was staring in my craft storage cabinet one day and had the brilliant idea to cover it in thumbtacks and turn it into a mirror. A quick trip back to Dollar Tree and I had 1500 gold thumbtacks and a cheap makeup mirror.
I painted the foam with some gold craft paint so no green would show through. I didn’t paint the back, but if you try this, you should.
Then I started tacking…
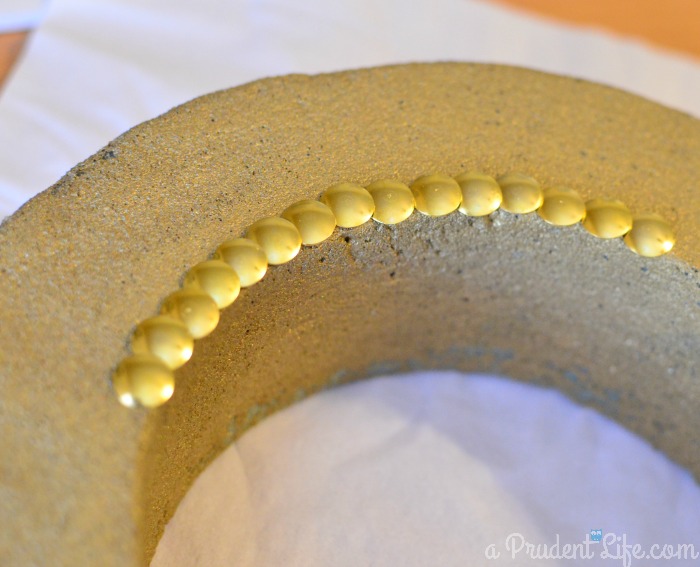
This was pretty easy to do while watching TV. I worked on it over several nights until it looked like the pic below.
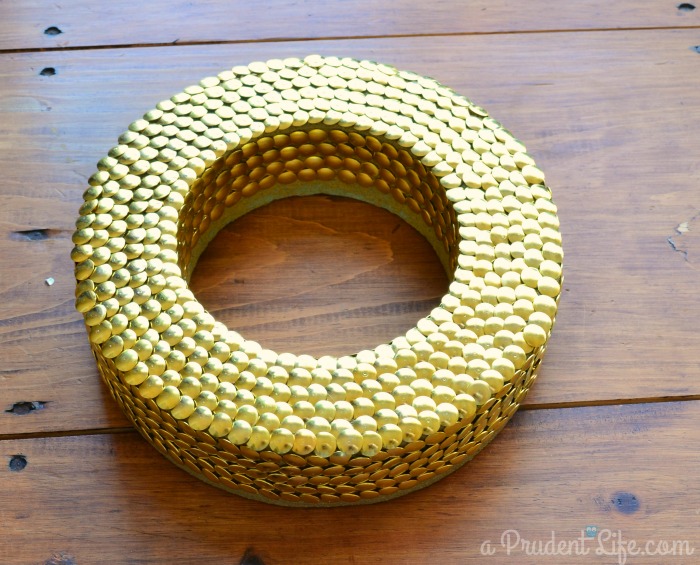
About that time, I had another idea. What if I somehow attached shims to make the mirror MUCH larger and more appropriate for one of our big blank walls??? Genius!
I picked up a large pack of shims for $4. Since shims are made for shimming things, not for art projects, they were rough around the edges. Guess what? That meant I got to sit down in front of the TV again! I took a sanding block and large cardboard box, plopped on the floor, and sanded the shims over the cardboard box to catch {most of} the dust. I’ll just warn you now that sanding while watching TV works better if you are alone. First try was a fail because hubby thought I was being WAY too noisy. 🙂
Here’s a before and after of the sanding step.

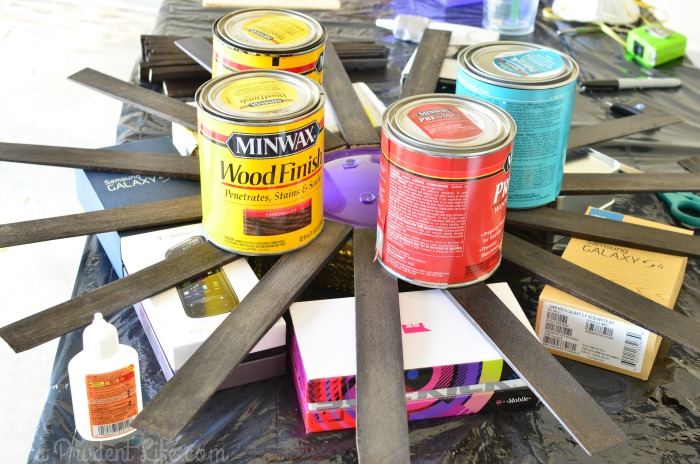
Once everything was sanded, I decided to stain the shims a dark wood tone. I used Minwax Wood Conditioner before staining to help the stain evenly cover the low quality wood .
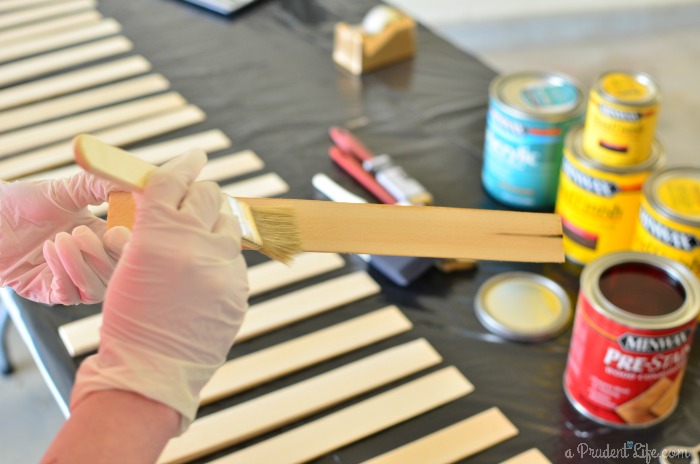
By the time I had the last shim covered with conditioner, I could start back at the beginning with Minwax Jacobean stain. Here’s a shot of the newly stained shims. I used 30 of them.
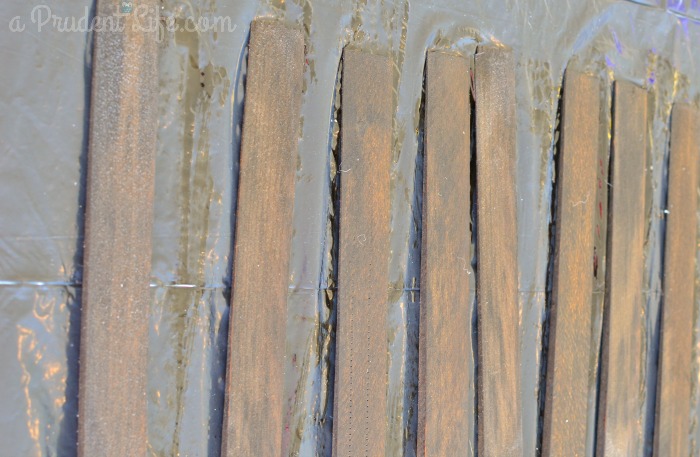
I let the stain dry overnight, then added a coat of polyurethane. Once the poly was dry, it was time to figure out how all these pieces were going to go together. Yep, probably should have planned that out ahead of time!
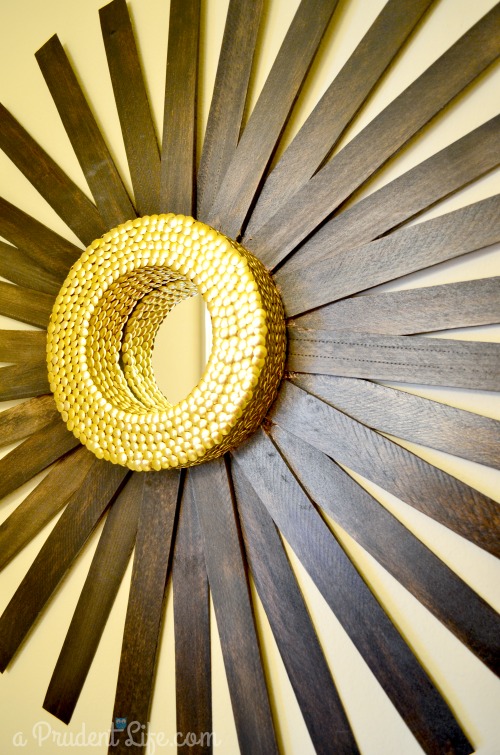
First, I attached the mirror to the floral foam.
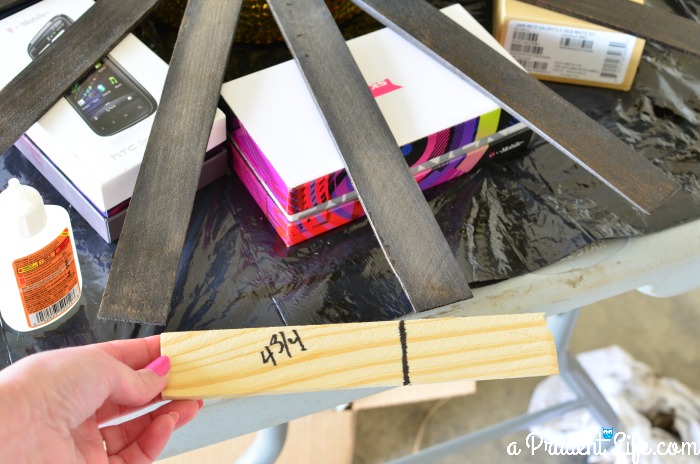
 Then I had to figure out the shim part. I quickly realized I needed something the same height as the floral foam to prop up the shims as they dried. I found a mish mash of random boxes, including a bunch of cell phone boxes, that were the perfect height. I arranged all the shims around the mirror, then measured so I could keep the spacing consistent. I didn’t do ANY tricky math, just eyeballed and adjusted until it worked out.
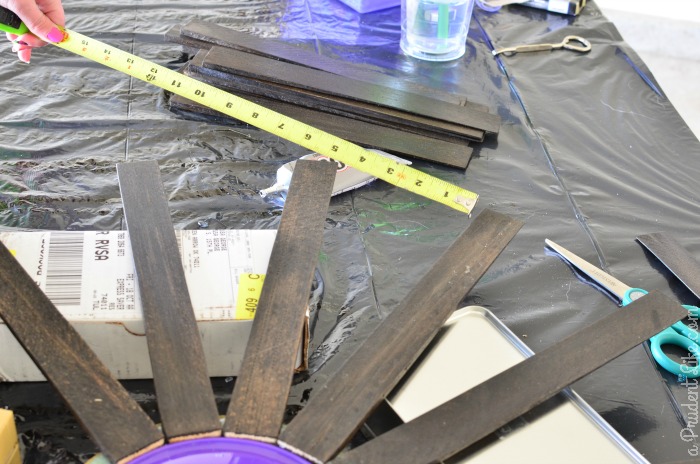
Once I figured out the spacing, I made a little template so I could quickly adjust the shims.
 It was finally time to glue! Once everything was glued, I weighed down the shims and let them dry overnight.
 The next day, I added another layer of shims. When they were dry, I was finally done! I used two large Command Picture Hanging Strips to attach my new mirror to the previously VERY empty wall in the bathroom.
For my new 30 inch mirror, I spent $12 total because almost everything came from Dollar Tree! The price doesn’t include glue or stain since it uses such a tiny amount. If you don’t have stain on hand, the shims could also be painted.
As I mentioned, I learned a couple things along the way:
Lesson learned #1: Everything would have been a lot easier if I had applied some thin glue to each section of foam before I started sticking the thumbtacks in. MOST of my thumbtacks stayed in just fine without being glued, but a few of them didn’t cooperate and kept jumping out of the foam every time I moved it.
Lesson learned #2: Pay attention to your glue! First I used E6000 which has more warning labels than I like, and takes a long time to dry. Second I used Gorilla Glue and totally forgot how much it expands, even though the label clearly tells me. It held REALLY well, but I made a bit of a mess with it 🙂
 The lessons and frustrations along the way ended up being worth it because I love the finished piece! This project actually inspired a mini bathroom makeover, so I can’t wait to reveal the whole bathroom next week!

Dee Williamson says
Gorgeous! I love that you list the lessons you learned. And that you stare at your craft storage area. I do the same thing, waiting for inspiration to jump out at me. E6000 glue is my go-to glue but holy cow it makes me dizzy. Really need to buy a mask for when I use it. I hardly spend more than a minute or two with it anyway, so I’m in and out while holding my breath. Haha!
You really made a beautiful piece here. I absolutely love it.
melissa@polishedhabitat.com says
Thank you Dee! Sometimes the staring in the craft area works and sometimes it doesn’t 🙂
Jodie says
This turned out beautiful! Definitely worth the TV watching time : ) I love how much of an impact it makes on the space! And of course you can’t beat $12. Love it!
Allison Rust says
This turned out GREAT! Gotta love the Dollar Tree. I may try this in silver.
Allison Rust says
Also… I see you have a project supervisor. 😉
melissa@polishedhabitat.com says
Always – although it’s usually more of a “hey, take a break so you can throw the ball” kind of supervision 🙂
melissa@polishedhabitat.com says
Silver would be awesome too!
Tasha @ Designer trapped in a lawyer's body says
WHAT?! This is amazing and so, so creative! Pinning and sharing! Love it!
melissa@polishedhabitat.com says
You’re so sweet Tasha! Thank you for pinning and sharing!
Bette @ Somerset Lane says
are you kidding me?!?!? that mirror is beautiful!
melissa@polishedhabitat.com says
Thank you Bette. I said “are you kidding me?” several times during this project 🙂
Rebecca says
That is so Awesome Melissa! You are very creative. I love it! Glad you stuck with it.
melissa@polishedhabitat.com says
Thank you Rebecca!!!
melissa@polishedhabitat.com says
Yes! I’ve been dying to do a thumbtack project since the &. Speaking of that, you better hide it when I come to visit 🙂 I’ve never stolen anything in my life…but…
Katie says
Great project, Melissa!! LOVE the thumbtacks! And … BONUS … I happen to have a bunch of shims lying around. This may need to happen in my future! Thanks for sharing!
melissa@polishedhabitat.com says
I hope you try it! I’d love to see your version! It’s not a fast project, but at least it has big impact when you are done.
Katie @ addicted 2 diy says
Eek! So excited to see he finished mirror! It looks amazing! You are so smart to have made a template for it too. I probably would have sat there measuring every single gap.
melissa@polishedhabitat.com says
That little template was the only thing I did right on the first try 🙂
Misty Nicole Overstreet-Roberts (The Lady Prefers To Save) says
I love this, and as I am in the crafting mood will try my hand at one!
Ivy@girlathomeblog says
Oh wow! This is super cool! Looks like it was well worth the twelve bucks and all the time it took. It turned out awesome!
Courtney @ Crafts by Courtney says
WOW this project turned out great!! I’ve used thumbtacks for crafts before and I’ve always liked how they turned out. They look so good byt are pretty inexpensive to get, especially if you get them at the Dollar Tree.
lisa@ the thrifty challenge says
Wow, this is beautiful! What a great way to create your own sunburst mirror and for only $12. Well done!
melissa@polishedhabitat.com says
Thank you Lisa!
The Style Sisters says
This is so cool! Great tutorial…Come link up to Centerpiece Wednesday and share this post with us http://thestylesisters.blogspot.com/2014/04/centerpiece-wednesday-beautiful.html
Karin
Julia@Happy House and Home says
I love the thumbtacks and shims! LOVE. I made a sunburst using paint sticks and it came out nice, but I love the depth you have with the floral foam… Pinning! Julia