
As I promised in the garage makeover reveal, I’m sharing the full tutorial of how we hacked IKEA pieces into that awesome custom garage workbench.
Aside from being a budget-friendly option, this IKEA workbench tutorial will work for almost any size space. It’s totally customizable!
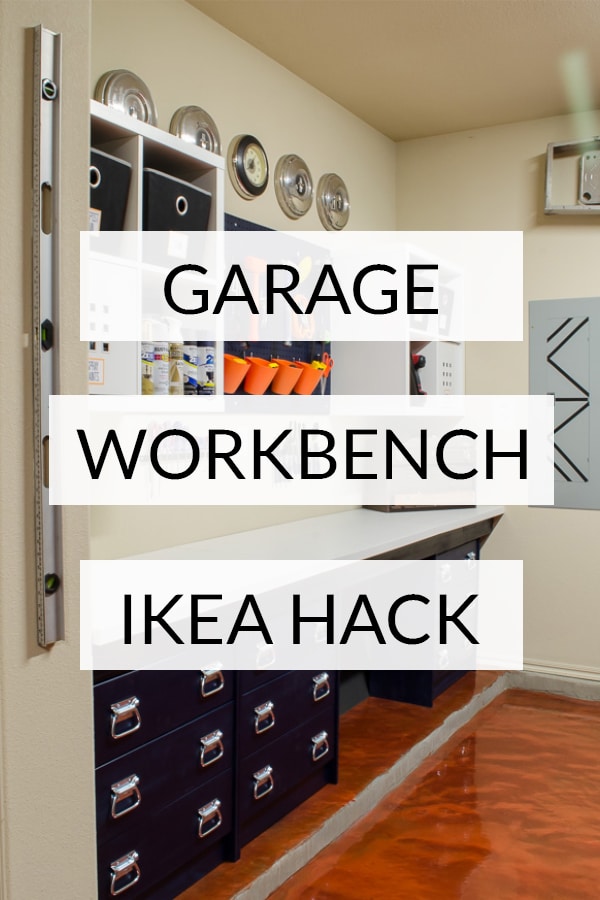
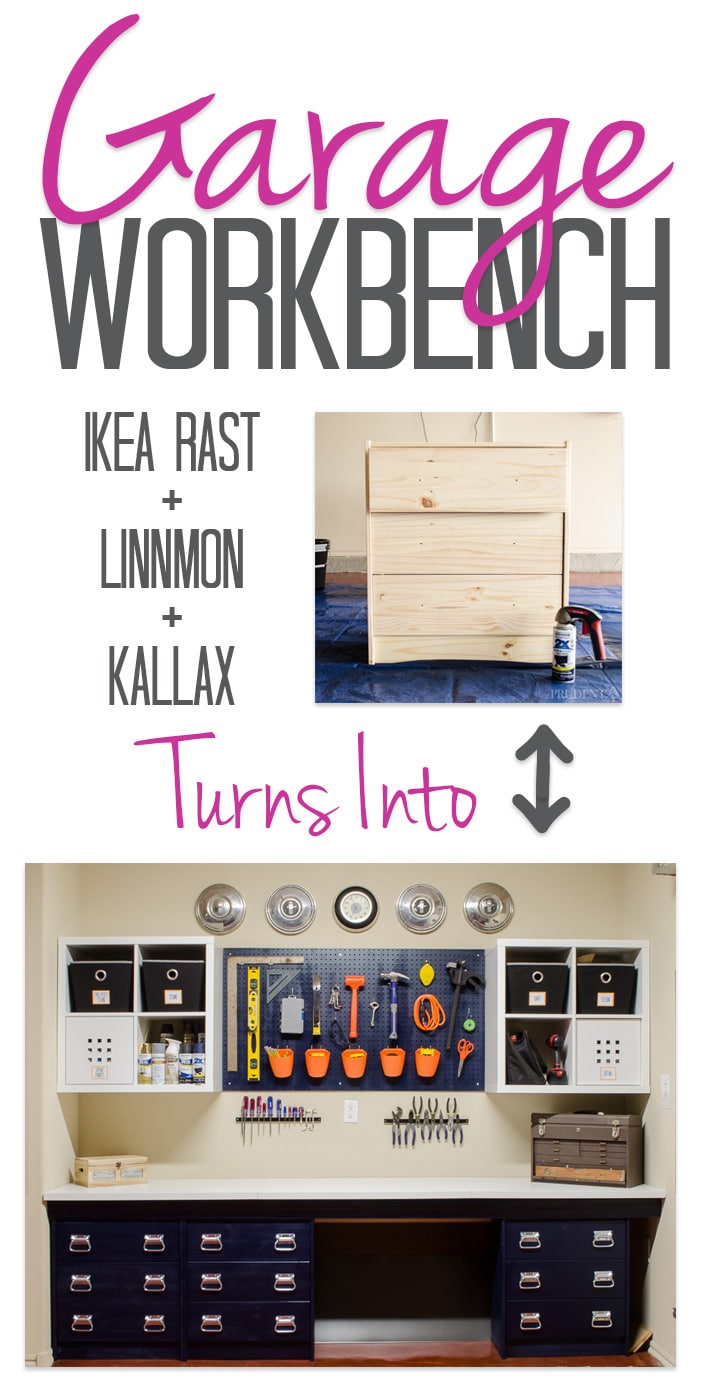
We were making over our garage on a time crunch as part of a larger challenge. We needed to design a DIY workbench that fit in a recessed area, but we didn’t have time to start from scratch.
We checked IKEA for garage storage solutions to see if they had something we could work with. While we didn’t find any garage cabinets at IKEA at the time, we did find inexpensive dressers to use for tool storage and a cheap work surface.
I grabbed some graph paper and marched out to the garage to scheme up my simple workbench plan using
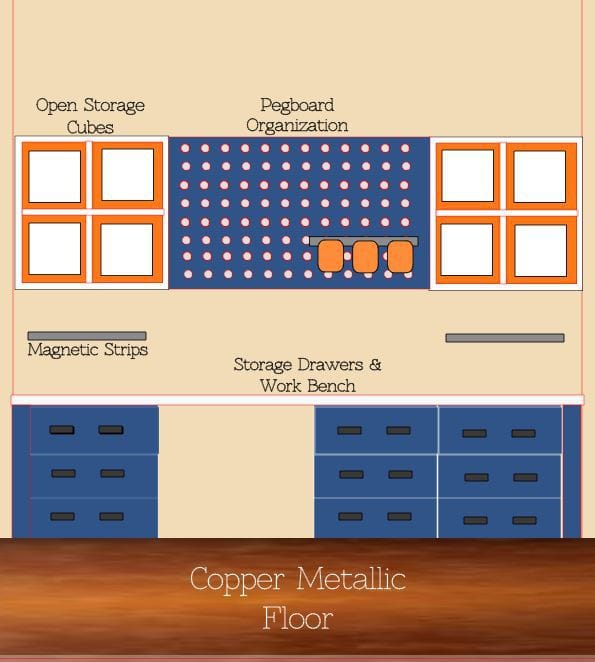
For the base of the workbench, I fit in 3 drawer RAST dressers. To create the top to the workbench, I got a little brave.
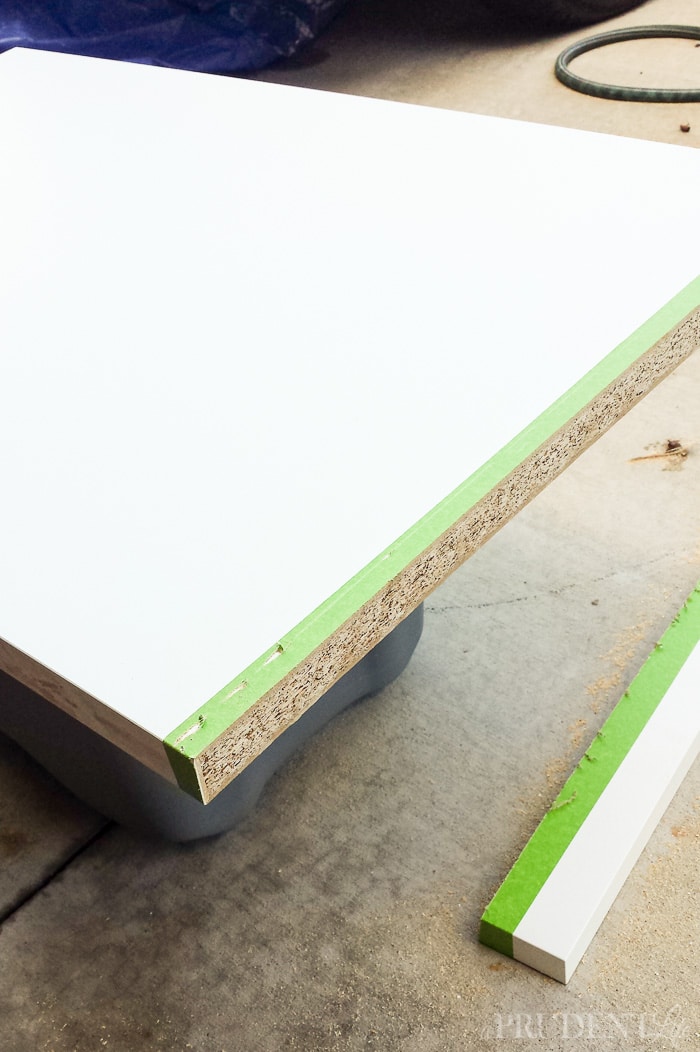
Instead of spending money buying or building a custom countertop, I bought 3 LINNMON table tops.
The depth was ideal and we would just need to cut a little length off one of them to get the perfect fit. It was a risk because I didn’t know how well they would look since they wouldn’t be a solid sheet, but they are REALLY cheap!
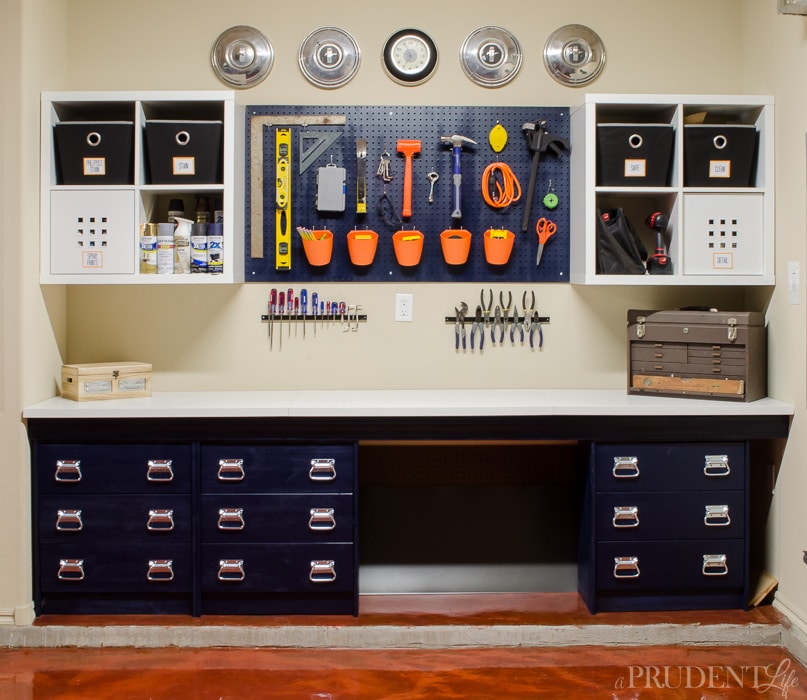
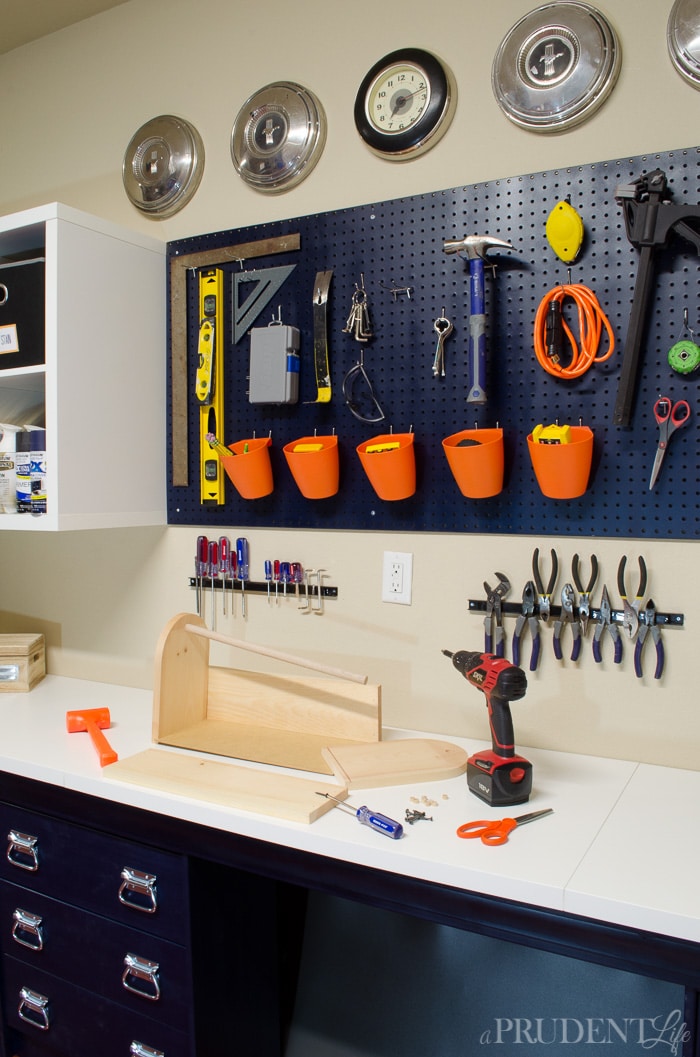
Above the workbench, I wanted a big pegboard so frequently used tools would be easy to access for DIY projects.
When I saw the KALLAX storage cubes in the catalog, I realized they would provide tons of storage if I hung them on the wall and used them to frame the pegboard. The cubes are HUGE and sturdy for their price.
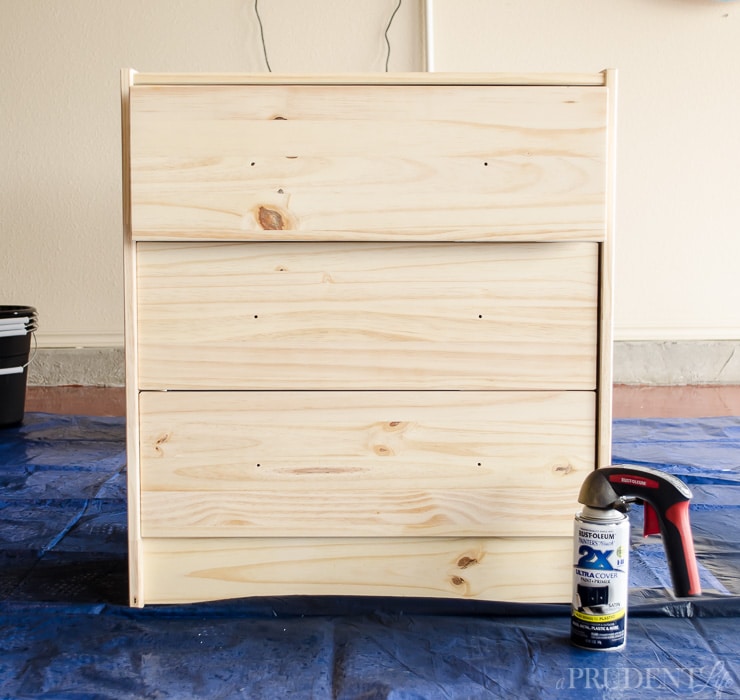
The first step in putting the workbench together was assembling all the separate pieces I hauled home. I spent several hours with Netflix and a screwdriver. The tool, not the drink. Although in retrospect…
Once everything was assembled, I spray painted all the dressers and the pegboard in Rust-Oleum Painter’s Touch Satin Midnight Blue.
When I was talking to Rust-Oleum about the copper floor project, they were awesome enough to send me this paint as well. It’s the same paint I would have used even if I was buying it. Anytime I can spray paint something instead of brushing it, I’m all in!
That handle on the paint was mine before this project and I LOVE LOVE LOVE it. If you EVER spray paint, you need one. It’s the Rust-Oleum Comfort Grip![]() (affiliate link) and you can get them on Amazon or at most hardware stores.
(affiliate link) and you can get them on Amazon or at most hardware stores.
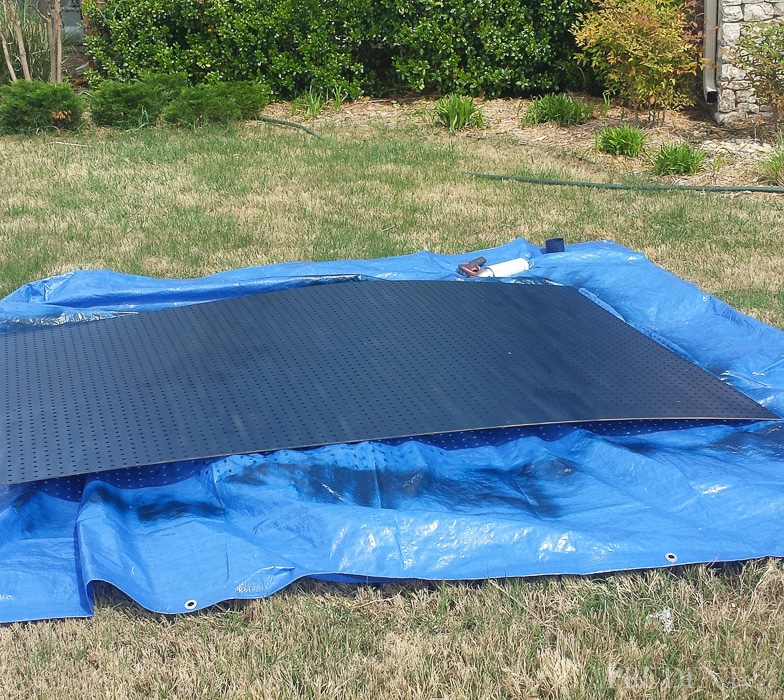
To paint the pegboard, I just hauled a tarp to the front yard and let all the neighbors think I was crazy. Try to pick a day that isn’t too windy.
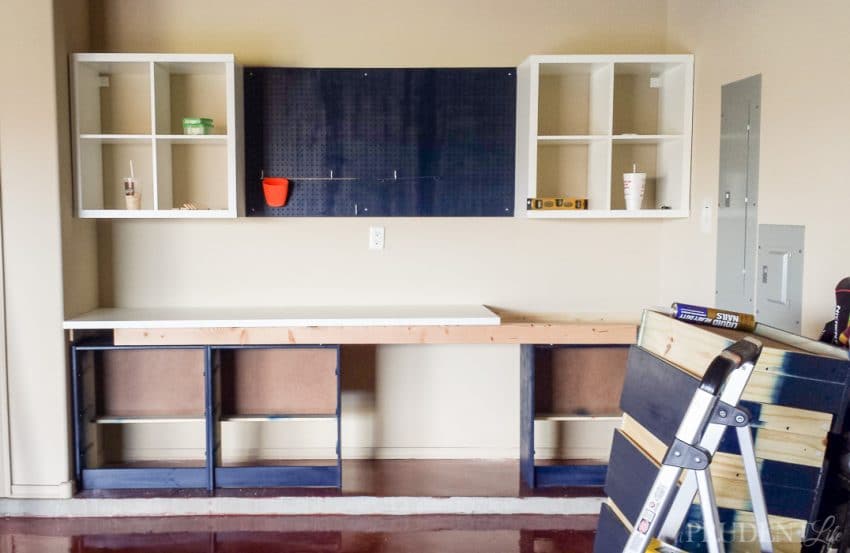
With everything assembled and painted, it was finally install day! We started with the upper KALLAX shelves.
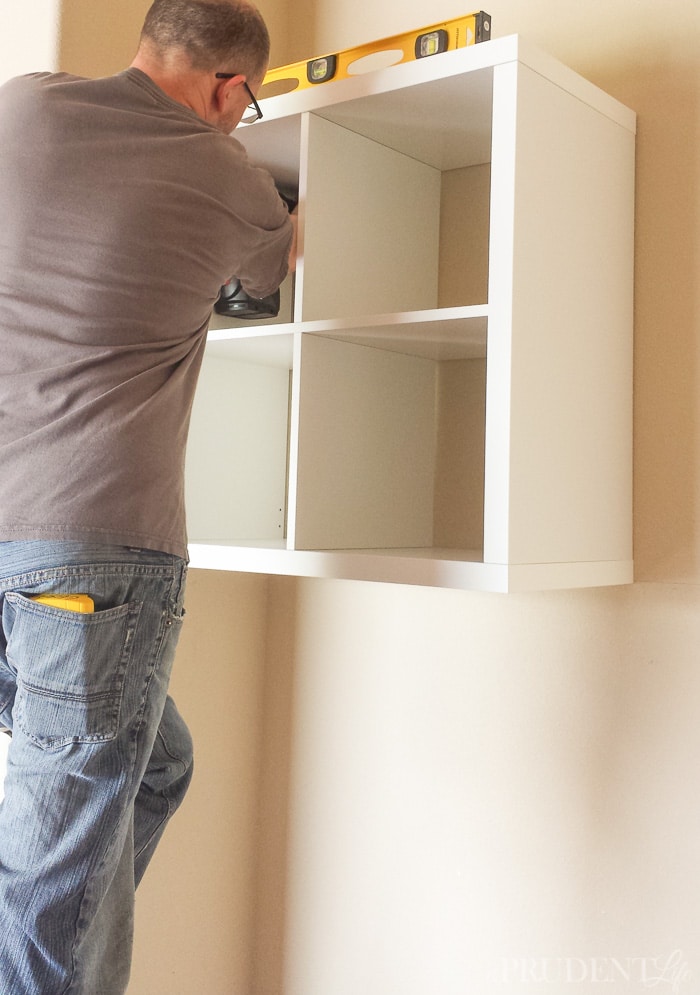
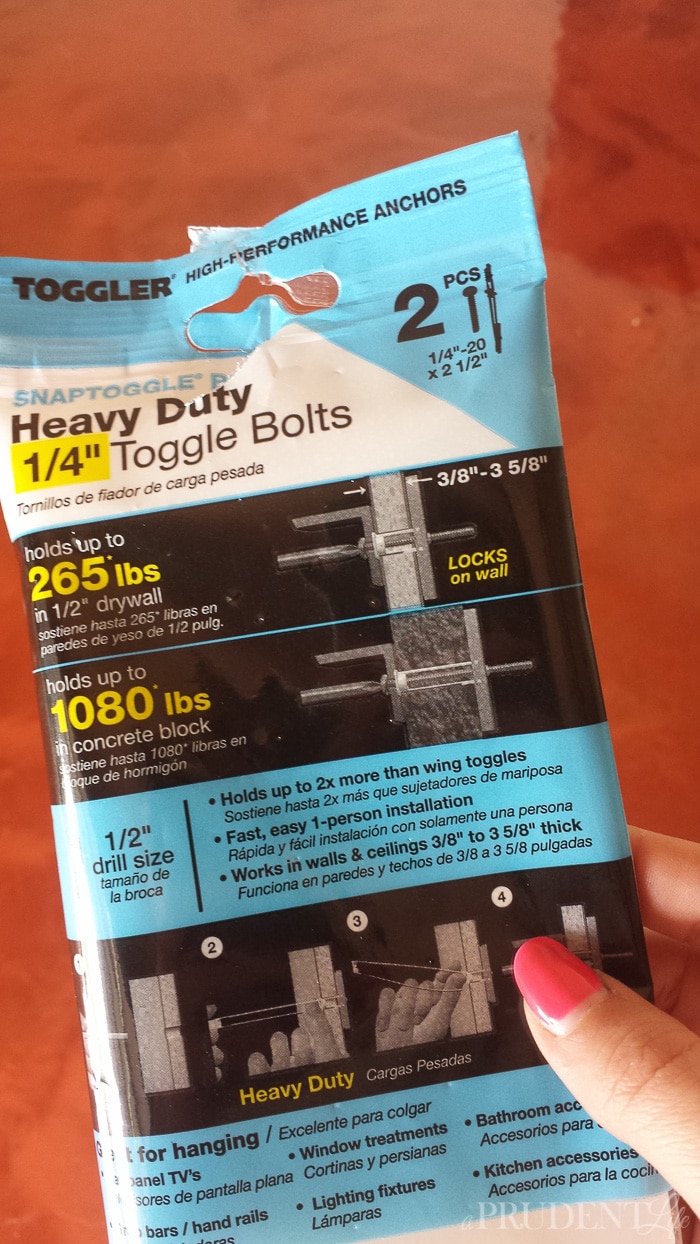
They are HEAVY when they are empty, so you’ll need some serious anchors and some strong arms. We used 265 lb toggle bolts to secure both units to the wall.
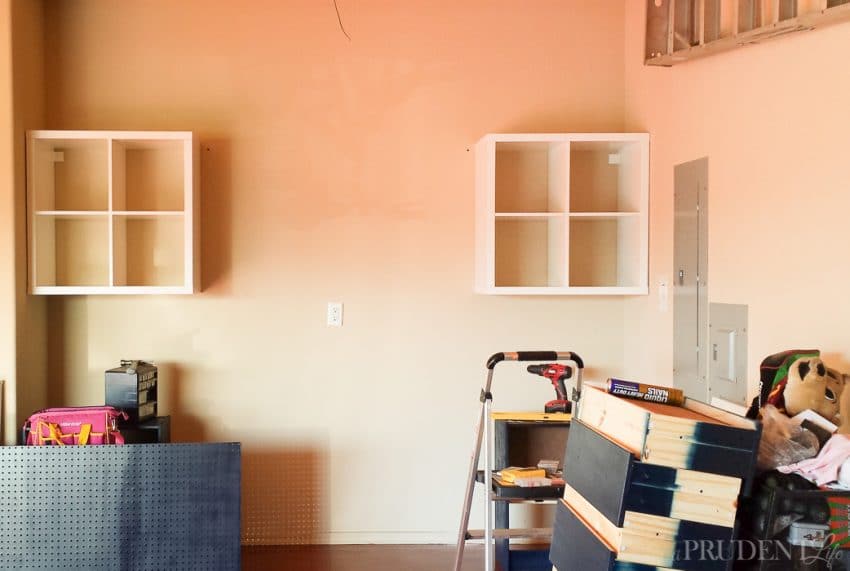 Next up was the pegboard. We measured the distance between the KALLAX shelving units and cut the pegboard to fit.
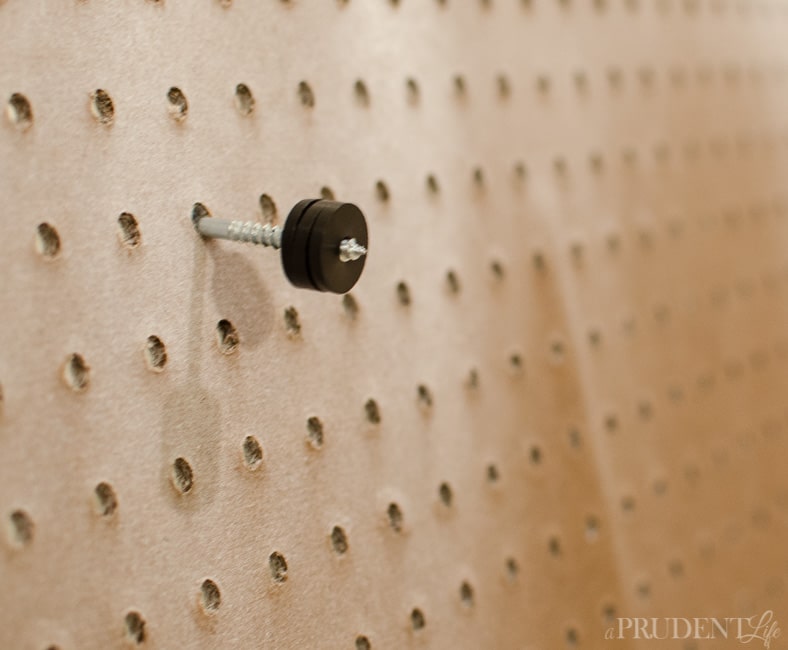
Don’t forget that you’ll need a gap behind the pegboard in order for the pegs to actually work. We used stacks of washers between the pegboard and the wall.
With the upper section done, it was time to tackle our IKEA garage hack!
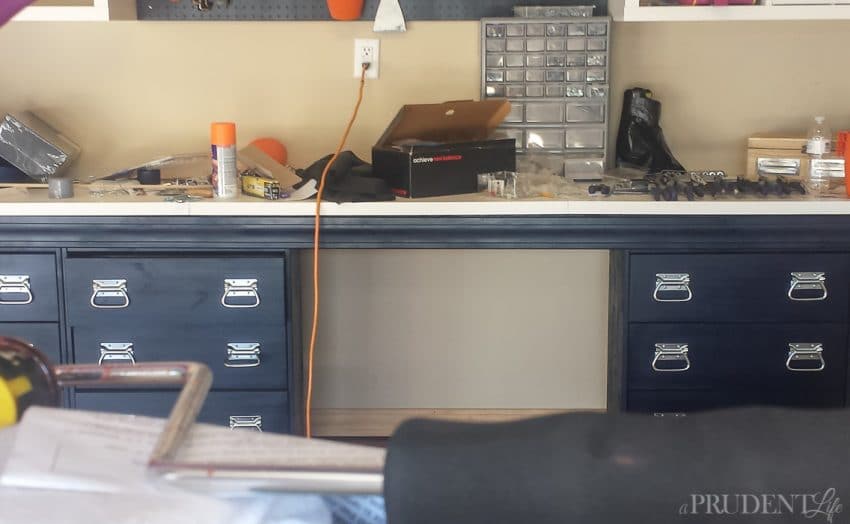
I designed the workbench to have some open storage space under the work area, which meant we had two dressers on the left side and one on the right side.
To add stability, we attached the right side dressers together.
We clamped them together to make sure they were level, then we screwed them together, making sure the screws wouldn’t impede the drawers.
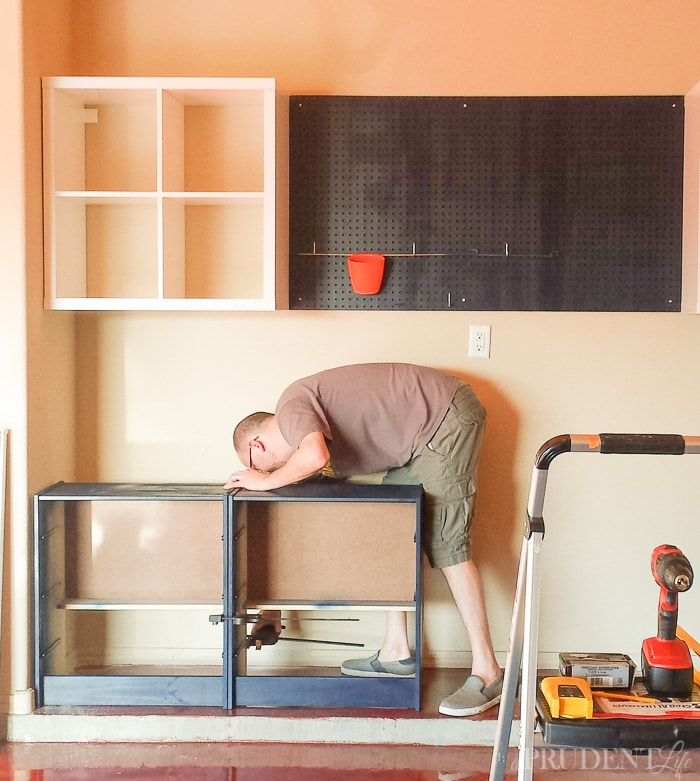 Even though our workbench was on a raised step in the garage, we still needed to add a little height to make it a comfortable work table height. Our options were either building a platform base, or adding a spacer between the dressers and the counter. Because we only needed to raise it 3-4 inches, going the spacer route was easier for us.
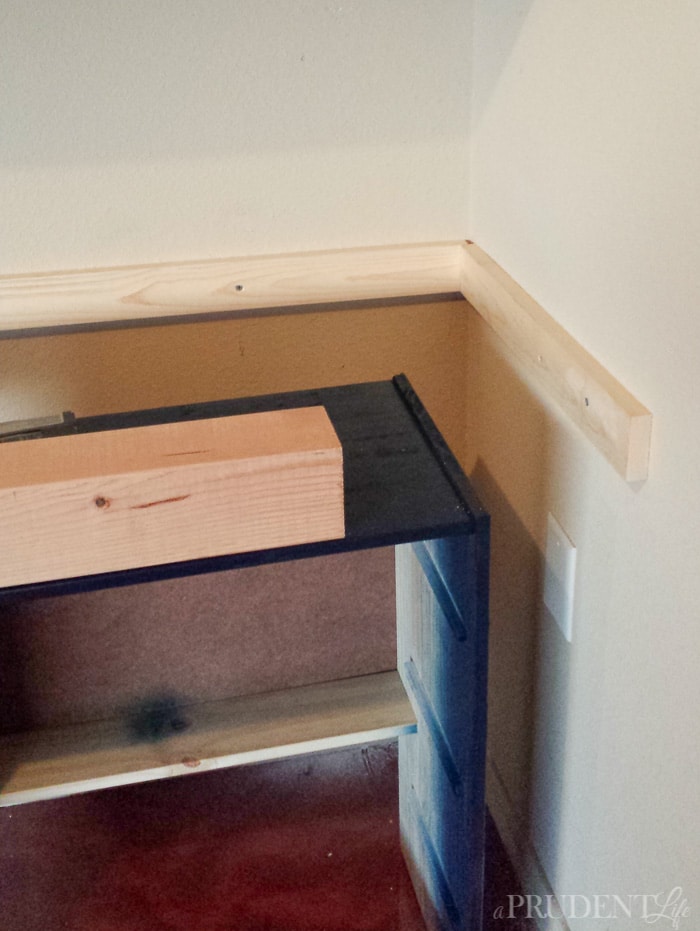
First, we added a 4×4 across the top in the front.
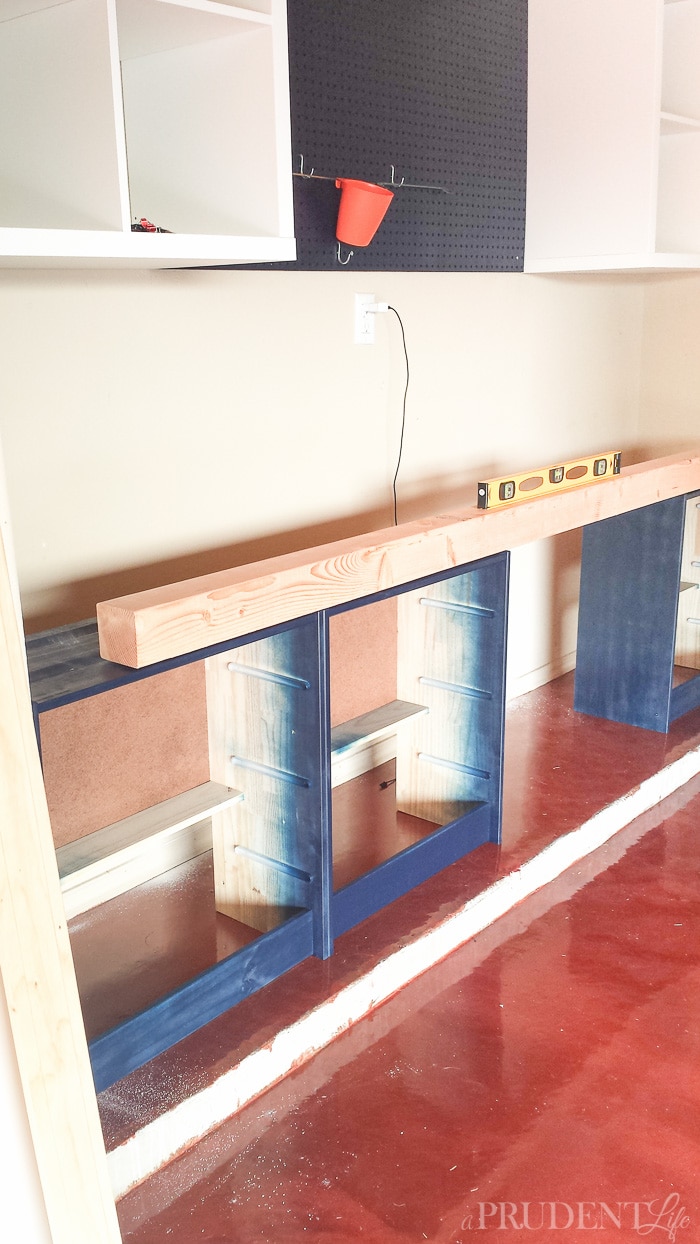
Then we created a ledge at the same height all the way around the walls.
Once the ledge was screwed to the studs, we set the first two LINNMON desktops in place using Liquid Nails.
Be sure to use the level and add shims as needed.
We paid extra attention to spaces where the countertops butted up against each other to make sure they stayed flush. I was willing to sacrifice the entire surface being slightly off level if it meant the seams would be clean.
Once the first two table tops were attached, we could get a good measurement to cut the third piece to fit. To protect the surface, we applied tape before cutting with a circular saw.
The ALMOST last step was covering up the 4×4. We used a piece of trim and attached it with more Liquid Nails and some actual nails.
As you can see above, we added some industrial drawer pulls instead of using the little wood knobs that come with the dresser.
The pulls are available on Amazon. Just note that they do NOT come with the hardware, so you’ll need to pick that up separately. I used 1/2″ sheet metal screws and they look great.

![]() Whew, so that’s how we did it! I know it seems like a lot, but we did the actual install in a day (not including the painting and initial assembly).
Whew, so that’s how we did it! I know it seems like a lot, but we did the actual install in a day (not including the painting and initial assembly).
Garage Workbench DIY Budget (Prices from 2015):
KALLAX Units $34.99 x 2 = $70
LINNMON Desktop $5.99 x 3 = $18
RAST Dressers $34.00 x 3 = $105
Drawer Pulls $3.50 x 9 = $32
Pegboard, Wood, & Anchors = $40
Total = $265
I love that anyone can adapt this plan to their own space, the width can be whatever works for you!
UPDATE: As of 2019, IKEA now sells garage storage solutions. It seems they went with a similar layout as ours, but the bottom has shelves instead of drawer storage.
If you haven’t seen the rest of the garage makeover, check it out now! And for more garage storage hacks, check out this post!
If you haven’t seen the rest of the garage makeover, check it out now!
Would you try this IKEA hack for your garage workbench?

Rita McKenzie says
Wonderful creativity! Thanks for the ideas.
Rita
bryan patterson says
you freaking kicked your storage problems butt that is awesome!!!
Brynne@TheGatheredHome says
This is freaking incredible, Melissa! I am blown away! When I saw the reveal, I would never have guessed that the work bench was made of Ikea pieces!!! I’m hoping to tackle our garage this summer and you are giving me SO MANY awesome ideas! 🙂
Melissa George says
Yeah for ideas! You are going to LOVE having the garage done!
Tara Siudy (Little Miss Dexterous) says
This Looks SO cool! I am really excited to use these ideas! Pinned and shared! Thanks!
Shauna says
Trying to find the drawer pulls on Amazon. What are they called? So I can search better.
Melissa George says
Hi Shauna, Here is a referral link right to them (so I get a small % back if you buy) http://amzn.to/1RXUeqO OR you can search for Reliable Hardware Chest Handle. Thanks for reading!
Laura says
WOW- I love this! It looks great, it was inexpensive, and it looks like it’ll be very practical- I love all the storage it provides. I showed this post to my husband, and he’s planning to use a bunch of your ideas in our own garage- awesome! (By the way, my husband used to thinking blogging was silly- THANK YOU for helping to change his mind!) 🙂
Melissa George says
Oh my gosh, thank you so much! So glad I could help make your husband see how awesome blogging can be!!!
Jenny says
What is the finished height of your workbench? We are trying to figure out the “perfect” height!
Melissa George says
Our finished height is 36″, which includes the 3″ that the floor is raised up in that area. That height is absolutely perfect for me at 5’4″ and still works for my husband who is 5’11”. Hope that helps!
Joni says
Love this! Such a creative way to use several Ikea products!
Melissa George says
Thank you Joni!!!
Amy says
Looks awesome, we so need this as our storage solution!! How many cans of spray paint did you use?
Melissa George says
Thanks Amy, I think I used 4 cans for the 3 dressers. I MIGHT have used part of a 5th can, but I think it was just four 🙂
Brekke says
Where did you get the orange storage bins on the peg board??
Melissa George says
Hi Brekke, they are BYGEL containers from IKEA.
Chris says
Did you use liquid nails to secure the 4×4 on the dressers or how did you do that?
Melissa George says
Yes, if I remember right, there was a small lip on the edges of the dressers, so we built up liquid nail on the flat dresser tops to make sure it touched the dresser and 4×4. Hope that helps!
nancy says
This is so great looking! You’re so creative and your color scheme is beautiful. . My question is how is this holding up under the weight of tools? My husband (not a big Ikea fan) is not convinced.
Thank you so much.
Melissa George says
The weight hasn’t been a problem. I’m guessing having them tied together with the large wood we used to up the height of the counter helps distribute the weight evenly. The RAST series aren’t the smoothest sliding drawers ever, but for the price and how often we use the stuff the drawers, I’d absolutely do it again! To up the quality, you could do the same thing with the MALM dressers. We used them in our master closet and they are the smoothest drawers we’ve ever had, much nicer than our more expensive furniture. You can see them here: http://www.polishedhabitat.com/2015/master-closet-organization/
victor walker says
Loveit .That garage is more beautifull than many people’s living room Congratulations
MIke says
Is this (http://www.ikea.com/us/en/catalog/products/75305709/) the RAST dresser you used here? Ikea says these are about 12″ deep, but the drawers visible on the right hand side of one of your pictures looks quite a bit deeper. The profile on the kickplate is a little different too, and I’m wondering if they may have changed the design since you made this.
Melissa George says
That’s is! We flushed ours forward, so they do have the illusion of being a bit deeper. Since there is space in the back, we’re able to use that for some scrap wood storage. Sometimes I wish they were deeper, but really everything we’ve stored in them so far has fit, including big folded up tarps.
Joanne says
Awesome! Love this transformation. How are the floors holding up with the cars on them? We are considering this rustoleum product.
Melissa George says
They’ve held up really well so far! I think we’ve had them finished around 20 months and have no complaints. Anything we’ve spilled has been easy to clean up and there are no marks from the tires. They do get dirty like any floor, but after a mopping they always looks new again.
Hardware Man says
It seams that the space that the 4×4 provided to raise the counter top is prime to add more storage. Maybe shelf space for templates, rolled or flat plans or custom sized draws. Considering the efficiency of space use I’m surprised you didn’t use it.
Melissa George says
Good idea! We completed the garage as part of a 5-week challenge, and were on a limited budget in addition to the time crunch, so it was definitely about doing the best we could with the money and time (and building skills) we had.
Lisa says
So clever! Love the storage and that huge workspace!!
Melissa George says
Thank you Lisa! We’ve never had any workspace like this in our garages so it was a big priority when we were planning out the space!
Cate says
I just looked, and the RAST dressers are $39.99 now. Still an okay price for something like this, just thought I’d point it out.