• About Polished Habitat
    • About Me
    • Contact Me / Media Requests
    • Partner with Us / Advertise
    • Terms of Service, Privacy, & Disclosure Statements
    • Facebook
    • Instagram
    • Pinterest
    • Twitter
  • Home Decor
  • Room Makeovers
    • House Tour
    • Space Reveals
  • Cricut
  • Organizing
    • Most Popular Organizing Posts
    • Closet Organization
    • Bathroom Organization
    • Kitchen Organization
    • All Organizing Posts
  • Cleaning
  • Letter Board Ideas

Polished Habitat

Home » DIY & Crafts » Marble Storage Box – A Chic & Easy Organizing DIY

03/10/2016 · 9 Comments

Marble Storage Box – A Chic & Easy Organizing DIY

DIY & Crafts· Organizing

817 shares
  • Facebook
  • Twitter

Post Contains Affiliate Links - You pay the same price, I get a small commission. High Five!

Move over gold spray paint, you’ve got a new competitor for my attention! I’ve seen some crazy-good furniture makeovers done with marble contact paper online, but I admit wondering how good they really look in person. I wanted to try it out myself!

When I realized the marble contact paper (aka adhesive film) was surprisingly affordable, two rolls jumped right into my Amazon cart. Thank you Amazon Prime!

Since then, I can’t stop running around the house looking for smooth surfaces to use it on. I’m hooked. Big time. I’ve threatened putting it on the granite countertops in the kitchen. More seriously, I’ve wondered if I could put it over the small section of laminate countertop in the laundry room.

My favorite project so far blends function with pretty for the win.
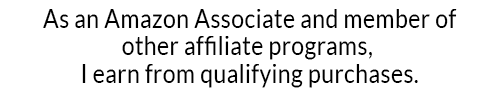
Marble contact paper plus an inexpensive photo box can be combined into inexpensive chic storage. Love the tips on how to make the corners look good! Supplies Needed
DC Fix Grey Marble from Amazon
Kraft Photo Box Michaels  or Amazon
Scissors (Rotary Cutter Optional)

I linked to the photo boxes in the supply list, but if you have a Michael’s locally, watch for their sales! I may be known for filling up an entire cart with them. The function is awesome, and the kraft color isn’t the end of the world, but it definitely wasn’t something I wanted displayed in the open.

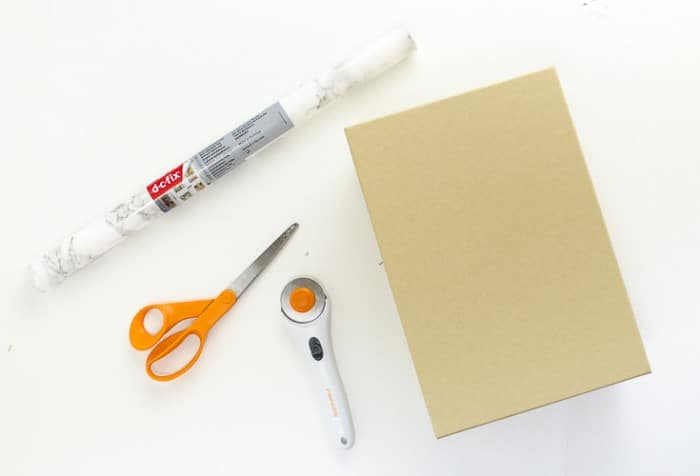
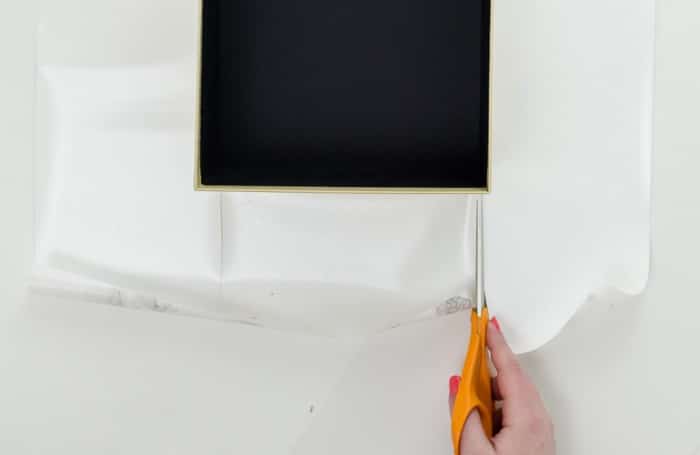
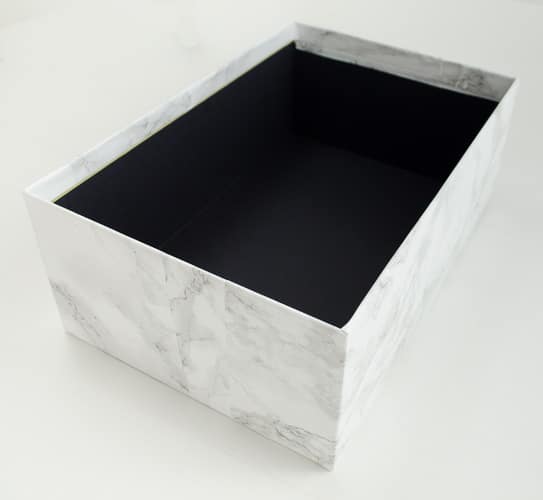
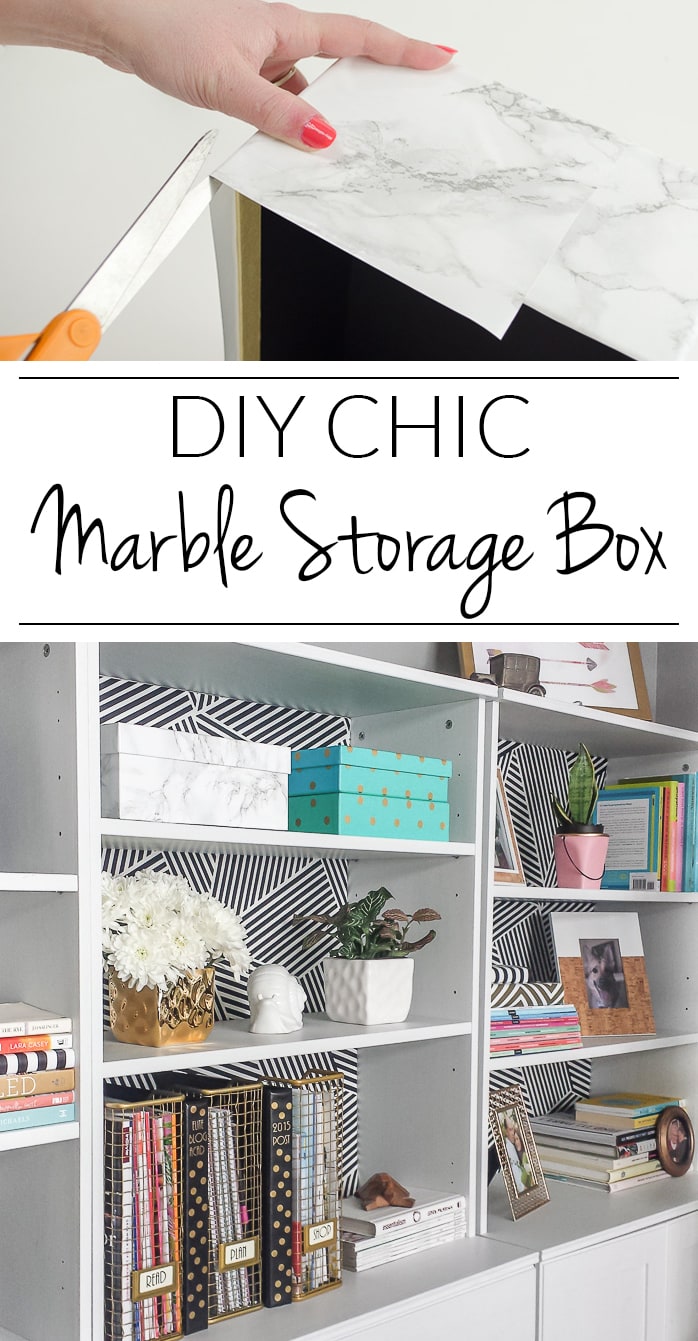
I started with the bottom of the box, and rolled out enough marble paper to cover all the sides.

Marble contact paper plus an inexpensive photo box can be combined into inexpensive chic storage. Love the tips on how to make the corners look good!
Then, with the marble face down, I started to peel off the backing. I STOPPED peeling about halfway across the marble so I wouldn’t have a big sticky situation.  I hovered the bottom of my box over the center of the marble paper, then gently placed one edge down first. As I lowered the box, I continuing peeling the paper back just far enough that the full box was down on the adhesive.

Marble contact paper plus an inexpensive photo box can be combined into inexpensive chic storage. Love the tips on how to make the corners look good! To cover the sides neatly, I cut a slit from the corner of my box straight out to the corner of the marble as shown below.

Marble contact paper plus an inexpensive photo box can be combined into inexpensive chic storage. Love the tips on how to make the corners look good! 
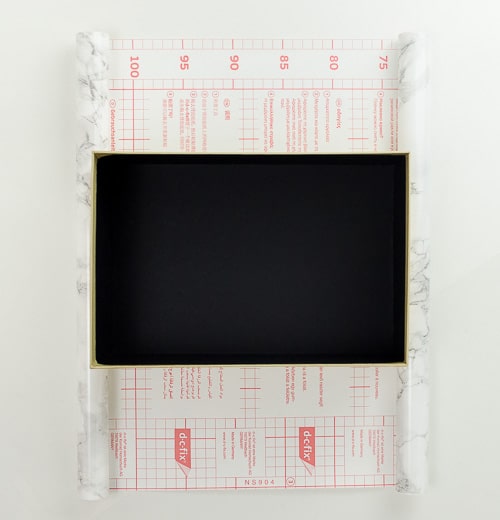
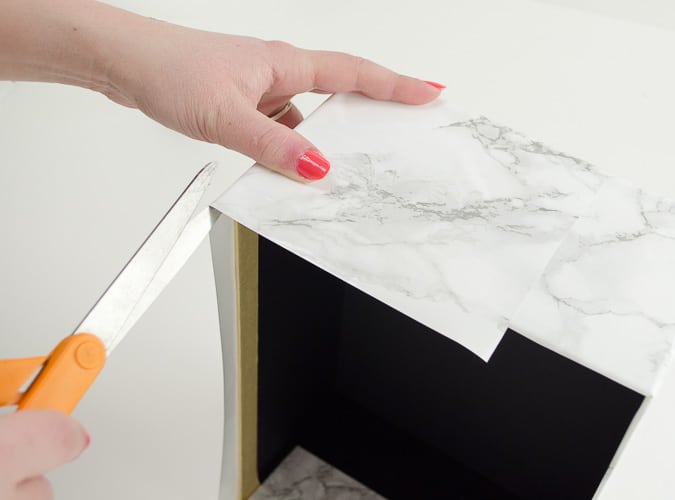
Next, I folded the flap I created up and over the end of the box.
Marble contact paper plus an inexpensive photo box can be combined into inexpensive chic storage. Love the tips on how to make the corners look good! 
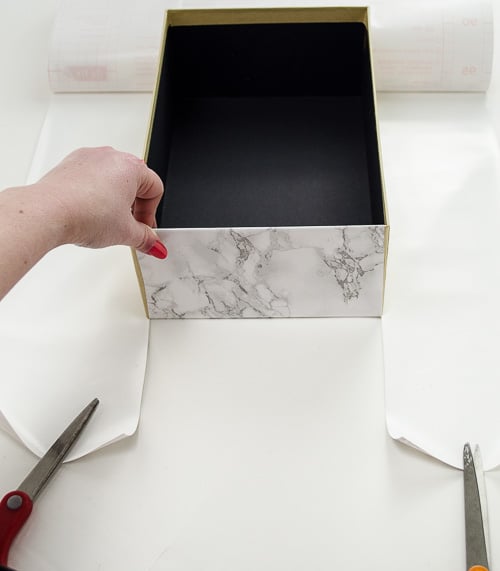
After sticking the first end down, I peeled the rest of the backing off and wrapped the opposite end. With both ends adhered, I could fold up the sides.

Marble contact paper plus an inexpensive photo box can be combined into inexpensive chic storage. Love the tips on how to make the corners look good!

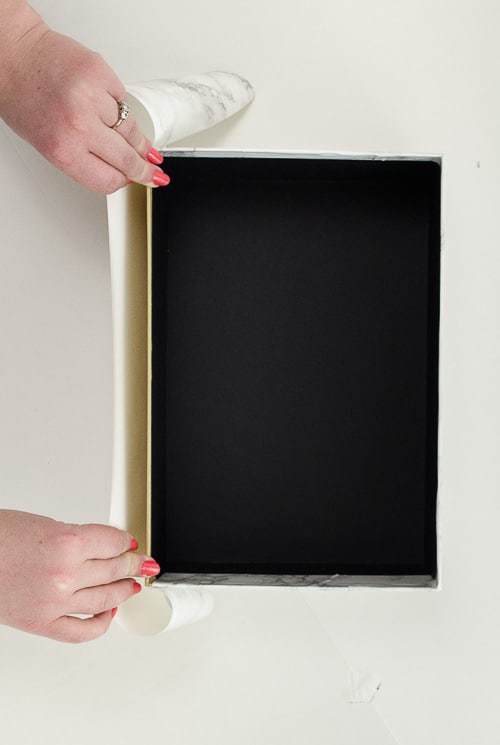
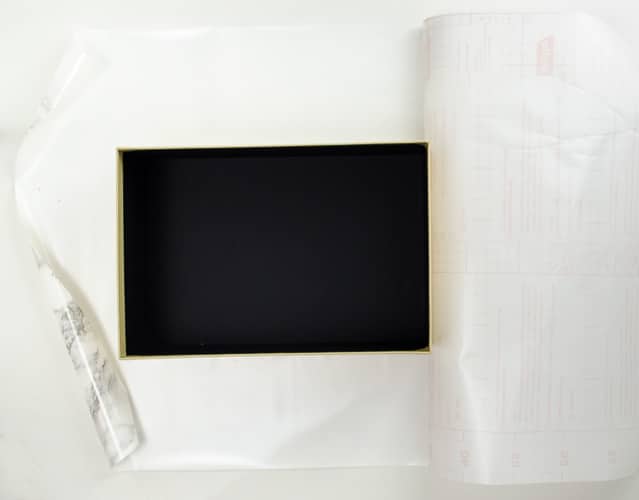
To make it easier to wrap the excess contact paper over the top of the box, I cut a small slit in each corner. After folding all the edges into the box, I had a nice finished edge.

Marble contact paper plus an inexpensive photo box can be combined into inexpensive chic storage. Love the tips on how to make the corners look good! Tada, my $3 craft paper photo box is now a chic marble storage box!

Marble contact paper plus an inexpensive photo box can be combined into inexpensive chic storage. Love the tips on how to make the corners look good!
I repeated the same steps for the top of the box, and then raced downstairs to add it to my bookshelf. Ah, so pretty!

Storage should be PRETTY! Love this tutorial for making an inexpensive marble box.

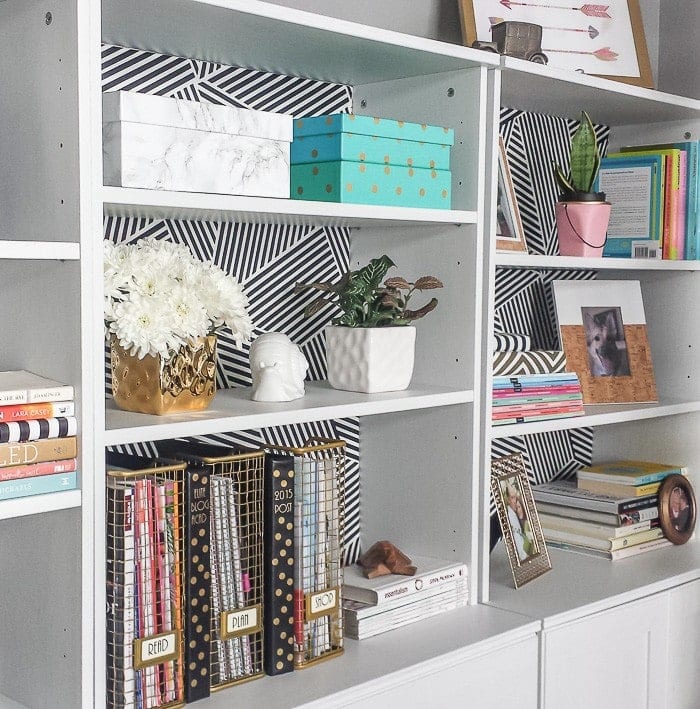
If you play “I spy” in the photo below, you can see some evidence that I really was covering everything I could find in marble.

Marble contact paper plus an inexpensive photo box can be combined into inexpensive chic storage. Love the tips on how to make the corners look good!

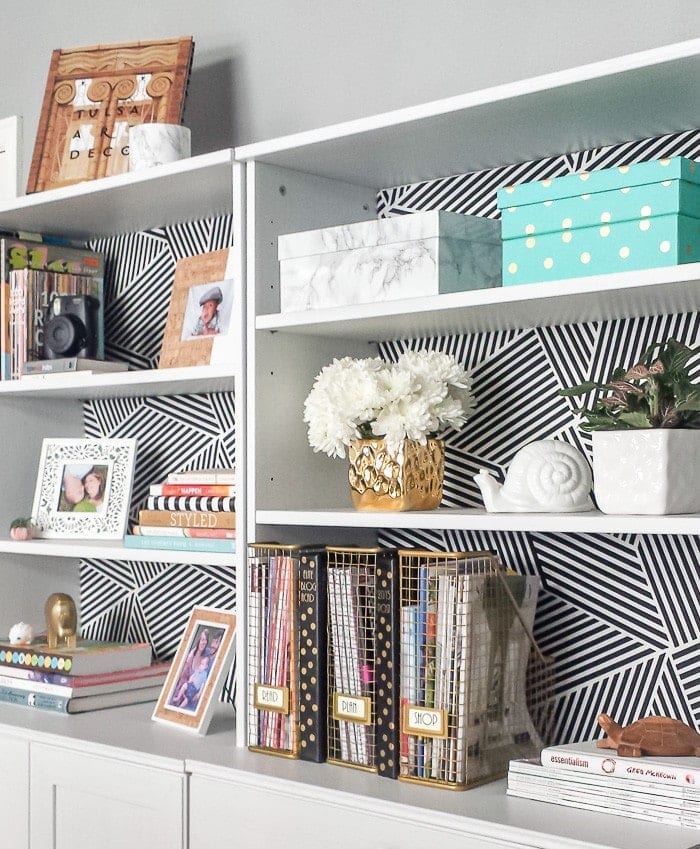
That round marble object used to be a clear candle from Bath & Body Works. Well, technically it IS still a candle, but it’s got a whole new look!

Transform a cheap photo box into display worth marble storage with this easy tutorial.
Post shared at: Remodelaholic, Pretty Project Party

817 shares
  • Facebook
  • Twitter
melissa

Melissa George

In 2013, Melissa founded Polished Habitat to share her passion for intersecting style and function to make everyday life more beautiful and less stressful. She does this by sharing easy home organization tips, home decor tutorials, and creative ideas to help readers think outside the box, no matter their budget. Her work has been featured in print in Better Homes & Gardens and Room to Create Magazine, and online by HGTV, House Beautiful, Buzzfeed, & more. In 2018 & 2019, Melissa was named as a Style Maker by Better Homes & Gardens. In 2019, Polished Habitat was shortlisted for the Amara Blog Awards Best Interior Styling Blog - International. Read more...

« What Do You Do With A Tart Pan & A Record?
Mirrored Nightstands – 10 Cheap Options »

Comments

  1. Krista says

    03/11/2016 at 12:33 pm

    Brilliant! The shelves look amazing and that little marble box just pops perfectly with all your other gorgeous pattern.

    Reply
  2. SARAH says

    03/22/2016 at 8:59 am

    This seriously looks SO good! I need to have put that marble paper I’ve been hoarding to work! Thank you for linking up to our Pretty Project Party this week!

    Reply
  3. Stephanie @ Casa Watkins says

    03/23/2016 at 9:54 am

    Love this!!!!! I haven’t done a lot of contact paper crafts recently, looks like I need to get back to that. 🙂 pinning and sharing my friend.

    Reply
  4. Erlene says

    03/23/2017 at 7:38 pm

    I like the idea of creating your own marble boxes (so much cheaper than buying). I’m going to try this on some round containers that I’ve been wanting to cover.

    Reply
  5. CAM says

    04/20/2018 at 12:19 pm

    Looks great, I’ll have to try that in my art closet!

    Reply
  6. dianne michele cornwell says

    04/20/2018 at 7:41 pm

    Love it. I’m scared of contact paper. My one and only attempt to cover school books scarred me.
    Any chance of a you tube how to?
    Love your sense of humor. You’re my new best friend ?

    Reply
    • Melissa George says

      04/20/2018 at 8:31 pm

      The video is a great idea for this one! And thank you so much!

      Reply
  7. Judy says

    04/21/2018 at 5:59 am

    What did you do to the back wall of you shelves? The black/white??

    Reply
    • Melissa George says

      04/21/2018 at 9:21 am

      Hi Judy, It’s fabric! There’s a simple tutorial here: https://www.polishedhabitat.com/fabric-bookcase-back/ Just a PS since this isn’t included in that post, but when I redecorated the office, I did the same process but with a wrapping paper. It doesn’t look nearly as nice as the fabric did. Have a great weekend!

      Reply

Leave a Reply Cancel reply

Your email address will not be published. Required fields are marked *

Welcome!

In 2013, Melissa started Polished Habitat to share her skill of mixing decor & organization to add style & function to everyday life at home.

Her work has been featured in print in Better Homes & Gardens and Room to Create Magazine, and online by HGTV, House Beautiful, Buzzfeed, & more.

In 2018 &  2019, Melissa was named as a Style Maker by Better Homes & Gardens. In 2019, she was also short-listed by the Amara Blog Awards for Interior Styling, International Division.

Need to reach Melissa?
Email: Melissa @ PolishedHabitat.com

Affiliate Disclosure

Polished Habitat is a participant in the Amazon Services LLC Associates Program, an affiliate advertising program designed to provide a means for sites to earn advertising fees by advertising and linking to amazon.com.

Copyright

Please keep in mind that all text and images on this blog are the property of Polished Habitat (formerly A Prudent Life).

Projects are for personal use only.

Photo Use Policy

You are welcome to share 1 image for an online round up or feature if you clearly link back to my post and use nopin code.

You are not permitted to remove watermarks, crop or edit my photos, use my images without credit, print my images, or share more than 1 image online without my written permission.

The 1 image used can NOT be a collage image or any image I have created that includes text. Please email me with any questions about acceptable use! THANK YOU!

Copyright © 2025 · polishedhabitat.com