
There have been lots of questions about where different items in the closet came from after last week’s post, so hopefully this will answer them all. I thought this was also a good post to talk about the MANY ways we saved money along the way to make this transformation possible.
 I seriously can’t fathom what this closet would have cost if we hired out the work or used a professional closet company, but my best guess would be that we’d be looking at 5 figures.
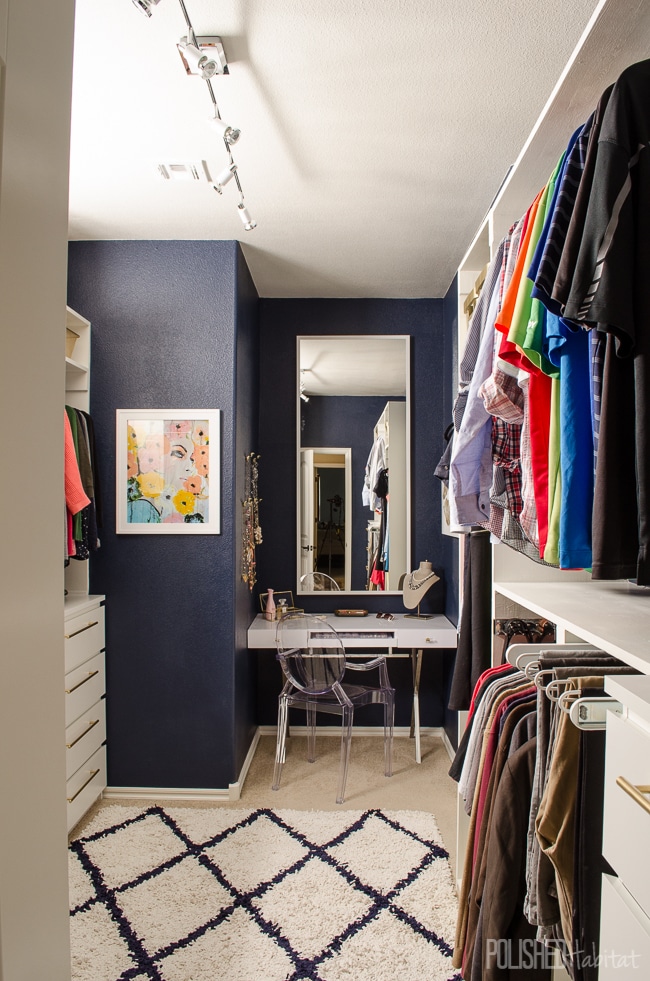
Starting at the top, we saved over $1000 just on lighting. I had this grand plan to add a gorgeous fixture and then lots of recessed lights to get the brightness we wanted. Well, that lasted as long as one quote from an electrician. My dream plan would be $1000-$1500, not including the new fixture. That was half the total budget! After some sulking and paranoia, I wondered if I could find a super bright track or rail lighting system that actually looked decent. After lots of research, I found something that would work! It is SO much brighter than the old fixture.
Lighting: EGLO Lighting Rail System – I purchased from 1800Lighting.com for the first time and will definitely use them in the future.
Navy Paint: HGTV Home by Sherwin-Williams (Lowes) in Naval, Satin Finish
White Paint: Benjamin Moore in White Dove
Rug: Anji Mountain Silky Shag Rug with Navy Diamond , also available on Wayfair (currently ON SALE!) I picked it up from Wayfair also on sale, saving $50 over the Amazon price.
Art: Collide by Leigh Viner on Etsy (16×20)
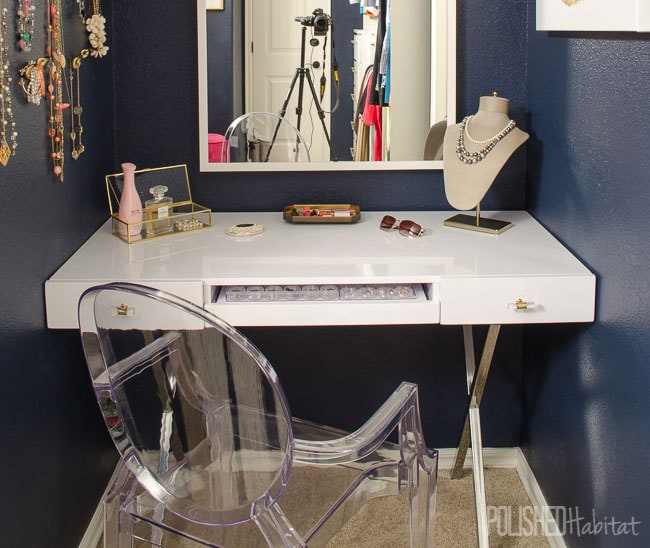
In the vanity area, my inspiration was this Jonathan Adler beauty, which was over my budget.

Then I found a gorgeous replacement under $275, which promptly went out of stock before I ordered and wasn’t going to be available until after the One Room Challenge. Take 3 was finally a win and was even less expense from Wayfair.com
Vanity: In Room Designs Computer Desk
Chair: Casper Arm Chair in Clear by LexMod Such a steal considering my inspiration version is over $2000!
Huge Mirror: IKEA STAVE This price is so good that it was worth a 4 hour trip to Dallas to pick it up.
Necklace Bust: Target I stalked this bust for MONTHS in the store waiting for it to go on sale and it NEVER happened. Ugh!
Glass & Gold Box: Target
Wall-Mounted Necklace Holders: Horn Pulls from Hobby Lobby (mounted using wall anchors) – (Dang, these seem to be discontinued)
Earring Organization: Bead Storage System
Gold Lipstick Artwork: Hobby Lobby (in store) – Picked it up for 50% off

Pink Ottoman: World Market
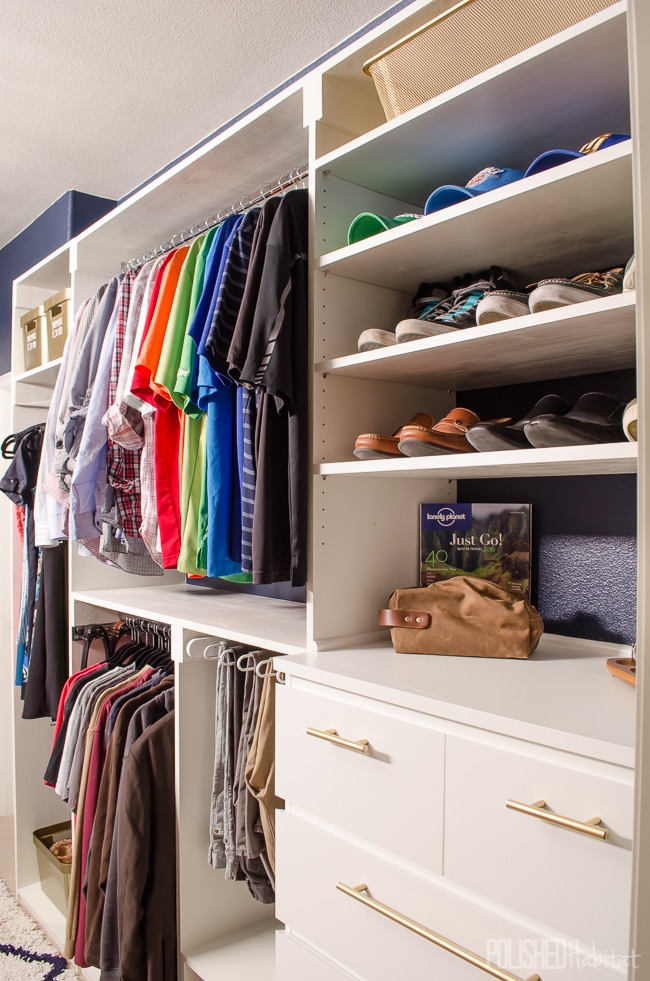
Closet Rods: Oval Chrome Rods from Amazon
Hangers: Black Velvet Suit Hangers
If you are going for a higher-end glam look, these hangers are a huge bang for your buck. After a decade of wanting fancy wood hangers, I had purchased a bunch of them over time and decided they took up WAY too much room and I was hugely disappointed in them. I ended up selling the woods ones in a garage sale and used the money to buy these. I will say that the velvet hangers are VERY clingy, which I love because nothing is falling off of them. However, they make my husband a little crazy. It takes longer to get your shirts on the hanger since the fabric doesn’t really slide. Luckily he loves me more than he hates the hangers, so they are staying.
Purse Storage: DIY Project – click for tutorial!
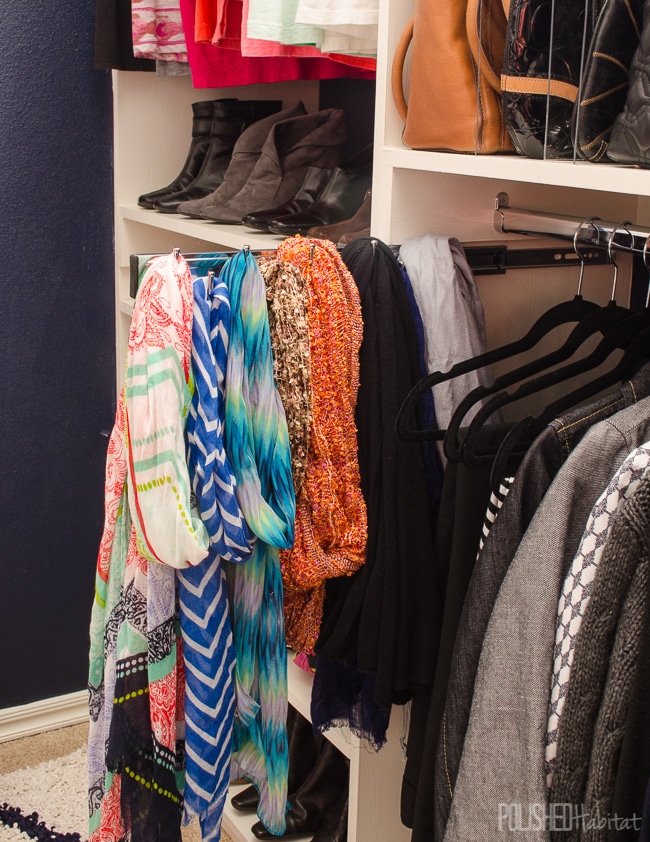
Pull-Out Belt/Scarf Organizer: Rev-A-Shelf Slide Out Belt Rack
Pull-Out Valet Rods: Rev-A-Shelf Designer Valet Rod
Pull-Out Tie Organizer: Rev-A-Shelf Side Mount Tie Rack
I’ve always liked the products from Rev-A-Shelf, and had an experience during the last week before the final reveal that made me a life-long customer. I opened all the boxes (which had been sitting on the dining room table unopened for WEEKS) and my heart briefly stopped when I realized that the belt racks were a completely different color than the valet rods and tie rack. The boxes on all the items said chrome, but the belt racks were not at all chrome. Whaaaaa!?!?!
I had less than a week before the reveal, so went for double problem solving and emailed both the third-party seller on Amazon AND tweeted Rev-A-Shelf to clarify if the belt racks came in a true chrome like the other items. The seller replied that they could check into it, but that their customer service wasn’t in the office (on a weekday!) and they’d get back to me in a few days. Fail. Meanwhile, Rev-A-Shelf came through in a BIG way. The tweet turned into an email, and their representative had me send a photo of the wrong item, and then quickly shipped out the correct item, even though I hadn’t ordered from them directly. AND she suggested I donate the incorrect items to Habitat for Humanity versus shipping them back. Talk about a win-win!
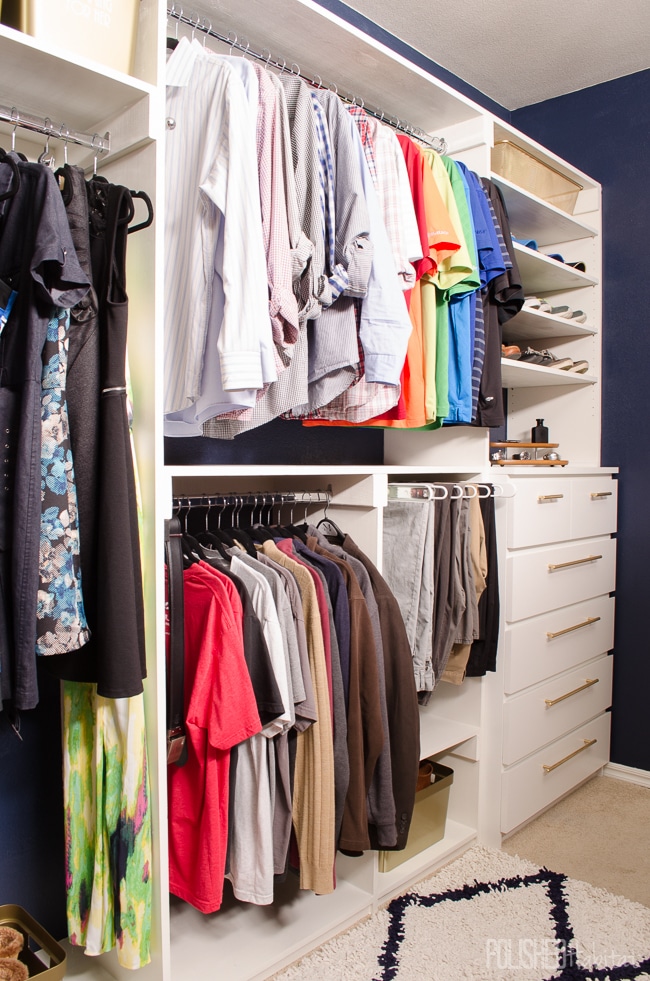
Pull-Out Pants Organizer– IKEA
Gold Mesh Bins (Top of Closet)– IKEA ALGOT Basket, spray painted in Rust-Oleum Gold
Solid Gold Bins – Target In Store

From the earliest planning stages in the closet, I knew we needed lots of drawer space. With our limited skills and timeline, I was desperate to find an affordable way out of building them ourselves. I should have guessed that IKEA would be the answer, but I did research many alternatives. I selected the IKEA MALM series because of the streamlined flat sides and top. This allowed us to truly build them into to closet. I gotta say, it was a little disturbing nailing into a brand new dresser, but it all worked out in the end. The MALM series also comes in several sizes, which gave me maximum flexibility when designing the room.
Dressers – IKEA MALM
Dresser Drawer Pulls – 15″ Euro Style, spray painted in Rust-Oleum Gold (tutorial here)
Painting the drawer pulls instead of buying them gold was a ridiculous savings again, just like it was in the pantry. The only 15″ brass pulls I could find are $36 each and I needed 8, so it would have been $288. My 10 pack in silver was $56. Just that savings more than paid for a dresser!
I also used the following tools from HomeRight, my One Room Challenge sponsor. Each one made my life infinitely easier and less messy throughout the makeover. Which is good, because we seriously had ZERO extra time or capacity for mess!
Finish Max Paint Sprayer – Putting the first coat of white paint on the shelves with the sprayer reminded my why I love the Finish Max so much.
Spray Shelter – You may have only seen this in the week #4 post with the Finish Max, but I use it constantly, including every time I spray paint.
PaintStick – This got put to work on both the ceilings and the walls in week #2
Digital Temp Heat Gun – I couldn’t have made the clutch holders without this!
Speaking of tools, here’s the low-down on what we needed to build all the shelving. This DIY aspect is were we saved an unimaginable amount. There was lots of trial and error since we aren’t woodworkers, but this proves it is possible for anyone to do it!
Wood Shelving: This is an odd thing to include, but it’s not easy to find affordable wide pieces of wood big enough for a closet. At least locally, we found the best option at Lowes. They carry paint grade 16″ wide x 8 ft long pieces for $19.99. It is hard to find more than 4-5 good pieces per store, so I HIGHLY recommend having them order it ahead of when you need it. We ended up buying wood from 5 different Lowes locations in order to come up with enough, and I know some people don’t have that many stores around.
Adjustable Shoe Shelving: Kreg Shelf Pin Jig This makes it super easy to make all those perfect holes for adjustable shelves & Corbel Style Shelf Pins
Sander: Ryobi Sheet Sander I wouldn’t have blamed this thing if it had quit, it was used constantly. Cheaper wood means lots of sanding. I used to have a mouse-style sander and the replacement sandpaper was outrageously priced. With this option, you can use regular sandpaper and get 4 pieces for the sander out of every full sheet. Honestly, we probably should have invested in a belt sander for this big project, but we already had this and it held up great.
Saw to Cut Metal Closet Rods: Rockwell Bladerunner I actually won this in a giveaway. It turned out to be super handy for cutting metal.
Miter Saw for Wood Cutting: Ryobi 10″ Sliding Miter Saw We bought this during the closet makeover and HIGHLY recommend it for beginner DIYers. I’d even call it a must-have.
3D Design Software – Home Designer by Chief Architect – WARNING: This is not an easy software to just start using. There is a big learning curve, and much of what you see in my renderings was imported into the program from the SketchUp 3D Warehouse. You won’t be able to install the software and then drag and drop to make rooms look like the spaces I showed. Plan to spend lots of time learning and reading forums. It’s not impossible to learn, but it more complicated than you may expect from a $99 software. It’s hugely powerful for the price, but there are still limitations. I plan to upgrade to the $495 version this year, but wanted to make sure I could learn on the less expensive version.
Whew – I think that’s everything, but let me know if I forgot anything. If you haven’t seen ALL the closet pictures, you can find them here.
See the whole closet makeover week by week:
Week #1: Skeletons In My Closet
Week #2: There’s No Going Back Now
Week #3: Road Trips and Close Calls
Week #4: Adventures in Closet Building
Week #5: The Final Countdown
Week #6: It’s Done – The Final Reveal!!!
Follow Up: Source List & Money Saving Tips
Post shared at: Remodelaholic


Jaclyn Lorimer says
Your closet turned out so beautifully, and thank you for sharing all the sources here! I had to laugh at the comment about your husband hating the velvet hangers–we have those as well in our closet and my husband hated them so much that I ended up having to give in and let him keep the plastic ones! I talked about it a bit in this post.
http://lorimerliving.blogspot.com/2015/11/master-closet-organization.html
If my closet was nearly as gorgeous as yours, maybe I would have fought a little harder! Lol, maybe someday!
XO, Jaclyn
Melissa George says
That is so funny! The rumbling seems to have died down, so I’m hoping he is adjusting. I can’t wait to check out your link!
Denise says
This is awesome Melissa! I am pinning this for future reference! I bought some of those velvet hangers to try out. I love them for me sweaters and shirts that tend to slip off everything else, but I’m not sure I could get my hubby on board – too much time getting things off and on the hangers – Ha! I’ve got time to ease him into it I guess 😉 You’ll seriously did an amazing job on this closet!!
Rana says
Your closet looks amazing and after seeing this post, I feel like this is something I can do in the future. Thanks for the inspiration 🙂
Amanda says
Loved your closet transformation! I am sure you must be living in your glory! I am always organizing and reorganizing my closets… and the terror of the purses. Loved what you did with the lucite clutch holders. Did you post the tutorial for that yet? Also, where is the hardware from on the vanity? I just ADORE them 😀
Melissa George says
Thanks Amanda! No clutch tutorial yet, but the weather is supposed to be a little warmer this week so we should be able to get the photos done for the tutorial. Tentatively, I have it scheduled to be posted on 12/16. That hardware on the vanity LOOKS pretty, but I really don’t recommend it at all. They are from Hobby Lobby, which usually has sturdy hardware, but one of those pulls broke during install and I had to super glue it together for photos. The other side is getting ready to break as well. After I had trouble, I noticed that they had bad reviews online for breaking just like mine. It’s a total shame because they are GORGEOUS!
Lori says
Love this closet makeover. I looked through your supply list but didn’t see anything on the actual building supplies. Did you use wood, MDF or prefabricated shelving? And is there anywhere that show the dimensions of the shelves and width of the hanging parts? Thanks!
Melissa George says
Hi Lori – we used wood. Lowe’s sells 16″ wide x 8 ft pieces, so we used 16″ as the depth for everything, which worked out really well. For the width of the sections, on my side, we started with the width of the MALM dresser and mirrored that same width to the shoe section and then the middle was whatever was left. I don’t have the specific widths listed anywhere since we custom did it to our weird shaped closet, but if you are wondering about a specific section, let me know and I can do a quick measurement for you. We had my 3D renders for the rough plan and then really started at one end figured out the specifics as we built.
Lori says
okay thanks! one last question, the shelves above your husband’s dresser look like adjustable ones..with the holes?
Melissa George says
Yes! We made those out of the same wood, but there is a tool you can buy to space the holes out perfectly. Toward the very end of this post, there is a tools section and a link to the shelf jig thing we used. We did the same thing over on my shoe side so they could adjust to different height shoes in different seasons. We felt so fancy making our own adjustable shelves, but it was pretty easy with the jig.
Anngela says
Gorgeous closet!!!! I am interested in how you did the acrylic purse divides (not the clutches) and I don’t re-call seeing anything mentioned!? xoxo
Melissa George says
I swear we took photos, but I can’t find them in any of the posts either. We marked out every 3 inches on the wood, making the marks the width of the acrylic. We adjusted the blade depth on our miter saw to only cut through half of the board, creating the grooves. We were originally going to cut both the top and bottom, but were pretty worried about our ability to be precise enough to line them up. We tested the dividers with just grooves in the top board and the acrylic sitting level on the bottom wood and it works well enough that we went with it. It was a little tough because one bad cut and you mess up the whole thing, but it is doable! It would probably be easier to use a router and straight edge, but we were trying not to spend any more money on new tools. 🙂
Rita Gindi says
Love it! Your before’s look my “currently” lol. Can you tell me the length and width of your closet? I would like to compare with mine to get a sense of how much I have to cut back on the overall look. Yes, I am totally copying this!
Melissa George says
Thanks Rita! It’s a very odd shaped room, but the side with the clutches is 9 ft long, and my husband’s side is 8.5″ long. That doesn’t include the vanity nook, just the clothing/shoe/purse spaces. All the parts we built are 16″ deep, and the Malm dressers are slightly deeper than that. In between, we have just over 5 ft of floor space, which is nice, but not necessary, it just ended up like that based on the layout of the rest of the house. Hope that helps!
Diana says
I love your blog .. you inspire me to do my closet but I really don’t know nothing about carpentry I got couple of items that you suggest but my concerned is the button did you leave it open or you make a base and how you hold the plywood against the wall to support ? I’m sorry but I really looking forward to do this but I’m not sure how will come out .. lol? Thank you and I hope you can answer my questions
Mary says
Hi Melissa! Love this closet remod. We’re in the process of a major house remodel/addition and I’ve been working on the close layout. Question for you now that it’s been a few years–how has the IKEA Malm dressers held up? I ask because about 15 years ago I put an IKEA dresser in my daughters BUILT IN bed and it failed after a year. I’ve been wary ever since, but I keep seeing the being used. Would love to see a follow up on some of the longetivity of some these items (like the painted pulls). Thanks, and now that I’ve found you, I’m never letting you go!! 🙂
Melissa George says
Ah, thank you Mary! The MALM has been AMAZING – still smooth and sturdy. There’s some pictures of the drawers in this post from this year: https://www.polishedhabitat.com/how-to-organize-dresser-drawers/ I totally know what you mean though, we used the cheapest, small IKEA dressers in our garage remodel and they aren’t so smooth. It was a good budget fix at the time, but I’m dreaming of replacing them with something sturdier. One other option if the MALM sizes don’t work with your plans are the NORDLI dressers. I used a big on in the office here: https://www.polishedhabitat.com/office/ and it is also sturdy and fabulous after almost three years. I don’t open the drawers as often, but haven’t had any issues and they’re nice soft close sliders. Good luck with your remodel!