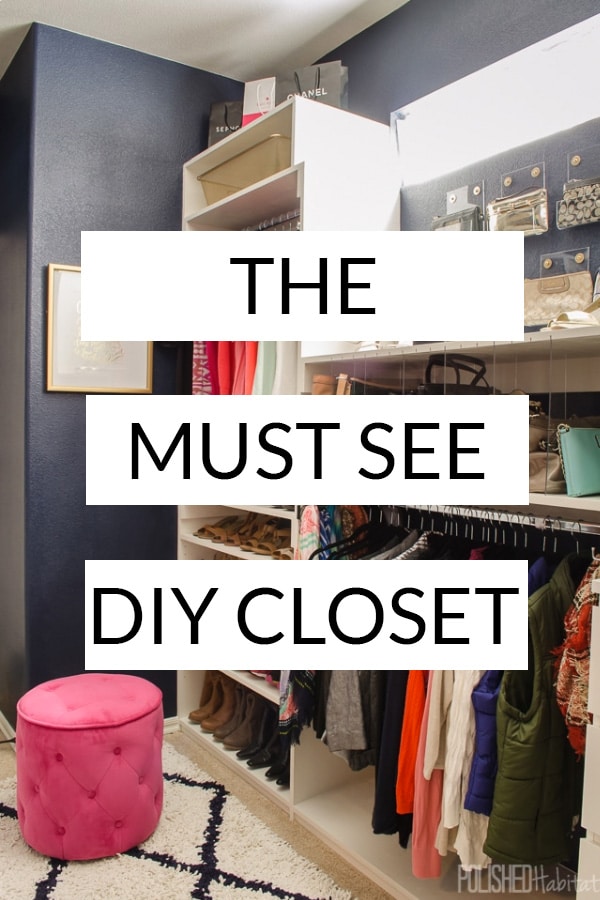
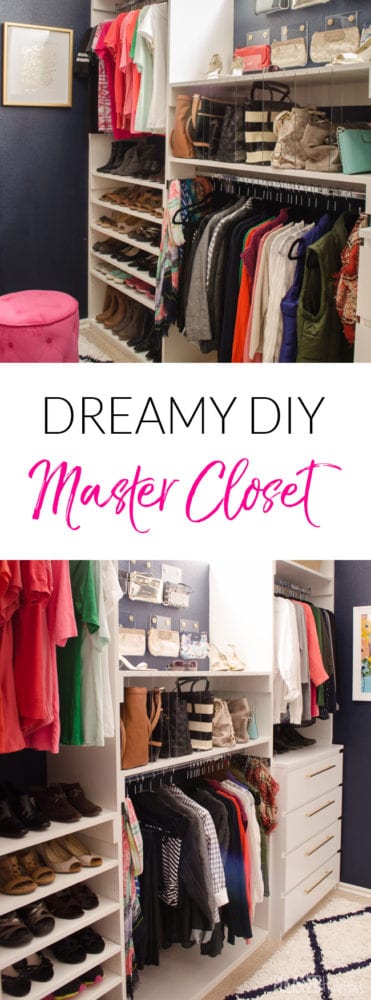
We made it! Five crazy weeks from the time we began, our blood, sweat, and tears have culminated into an absolutely dreamy glam organized master closet.
I thought my first One Room Challenge was tough when I transformed our pantry. Then the garage was even more challenging this spring.
Clearly, my pattern is to just keep pushing us to the limit, because the closet project felt way worse than the garage. Thank goodness the end result was 100% worth the struggle.
I think I may start sleeping and working in the closet. That’s normal, right?
Today’s post is going to be all about the photos, but you can find the full source list here.
If you are wondering what I’m talking about, we gutted the master closet down to the drywall 5 weeks ago as part of the One Room Challenge. Yes, I’m crazy. Luckily there were over 150 other crazies like me, also beating their heads against walls wondering why we decide to do this challenge twice a year. You can follow my progress starting in the week one post, and check out the rest of the rooms at the host blog, Calling it Home.
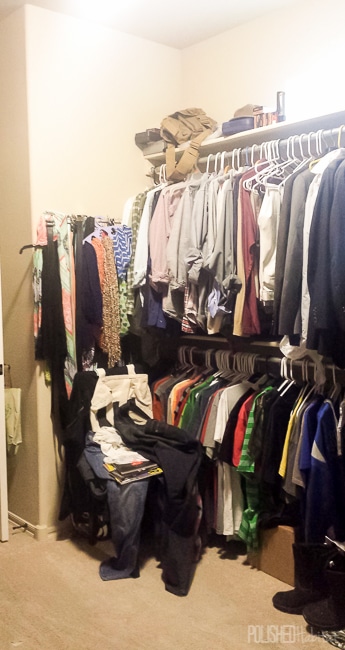
Let’s remember where we started – with a beige on beige on beige dysfunctional closet.

DIY Master Closet Before & After
I came up with a grand design plan, with no idea if we actually had the skills to implement it. There are some bloggers with KILLER building skills, but I’m not one of them. While my husband is willing to help (and I couldn’t have done it without him), he’s not a master woodworker either.
Lucky for us, hard work can overcome lack of skills. You might cry, but the following pictures are proof that persistence wins.
Are you ready?
It’s good.
I’m kinda in awe that it’s mine.
I’d pretty much love you forever if you took a second to pin your favorite pictures as you go. Really. Forever.
Oh, you want to SEE the pictures? Here we go!
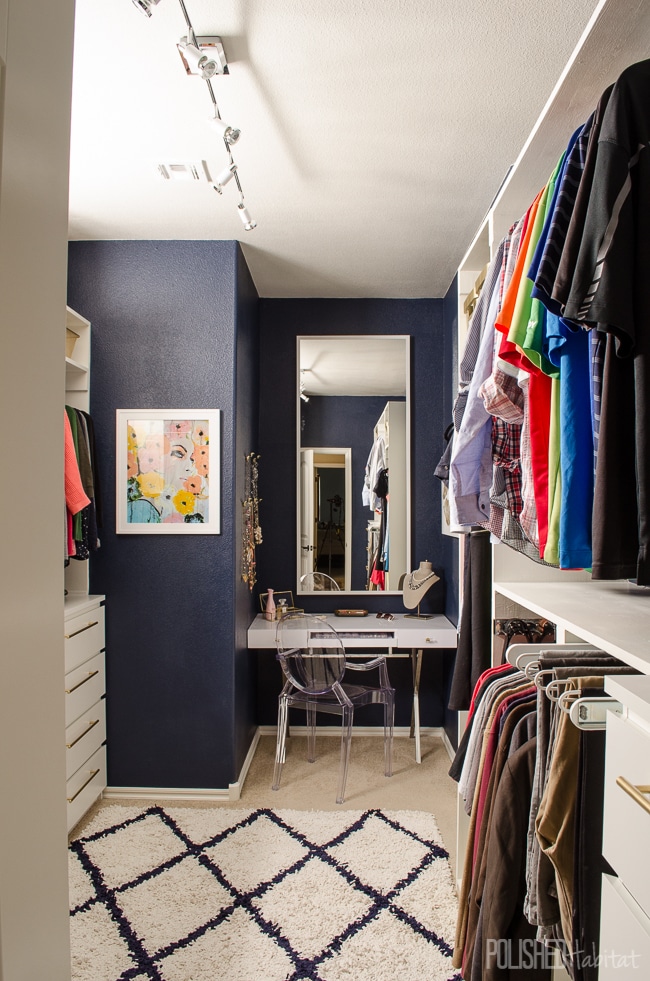
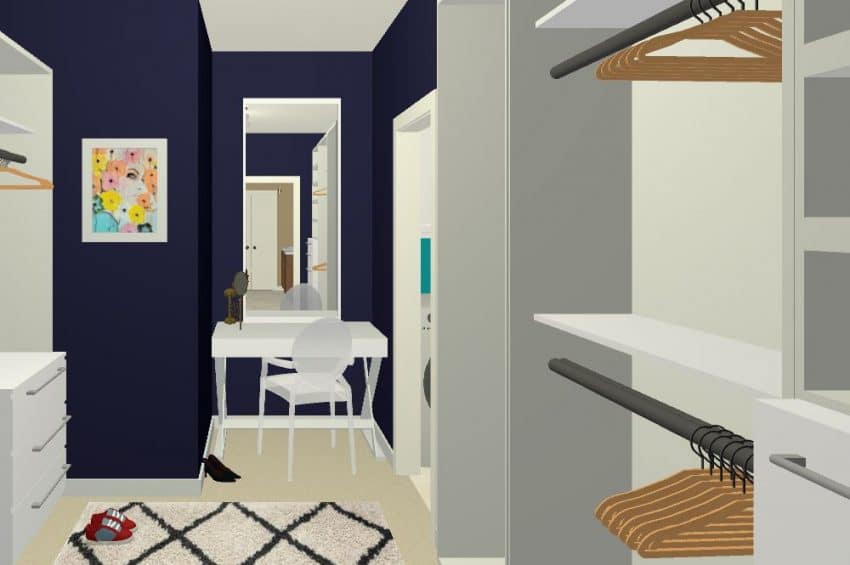
Pretty dang close to my mock up, right???
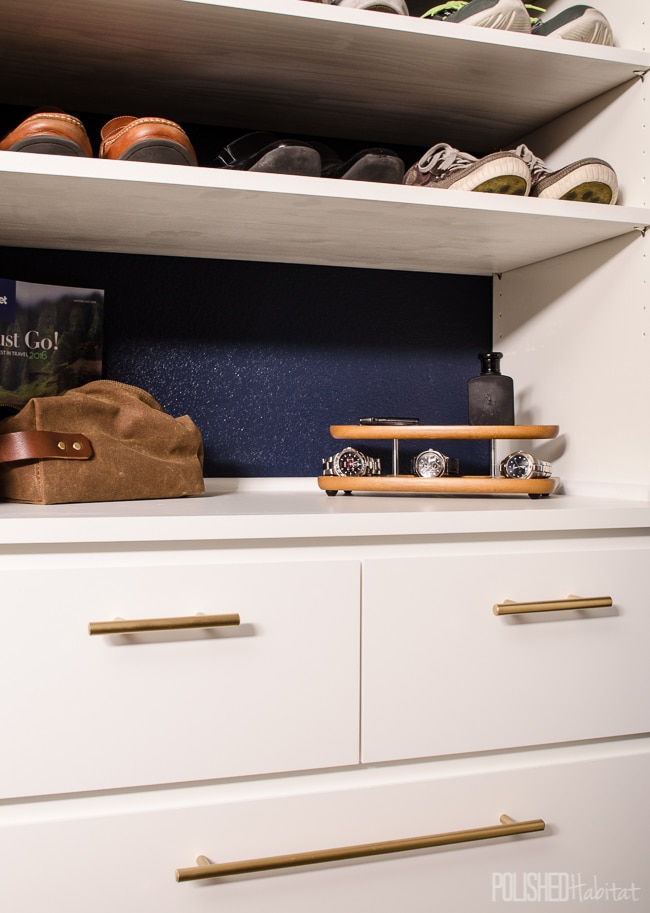
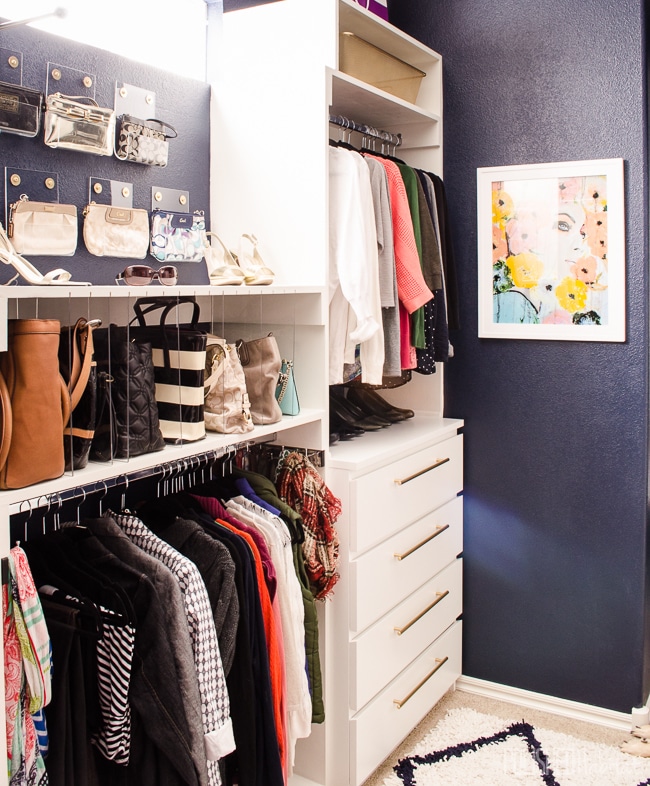
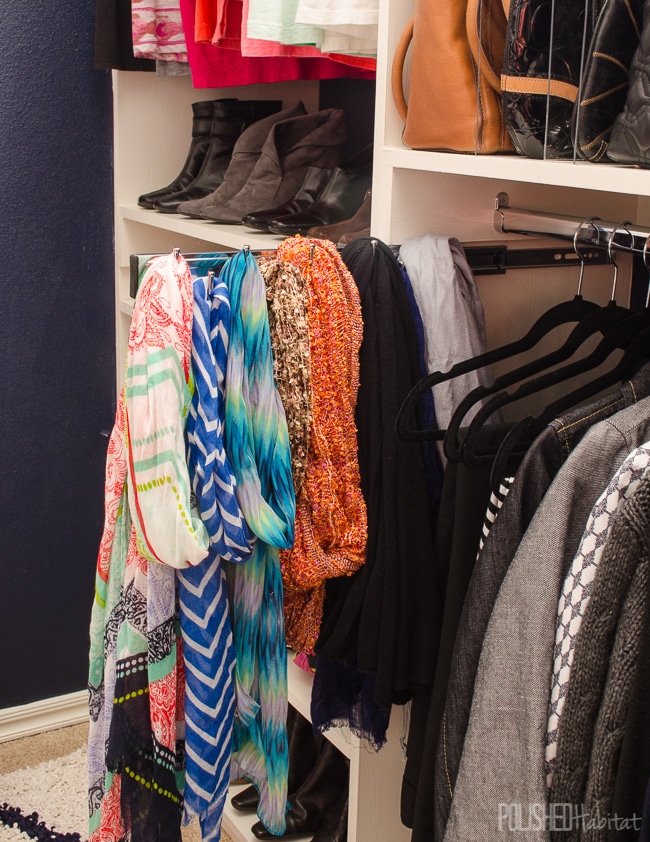
Let’s take a closer look at HIS side. We used an Ikea MALM dresser, added glam hardware, and attached the shelving right to the dresser to create the built-in look without having to build drawers ourselves.
The shoe shelves are all adjustable, and we left space to create a bit of a staging area for him. The wooden tiered stand is a family heirloom from my grandparents. I love having something old among all the new!
ORGANIZING TIP:
I also have a post on how to organize dresser drawers!
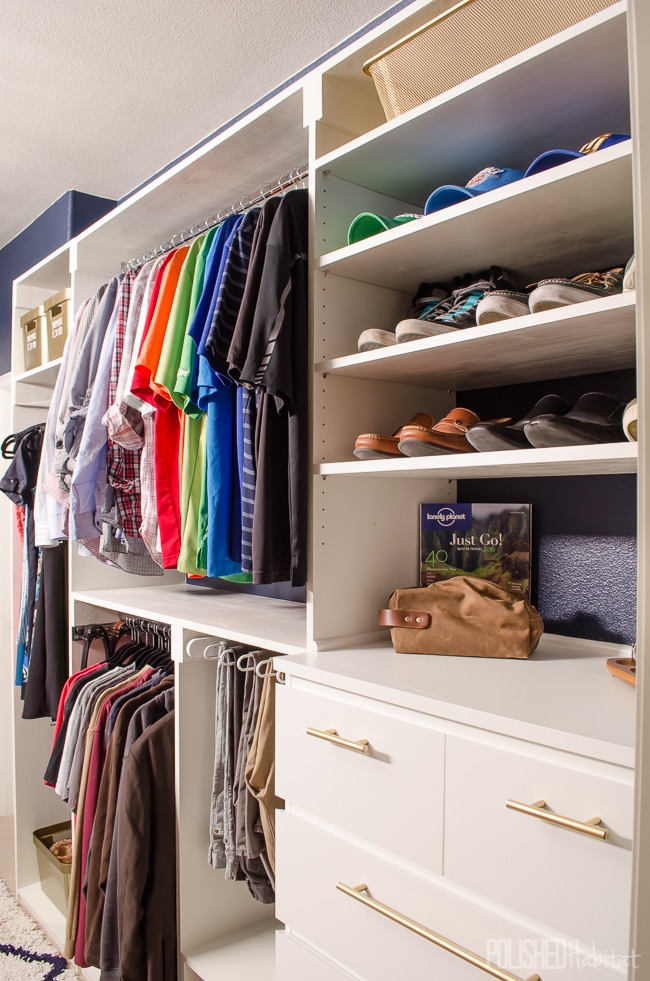
Next to the dresser, he has lots of hanging space, including a pull out pants rack. So fancy.
As you can see, I also got a little bit of his side for my dresses. Luckily he’s good at sharing. 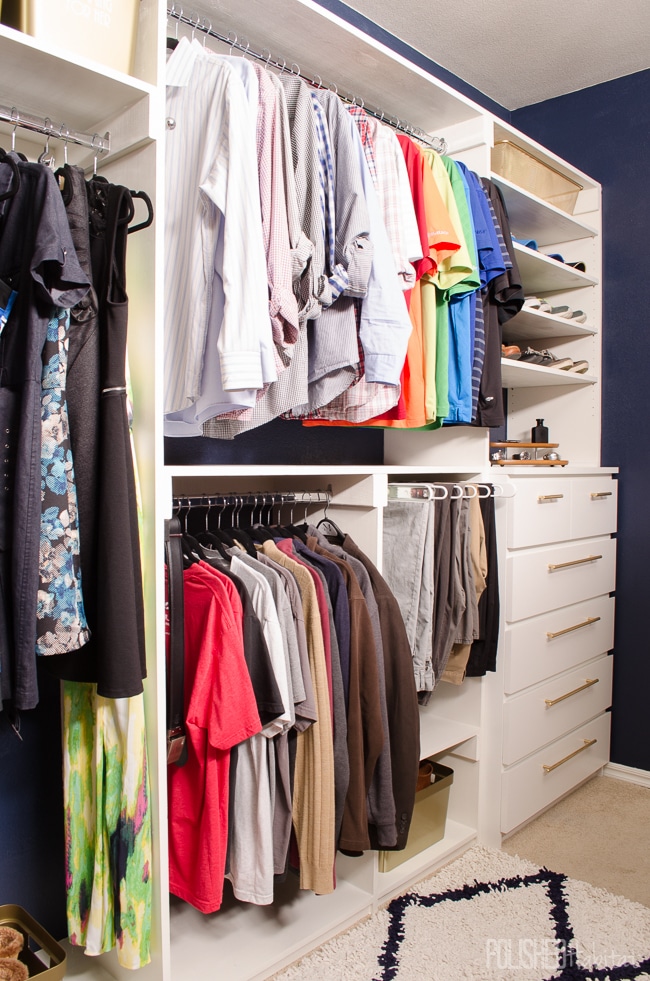
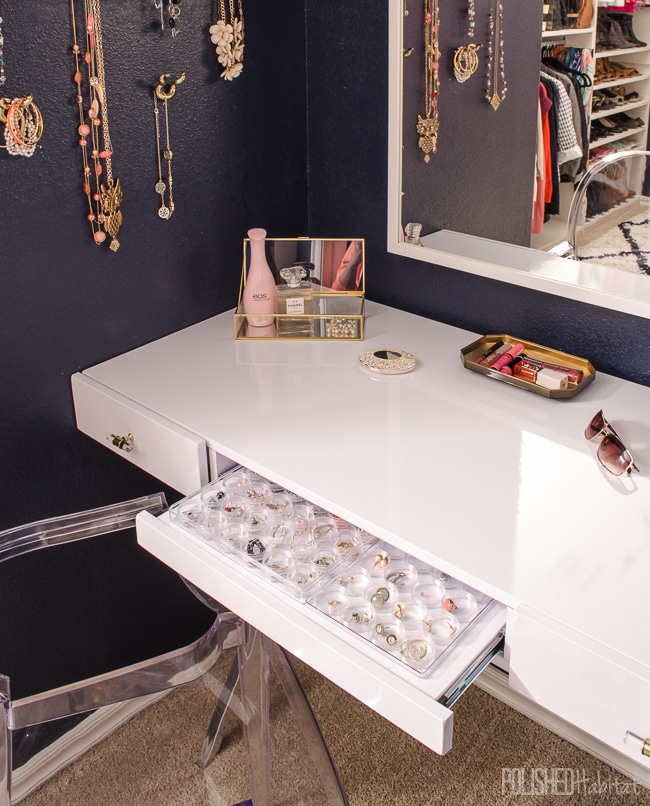
One of my favorite new features is the pull out valet rod. I’ve never been so excited to think about packing!

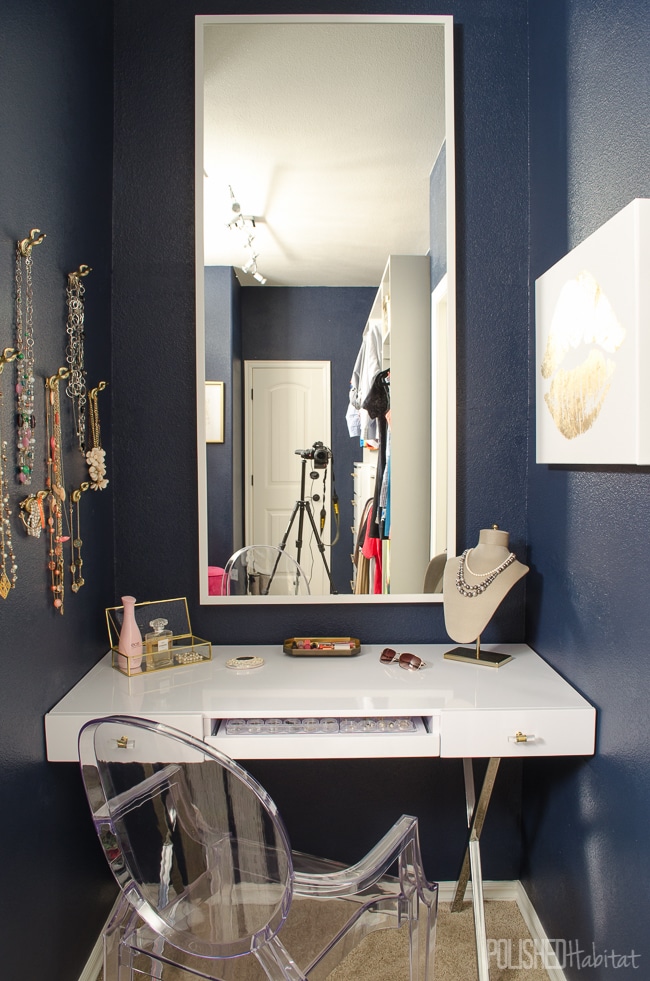
But enough about him, 95% of you are more excited about the glam goodies on my side, right?
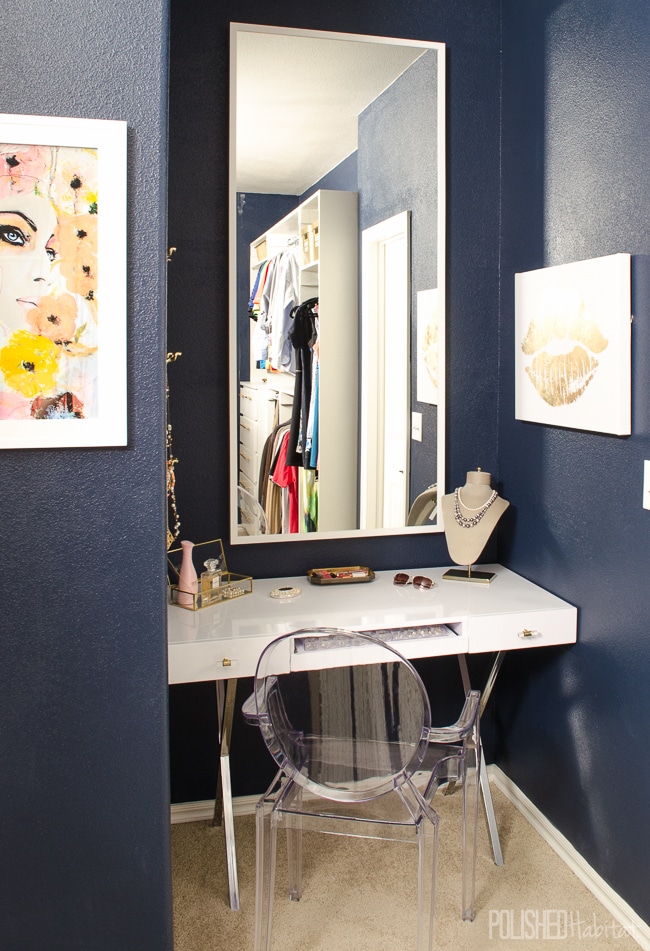
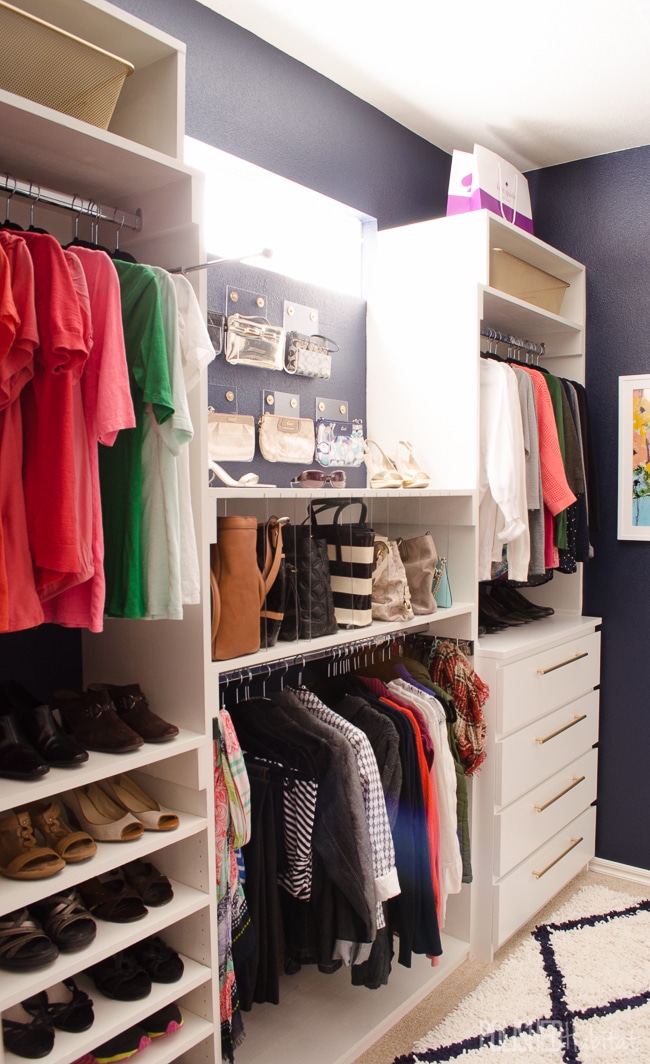
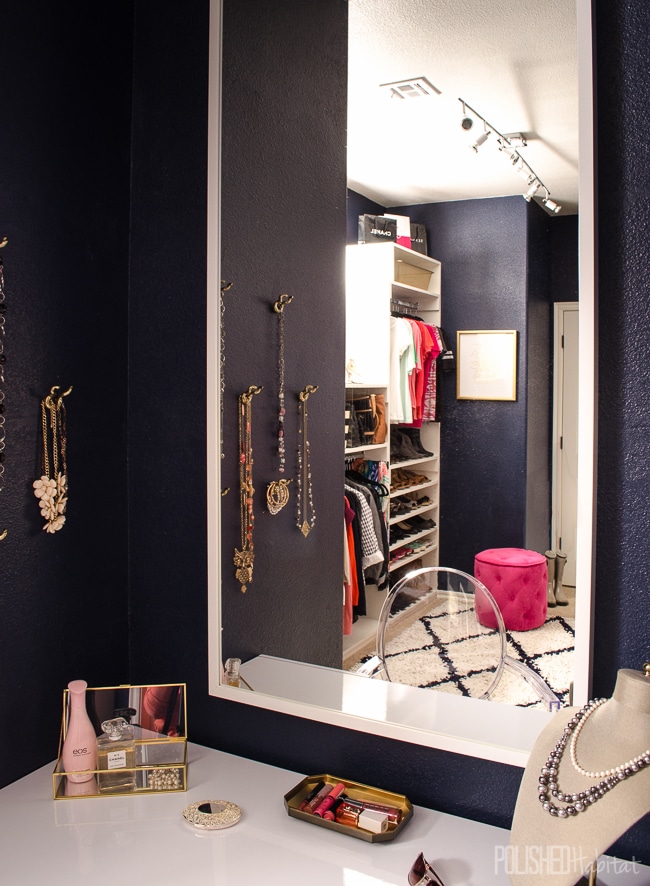
The former abyss of disorganized, too-deep shelving is gone and now I’ve got a dream vanity area!
Last week I mentioned not knowing how I was going to hang the necklaces on the wall, and I had nightmares of ending up with pushpins because I was out of time. But sometimes you get lucky.
I found some amazing gold ram horn drawer pulls at Hobby Lobby and knew they’d be perfect the moment I spotted them. I threw those suckers in the cart before someone else could swoop in and steal them from me.
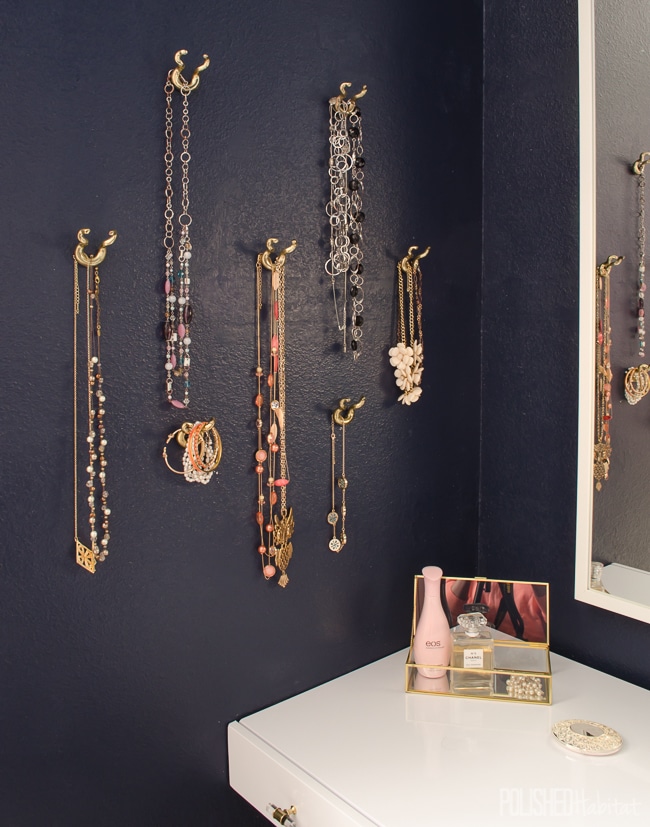
I also found some clear bead organizers that turn what is supposed to be a keyboard tray into ideal earring organization. Have I said “dreamy” lately? Please don’t pinch me, I don’t wanna wake up.
I’m not sure I ever thought I’d have art in the closet. But I love it!
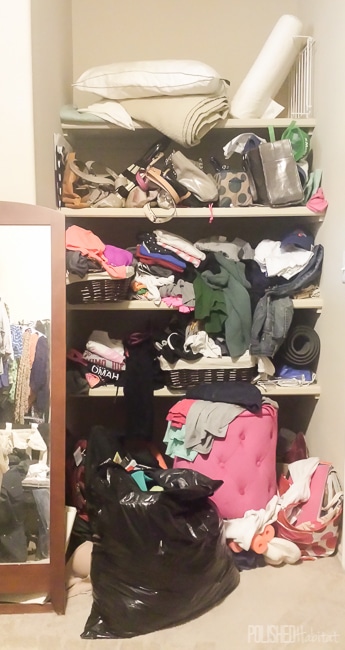
Let’s check out another SCARY before of what used to be his side and is now mine.
And now from the same angle…I have no words. I could spend an hour just scrolling back and forth between this before and after.
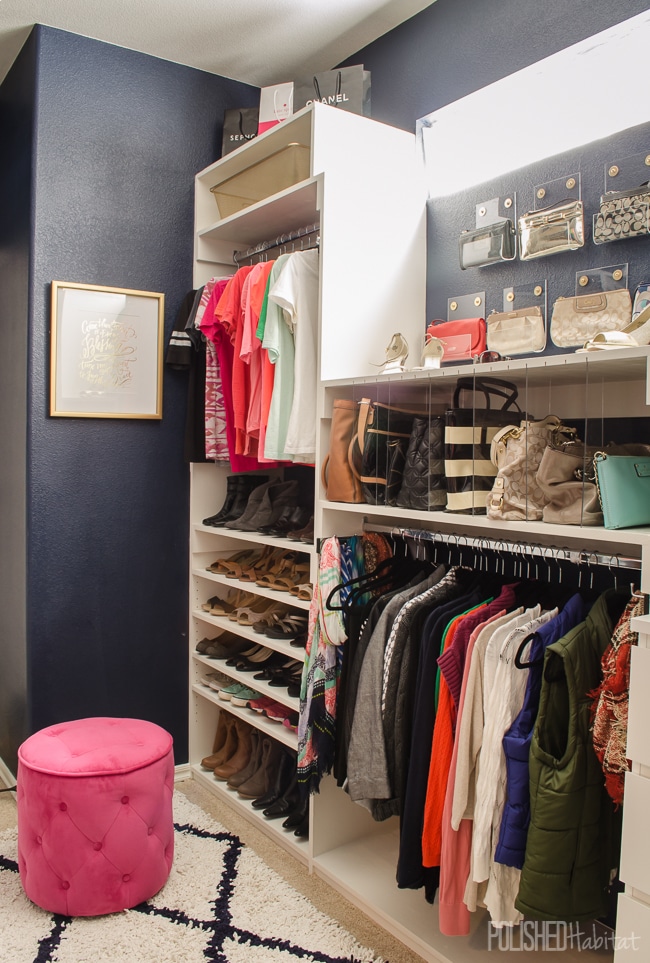
This was our first time working with acrylic, and while the end result was well worth it, I can’t say it is our favorite medium to work with. I’m over that now though, because hello beautiful purse storage! Here’s a link to the tutorial.
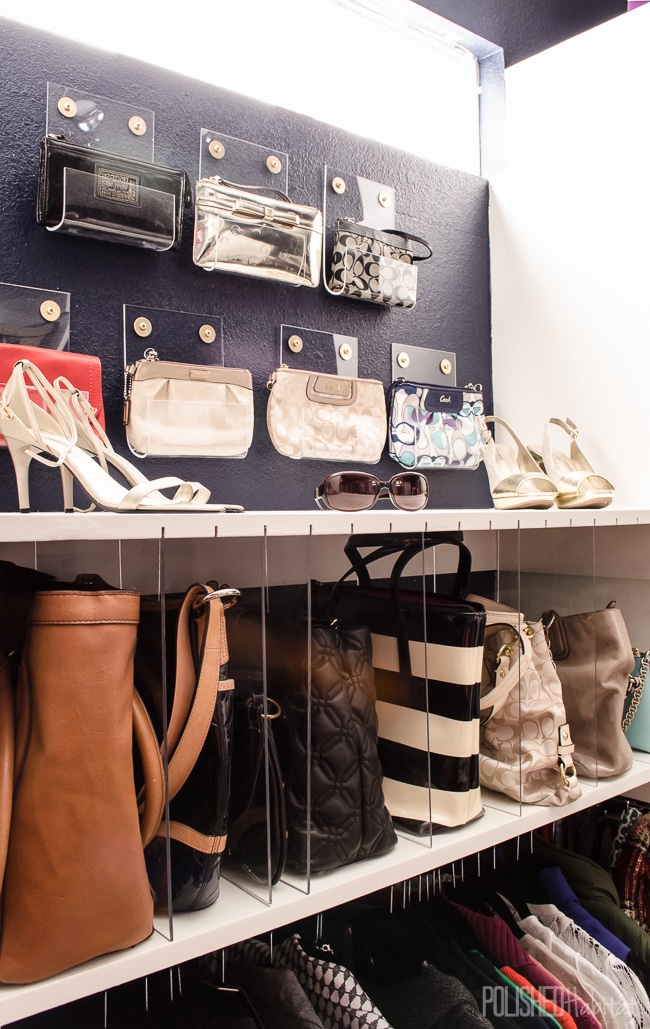
Purses are absolutely art to me, and I love that my little collection can be on display.
The REAL reason behind the clutch storage was that the window used to be obstructed by shelving. It made me crazy and one of my prime design challenges was figuring out how to maximize storage without putting a shelf directly below the window, which blocks the light. I had no idea my functional dilemma would turn into the best part of the room.
Um, did you notice the dog paw photo bomb? Maddie’s a big fan of the closet too. Photography fail.
I’ve got a pull-out valet rod on my side too. It’s like playing dress-up without having to dress up.
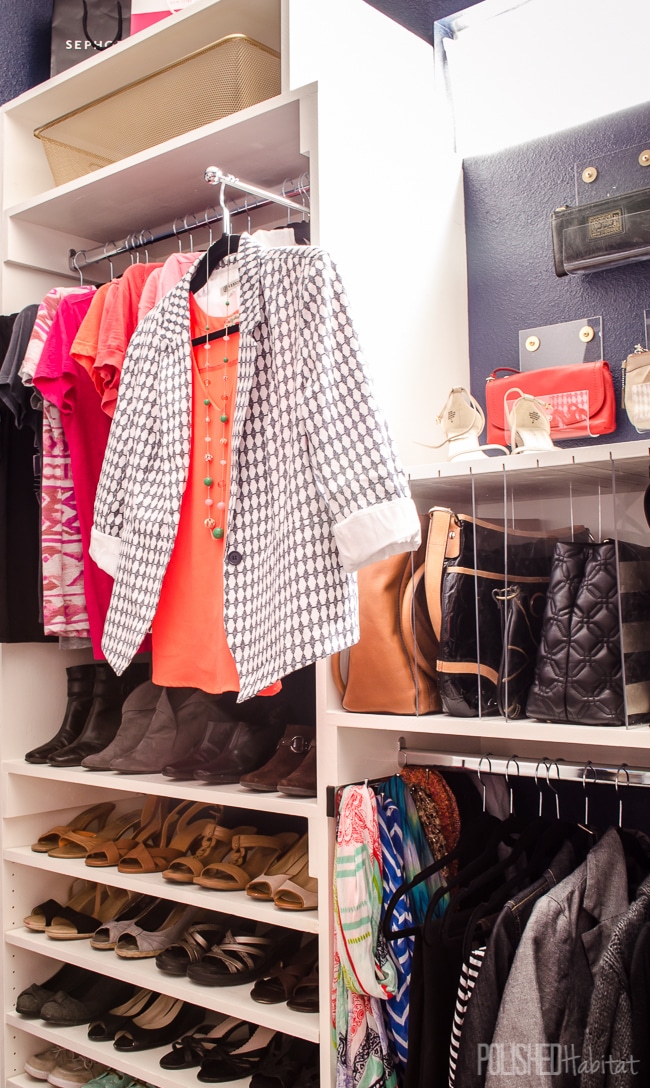
The scarves also got some pull-out organizing action.
I saved my favorite photo for last. Let’s remember what I used to see in this spot. Notice how sad the purses are. For obvious reasons, I was agitated every time I went in the closet.
The vanity with the reflection of the rest of the closet makes me SO DANG HAPPY. No more agitation. Just bliss.
My biggest hope is that these before and afters show someone that they can turn their cluttered mess into something that gives them life instead of sucking the energy from them.
In January 2019, I finally got around to organizing the clothes drawers in the closet! What a world of difference that has made. Be sure to check it out next!
If you have questions about any of the products or colors I used, or want to read more about how we saved BIG MONEY in closet, your next step is this post with the source list.

See the whole closet makeover week by week:
Week #1: Skeletons In My Closet
Week #2: There’s No Going Back Now
Week #3: Road Trips and Close Calls
Week #4: Adventures in Closet Building
Week #5: The Final Countdown
Week #6: It’s Done – The Final Reveal!!!
Follow Up: Source List & Money Saving Tips

maria says
I love the pframed print in the closet with the face and flowers. Where is it from?
Melissa George says
Thanks, it’s from Leigh Viner on Etsy. There is a direct link to it in the source post.
Amy @ MomAdvice says
You guys are KILLING IT! I just love this closet makeover so much. Our home has the world’s tiniest closets so I am living vicariously through you!! It’s perfection!! Happy Thanksgiving! xoxo
Melissa George says
Thank you Amy! Happy Thanksgiving!!!
Deb says
Truely beautiful. Where did you get the gold drawer pulls?
Melissa George says
Thank you Deb! There is a link to the pulls I used and the paint I used on them in my source list post here: http://wp.me/p6O8Sc-1Ey I buy them satin nickel and paint them myself to save big money!
Sheila says
Where did you purchase the entire vanity area…vanity, mirror, etc. and the purse organizers? I saw you found the jewelry horns at hobby lobby and they’re awesome! ???this closet!!!
Melissa George says
Thanks Sheila, you can find all the sources here in the follow up post here: http://www.polishedhabitat.com/2015/how-to-organize-closet/
lorie says
what program did you use to sketch
Melissa George says
Hi Lorie, I used the Home Designer Suite by Chief Architect. It’s got a big learning curve, but it can do a lot!
Wendy says
What a wonderful job you did Melissa!! I’m usually drawn to a lighter colour palette, but I’m in love with the dark blue…it’s so rich and classic looking!
All your hard work paid off…and you still have lots of storage despite losing the “too deep” shelves. If shelves are too deep it’s just a recipe for messiness!!
I wouldn’t change anything…but, since I’ve become addicted to the bling, I’d add a beautiful light (in my case blingy chandelier) above your vanity to reflect in the mirror…but that’s just me…it’s perfect as it is! Congratulations:)
Melissa George says
Thanks Wendy! There was definitely a gorgeous light fixture above the vanity in my dream plans, but the budget reality stopped it. Maybe one day we’ll go back and add it!
Wendy says
Well I know all about budget!!! I think it looks beautiful just as it is! It’s always best to live with something for a while anyway…can’t wait to see your next project Melissa!!
Melissa George says
Thanks so much Wendy!
Stacy Risenmay says
This.Is.Amazing. I want to move it 🙂 It made the top ten projects in the DIY contest on my blog. Congrats!
Melissa George says
How exciting! Thanks so much Stacy – I can’t wait to ooh and ahh over the other 9 projects!
Mariele says
Omgosh!!!! I can’t believe how beautiful this turned out, your hard work sure paid off! It’s IDEAL! I don’t think I’ve ever seen a prettier closet! Alright, maybe enough exclamation points now, but I’m really that excited. 🙂 I live in a big old MAJOR fixer-upper (my mom and aunt installed all the plumbing and electricity themselves when we moved in) that hasn’t been remodeled since we’ve moved in. I finally have started – just on my own room, to start. While I’ve been taking paneling and old glue off the walls, I’ve just been going through this post again and again for inspiration on my breaks. 🙂 You guys did such an amazing job! My closet is itty-bitty at a whopping 3x5x7 feet, but I still want to try to incorporate some of these ideas into it… pinned some of my favourite photos! 🙂
Melissa George says
SOO exciting that you are starting work on your space. I’m so glad you found inspiration from our closet! Thanks for pinning too!! You’re in total good company with the exclamation points, how could we live without them? I always have to edit my posts after I right them to make sure at least a few sentences end in periods.
Ariel says
Holy smokes. One day, when we don’t live in base housing, I will have a closet like this. In the meantime I’ll borrow yours in my dreams!
Love the paint colour too!
Melissa George says
Thank you, Ariel! It’s been done about 9 months and it still seems like a dream that it is in our house!
Diana Elizabeth says
I’m about to redo my small walk-in closet (barely walk-in more like take a step and turn around). Love this and so inspirational! I want to try the acrylic purse organization, I too believe purses are art 🙂 Thanks for the post!
Debbie says
Beautiful! I love the pull out valet! Question…I have a closet system with preset holes for shelves etc. Would the closet rod install in my preset holes or would I have to drill to make it fit?
Melissa George says
I feel like when we were looking, I saw one that would work in closet systems, but it’s been awhile now and my memory isn’t helping me out. I did have to contact Rev-A-Shelf customer service when I received something that was labeled the correct color on the packaging, but inside, it was incorrect. They were SUPER helpful even though I bought the items on Amazon and not through them directly, so I’d give them a call or submit a question online and a bet they’d be helpful. Here’s their contact page: https://www.rev-a-shelf.com/rev-pages/ContactUs.aspx
Debbie says
Sorry…I meant the pull out valet, not the rod?
Melanie says
I love your design! We are building soon and I wondered if you’d share the approximate length of your closet so I can see if our plan would accomodate something similar in size/design? Would love to copy some of your ideas!
Melissa George says
Sure – it’s such a strange space with akward bump-outs, but each side is about 9 ft. That doesn’t include the vanity bump out, which is about 3.5′ x 3.5′. Good luck with your new home!
Melanie says
That is very helpful! Thank you.
Fabia Waters says
Hi Melissa! I love what you have done with the space, we are currently building our house now and I’m getting a tons of ideas from your post, especially putting shelves on top of the dresser! so neat !!! if you don’t mind me asking where did you get your adjustable shelves from? maybe I’ve looked in the wrong places but just can’t seem to find it , anyways thank you for inspiring us all !!
Melissa George says
Hi Fabia, we custom built all the shelving in the closet ourselves with the exception of the actual dressers and the vanity. To make the shelves adjustable, we use the Kreg brand shelf pin template tool. We are NOT woodworkers, but were able to figure it out and save thousands of dollars. So glad you are getting ideas for your new home!
Francine Weir says
O..M..G… I’m speechless. What a wonderful makeover, and a really great job you and your husband did. I love everything about it. Was searching for ideas, etc. for the closet in the condominium I rent and found your site; your closet gives me inspiration and bliss too. Oh happy day…!
Melissa George says
Thank you so much, Francine! It was the biggest project we had ever tackled and we were quite afraid that we’d never be able to put it back together after we knocked out all the shelves. Totally worth the literal blood, sweat, and tears though!
If you haven’t gotten a chance to join the newsletter yet, today is a great day to do that if you’re looking for more ideas. I’m launching a brand new community tomorrow where people can submit photos and get feedback on their spaces from me, along with the other community members who are all held to high standards of kindness. We’d love to have you!
Mrs. Sarah Painter says
In pics 13 & 14, where did you find the clear acrylic dividers for your handbags and totes? I have a small reach-in that’s evolving yet, I’m always trying to maximize space. The setup is ClosetMaid wire shelving which I hate but not much I can do about it. Would these acrylic dividers work for a closet with wire shelves? You and hubby did a great job. Thanks in advance.
Melissa George says
Hi Sarah, We built the dividers right into the closet by notching out the wood shelf for them to slide into and cut the acrylic to custom fit. That said, there are some good dividers on the market now! These ones look like they might work with our system: https://amzn.to/2FG2Tkq Hope that helps!
Virginia says
What an amazing closet reveal!! All that hard work and inconvenience paid off for sure! I have just a few questions. Did you install the boxes in place standing up? Where did you purchase the pants hanger? It looks similar to one I’ve seen at IKEA. What size was the wood you purchased for the braces?
Melissa George says
Hi Virginia! The pants hanger was from IKEA! We just built the shelving to fit it. I believe the braces are all 1 x 4’s, and we did build everything in place in the closet versus building in the garage and then bringing it in. We just measured and cut as we went, starting with the sections above the dressers. Hope that helps!
Barbara Karvonen says
What was the total cost?
Melissa George says
Hi Barbara, It’s been about 4 years so I don’t remember exactly, but I’m pretty confident in ended up between 1000-1500 for everything. This follow up post lists out where we got everything: https://www.polishedhabitat.com/how-to-organize-closet/