• About Polished Habitat
    • About Me
    • Contact Me / Media Requests
    • Partner with Us / Advertise
    • Terms of Service, Privacy, & Disclosure Statements
    • Facebook
    • Instagram
    • Pinterest
    • Twitter
  • Home Decor
  • Room Makeovers
    • House Tour
    • Space Reveals
  • Cricut
  • Organizing
    • Most Popular Organizing Posts
    • Closet Organization
    • Bathroom Organization
    • Kitchen Organization
    • All Organizing Posts
  • Cleaning
  • Letter Board Ideas

Polished Habitat

Home » DIY & Crafts » Modern Feature Wall Tutorial

09/20/2016 · 18 Comments

Modern Feature Wall Tutorial

DIY & Crafts

288 shares
  • Facebook
  • Twitter

If you’ve poked around any magazines or watched any HGTV lately, you may be thinking that shiplap is the best/only way to add a cool feature wall.

But, if the number of times I see the word shiplap every week is any indication, it seems like it’s becoming a standard feature in homes across America.

That doesn’t mean it’s BAD, I mean, air conditioning is pretty common too and I’d be a VERY cranky person in Oklahoma without it. And if you dream of, or have installed, a shiplap wall that just feels like YOU, I LOVE that!

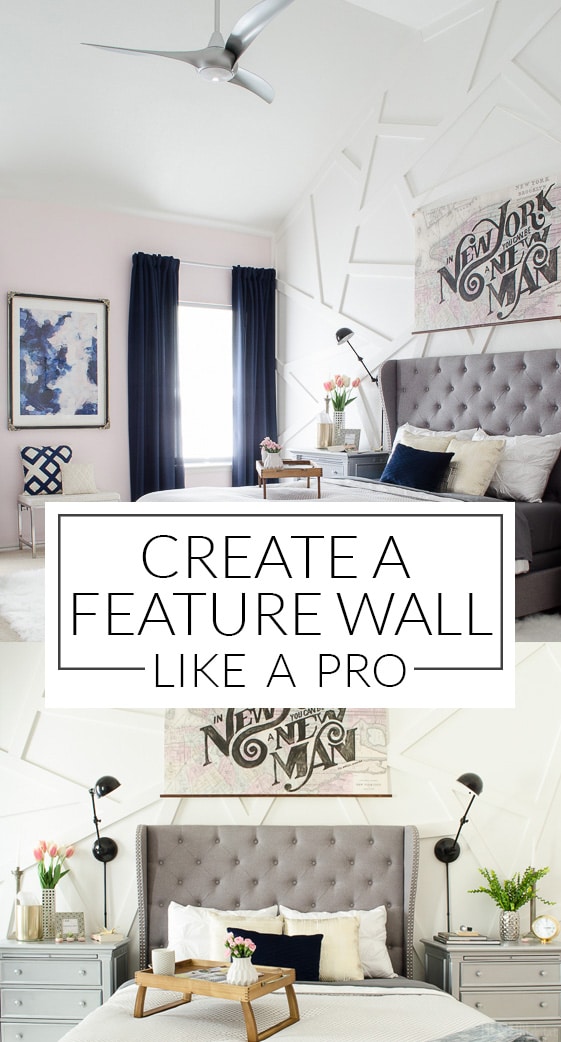
If the farmhouse look doesn’t feel like you, this is the week to find your own modern feature wall style!

This silver nightstand was a DIY that works perfectly in this modern master bedroom. Love that gray tufted headboard!

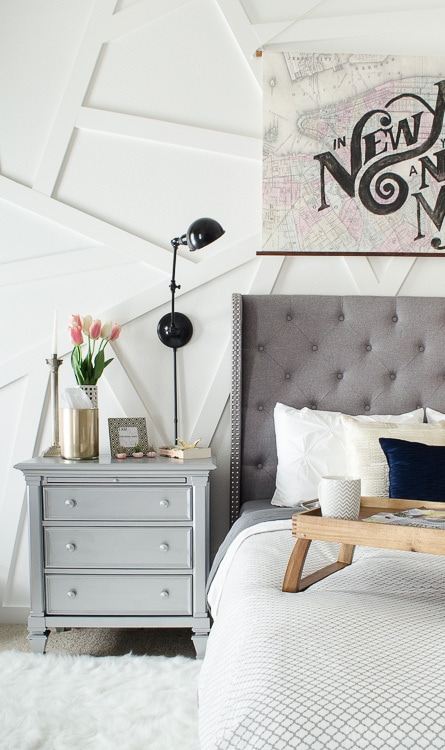
Those of you that read the post about my style last week may have noticed the crazy diagonal wall in our master bedroom. I never shared a tutorial for how we did it, so this was the perfect week!

Here’s how we did it in 8 short steps.

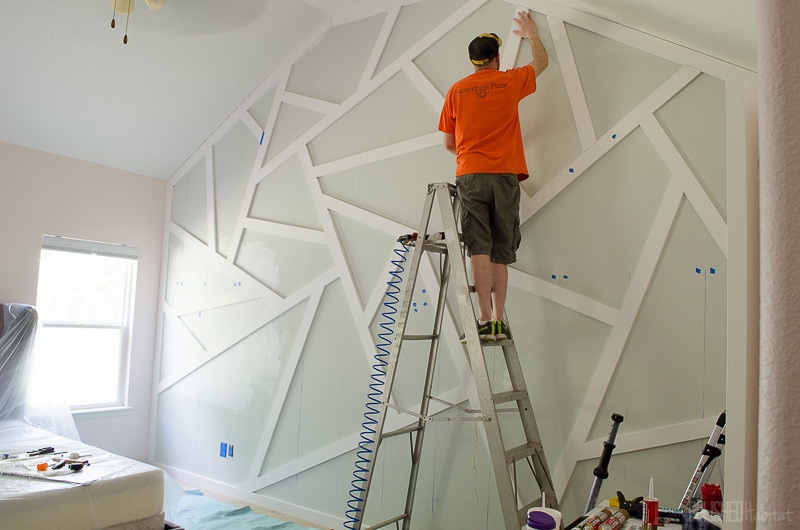
Step 1: Paint a Base Coat of You Final Wall Color & Remove Any Existing Trim
We skipped that step and had to do two coats inside every geometric shape. It would have been way faster to roll the whole wall white once and then just do the 2nd coat at the end.

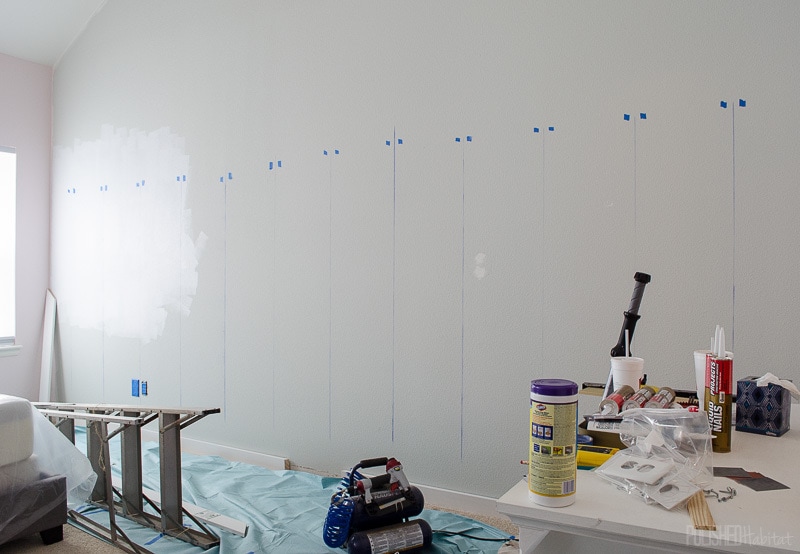
Step 2: Mark the Studs
We used a stud finder and marked the edge of each stud with painters tape. Since we knew wood would be going all kinds of crazy directions, we also snapped chalk lines so we’d be able to easily find the studs for each piece of wood.

Here’s what it looked like with the chalk lines snapped on the bottom half of the wall.

Bedroom Feature Wall Polished Habitat-4

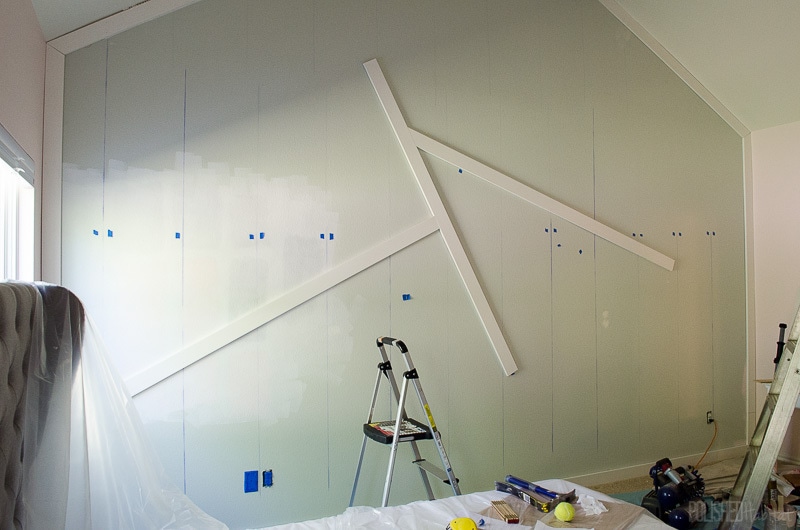
Step 3: Frame the Room
After considering a few different options, we selected pre-primed 1×4’s from Home Depot for our wall. You could save money by sanding, prepping, and priming the boards yourself.

Before placing the first diagonal board, we placed straight pieces around the floor, side walls, and ceiling to ‘frame” the wall. To attach them, we used Liquid Nails on the back and also nailed each place the boards crossed a stud.

Step 4: Let the Diagonals Begin
I was afraid that if we started on one side of the room, we’d end up with full lengths of wood on one side, and lots of little pieces on the other. To avoid this and keep things somewhat symmetrical, I started in the middle of the room.

The first piece was a bit scary, but we just went for it! As we selected the angle, we made sure that even though the piece was fairly vertical, it crossed three of our stud-lines.

We applied Liquid Nails to the back, crossed our fingers, and nailed it into the studs. Once it was in place, we put up another uncut piece on the left side. To the right, we cut the end off a full piece of wood at a random angle and attached it as well. 
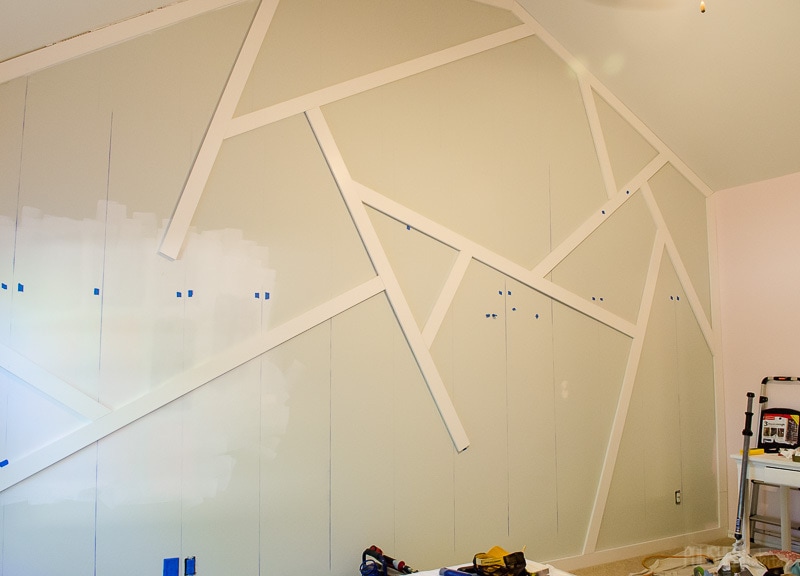
Bedroom Feature Wall Polished Habitat-10

Step 5: Keep Going!
With the first three pieces secure, we kept going, using mainly long pieces of wood. For these early pieces, we could hold a full piece up to the wall and adjust it until it looked right.

When we liked the placement, we could mark the approximate angle the end of the wood needed to be cut at to get the look. Since it wasn’t an exact process at this point, it went pretty quickly.

Bedroom Feature Wall Polished Habitat-11
Step 6: Power Through the Tricky Part
Toward the end, we’d have pieces that needed each end cut at really specific angles to fit in between two existing pieces AND still cross a stud for some stability. That meant finding a protractor and actually measuring angles. Yuck!
Bedroom Feature Wall Polished Habitat-16
Step 7: Wood Fill & Caulk like Crazy
When you step back and feel like your wall is complete, celebrate and then get ready for the last steps.
As you can imagine, by the time we were done, there were lots of nail holes to wood fill. We also needed some wood filler in several of the junctions between boards.
While the wood filler dried, I started a day of caulking. Each place wood touches the wall needs to be caulked to have a finished look. It’s not hard, but takes a while because of all the angles.
Step 8: Paint! 
When all the wood filler and caulking was dry, it was time to paint everything. I used a brush for the wall so I could get into all the angles, and a 4″ roller for the wood to get a smoother finish. The color is White Dove by Benjamin Moore.
Although this project was a little tricky at times, it was totally manageable if you have a miter saw and nail gun. The end result was definitely worth the work!
This silver nightstand was a DIY that works perfectly in this modern master bedroom. Love that gray tufted headboard!
The depth of the wood creates some great shadows at night.
Pink Master Bedroom-107
PS: We updated the furniture since this post.

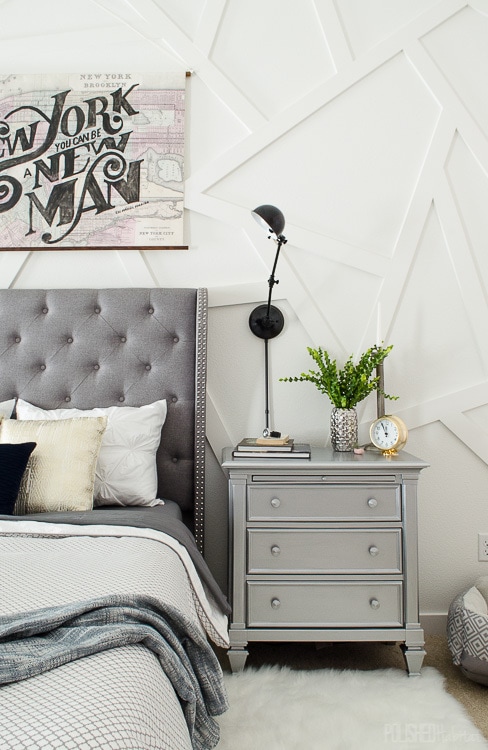
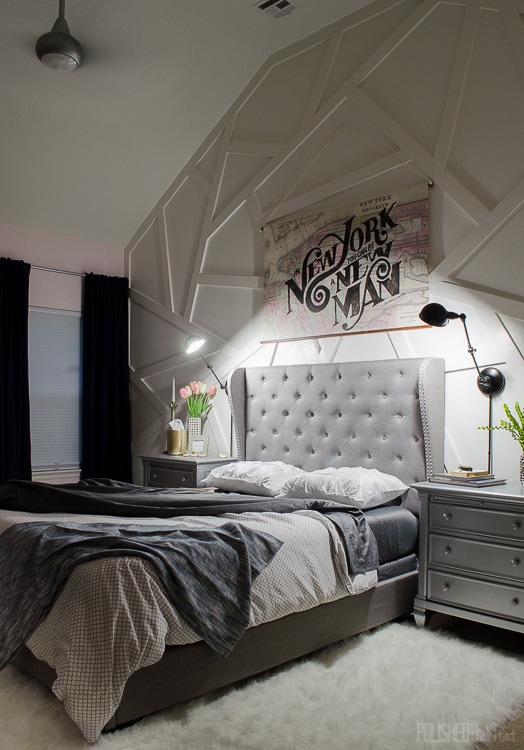
Take a look at the most recent master bedroom makeover here. 

Not all feature walls have to be shiplap. Get the tutorial for this modern wall treatment, along with links to 18 other posts all with unique feature wall ideas!

MORE FROM POLISHEDHABITAT

288 shares
  • Facebook
  • Twitter
melissa

Melissa George

In 2013, Melissa founded Polished Habitat to share her passion for intersecting style and function to make everyday life more beautiful and less stressful. She does this by sharing easy home organization tips, home decor tutorials, and creative ideas to help readers think outside the box, no matter their budget. Her work has been featured in print in Better Homes & Gardens and Room to Create Magazine, and online by HGTV, House Beautiful, Buzzfeed, & more. In 2018 & 2019, Melissa was named as a Style Maker by Better Homes & Gardens. In 2019, Polished Habitat was shortlisted for the Amara Blog Awards Best Interior Styling Blog - International. Read more...

« Modern Industrial Glam Home Style: Before & After Photos
Rory’s Decor Style: How it Changes with Dean, Jess, & Logan »

Comments

  1. cassie bustamante says

    09/20/2016 at 6:17 am

    this feature wall is a beautiful beast! i mean that in the sense that it’s dramatic and amazing and stunning!c

    Reply
    • Melissa George says

      09/20/2016 at 4:18 pm

      LOL – LOVE that description, Cassie!

      Reply
    • Brigitte Lalonde says

      03/11/2018 at 8:25 pm

      It’s Beautiful. I was looking for ideas for my basement feature wall. They are only 71/2 feet?????

      Reply
      • Melissa George says

        03/13/2018 at 9:24 am

        This pattern could still work really well and would distract from the lower ceiling. Vertical stripes are always a good way to add a bit of height as well. Maybe vary skinner and wider pieces of wood to create some more interesting than standard paneling?

      • Brigitte Lalonde says

        03/18/2018 at 2:48 pm

        THANKS for the reply! I might just do that! 😀

  2. Jenna says

    09/20/2016 at 8:53 am

    This wall is just killer!!!!! And it looks so cool at night as well! You nailed it!

    Reply
    • Melissa George says

      09/20/2016 at 4:19 pm

      Thank you!! So glad I followed through on my crazy vision, and that my husband agreed to just trust me that it would work!

      Reply
  3. Brynne | The Gathered Home says

    09/20/2016 at 9:41 am

    YAY! This is one of my favorite feature walls ever! Absolutely stunning, Melissa!

    Reply
    • Melissa George says

      09/20/2016 at 4:18 pm

      Thanks so much, Brynne!

      Reply
  4. Lora says

    09/20/2016 at 3:33 pm

    Very cool wall treatment! And I love that huge map above the bed 🙂

    Reply
    • Melissa George says

      09/20/2016 at 4:17 pm

      Thank you, Lora! My husband gets most of the credit for the map!

      Reply
  5. Rachael @ This is our Bliss says

    09/21/2016 at 3:59 pm

    Every time I see your room I swoon and then I think of how proud you guys must be of that WALL!! Thanks so much for sharing this awesome tutorial. It is an absolute jaw-dropper! Love, love!

    Reply
  6. Ariel says

    09/22/2016 at 6:03 am

    I really do love this project. The wood, the shadows, the geometry; super funky!

    Reply
  7. Kathy says

    09/25/2016 at 12:38 am

    Still LOVE this wall!! It looks great at night too.

    Reply
  8. Krista says

    09/25/2016 at 10:51 am

    This wall treatment absolutely blew me outta the water last spring, Melissa. I can’t wait to see what you have in store of this round!

    Reply
    • Melissa George says

      09/25/2016 at 11:14 am

      Neither can I! I seriously changed rooms AGAIN yesterday, but I think this one may stick if I can figure out the budget. 🙂

      Reply
  9. Lauriepop2 says

    09/26/2016 at 4:10 pm

    Wow, this looks amazing! I’m def showing my husband this art. Our bedroom wall is just as hard to fill! Looks great.

    Reply
    • Melissa George says

      09/27/2016 at 5:06 pm

      High ceilings seem so great until you have to decorate them, right? 🙂

      Reply

Leave a Reply Cancel reply

Your email address will not be published. Required fields are marked *

Welcome!

In 2013, Melissa started Polished Habitat to share her skill of mixing decor & organization to add style & function to everyday life at home.

Her work has been featured in print in Better Homes & Gardens and Room to Create Magazine, and online by HGTV, House Beautiful, Buzzfeed, & more.

In 2018 &  2019, Melissa was named as a Style Maker by Better Homes & Gardens. In 2019, she was also short-listed by the Amara Blog Awards for Interior Styling, International Division.

Need to reach Melissa?
Email: Melissa @ PolishedHabitat.com

Affiliate Disclosure

Polished Habitat is a participant in the Amazon Services LLC Associates Program, an affiliate advertising program designed to provide a means for sites to earn advertising fees by advertising and linking to amazon.com.

Copyright

Please keep in mind that all text and images on this blog are the property of Polished Habitat (formerly A Prudent Life).

Projects are for personal use only.

Photo Use Policy

You are welcome to share 1 image for an online round up or feature if you clearly link back to my post and use nopin code.

You are not permitted to remove watermarks, crop or edit my photos, use my images without credit, print my images, or share more than 1 image online without my written permission.

The 1 image used can NOT be a collage image or any image I have created that includes text. Please email me with any questions about acceptable use! THANK YOU!

Copyright © 2023 · polishedhabitat.com