
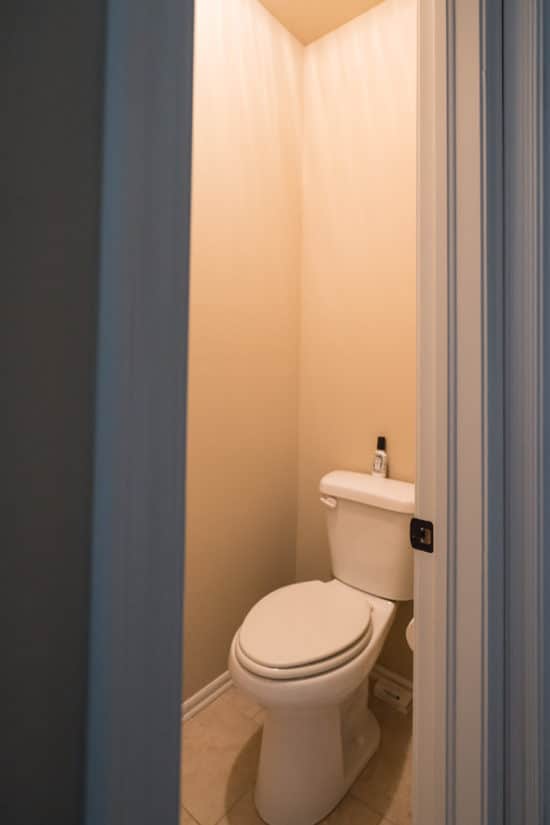
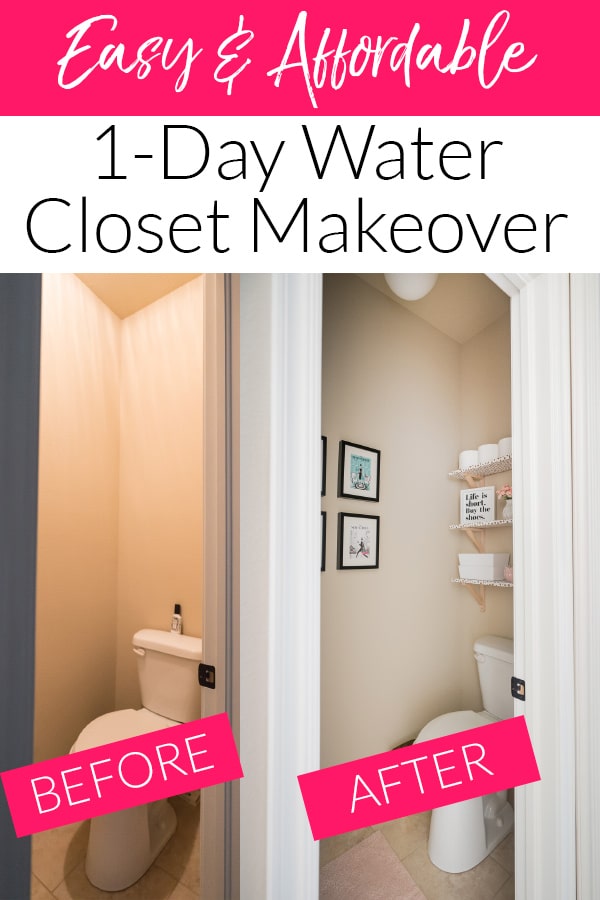
The master bathroom water closet has to be one of the least exciting places to organize and decorate.
Like many, ours is small at 3 feet wide x almost 5 feet deep for a grand total of less than 15 square feet.
What is a water closet? The separate “room” for the toilet as part of a home bathroom.
Seriously, ours had ZERO decor or storage above the toilet…not even a rug!
The real incentive prompting this mini-makeover was of the “one thing leads to another” variety.
The actual end-goal is re-doing the bathroom linen closet shelves and organization.
As I plan that project, I wanted to make smart decisions about what we continue storing there and what needs a different permanent home.
That process led to the realization that I needed the perfect above toilet storage idea in the water closet for our bathroom supplies, like toilet paper and feminine products.
It turned out to be an easy fix with a mix of IKEA and DIY wooden shelving!
DIY Bathroom Shelves Over the Toilet
I ordered 6 IKEA EKBY VALTER brackets to create our new shelves. We’ve used the same brackets for craft room storage and they are really sturdy when mounted in wall studs or with drywall anchors.
Instead of using the actual IKEA shelves with the brackets this time, I had Lowes cut a single piece of 8″ wide wood into three 30″ shelves.
Going that route means you can get custom sized shelves for an affordable price. I opted to make mine 2 inches shorter than the water closet so there would be an inch on each side.
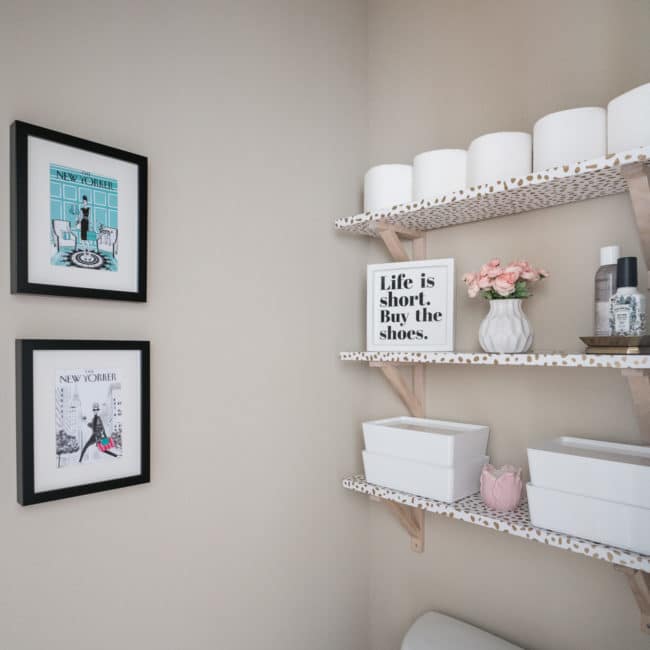
To add a little extra personality, I wrapped the wood in temporary wallpaper.
Storage on Over the Toilet Shelves
To add extra storage to the new open shelves, I ordered KUGGIS containers from IKEA. They hold all the bathroom necessities out of sight and keep the shelves from looking cluttered.
Even the Poo-Pourri got a designated spot sitting in a soap dish!
Side note: I spent 10 years not understanding the magic of Poo-Pourri. Now, I can’t recommend it enough, we have this scent and it’s crazy. The water closet smells good all the time now!
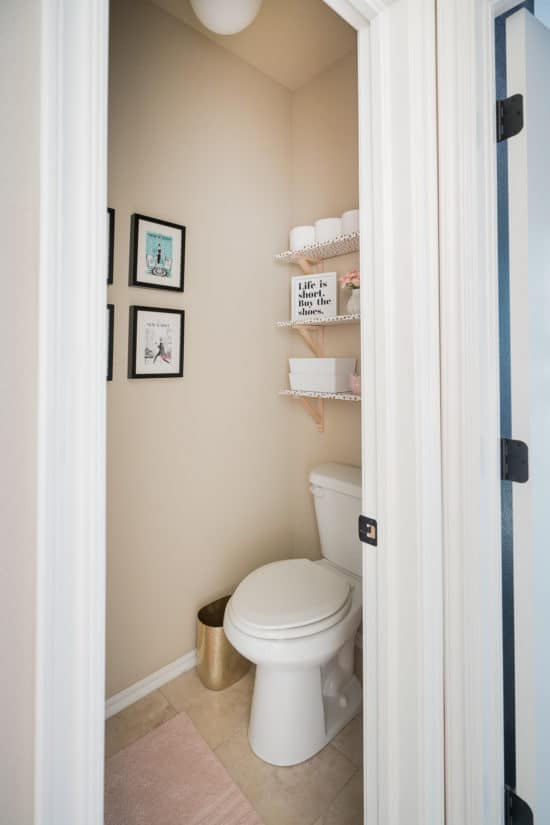
The top shelf was reserved for toilet paper storage.
Water Closet Decor
When I was in New York last fall, a lady was selling art outside Central Park. When she offered prints, complete with mats, for $1 each, I couldn’t turn her down. I wasn’t 100% sure where I was going to put them, but I’m so glad I bought them now because they’re perfect for this little space.
Combined with $4 IKEA RIBBA frames, the whole collection of art was $20 total!
To finish pulling the room together, we just needed a $4 rug and a new light fixture.
Turns out it’s almost impossible to get good photographs of the light fixture once we installed, but it adds a fun mod-vintage feel that coordinates with the other bathroom lighting! Here’s what it looks like:

![]()
I did impulse-splurge on the perfect small, gold, oblong trashcan at Target.
My favorite thing about this water closet makeover might be that it was so easy and affordable. Everything could be done in one afternoon!
If you have a small bathroom with a lack of storage space and don’t already have above toilet shelving, I’d order some shelf brackets or even simple floating shelves asap!
While it wasn’t the same crazy transformation of our larger interior design projects like the closet, bedroom, or office, smaller changes can still feel SO good when you tackle them.
I put the before and after images side-by-side below. As you can imagine, it’s so much nicer to walk past the room now. My only regret is waiting SO long to add style and storage to this tiny space!
 To see another space we tackled in a day, on a budget, without painting the walls, visit the affordable entryway makeover next!

Mariely says
Looks great!
Jean says
I feel trapped in rooms like this. I would tear out the walls.
Melissa George says
We love the privacy, especially as the bathroom is also between the bedroom and closet so serves as a hallway. No walls definitely wouldn’t work for us, but at least you know what you like when you’re looking for your own home!
RW says
Very nice transformation, well done. I plan to do something similar with shelves in a bath we are building, and have saved a picture from somewhere… the shelves are actually recessed into the wall behind the toilet, from just above the tank — making the whole space seem that many inches deeper. Sheetrock stage makes it easy to do for us. Jyst mentioning it in cssr another reader has the option as I do. But love your approach of improving this space so quickly and economically!
Melissa George says
That’s a great idea!
LJ says
It even looks bigger! You said you didn’t paint, but the walls definitely look ligher.
Melissa George says
The light fixture helped lighten things up in real life, plus switching to a Daylight bulb makes a big difference! But most of the difference is also that the before is a phone snapshot in the dark and the after was taken in the day with the real camera. You can read more about difference bulbs affect paint color here: https://www.polishedhabitat.com/how-lighting-affects-color/
Joycegina Hosmar says
The change looks great! I agree with having the TP and feminine products nearby. In our bathroom we have a cupboard
right next to the toilet…..an easy reach and no getting up!
Just wondering if that lower shelf is high enough. No one hits their head on it?
Melissa George says
Nope! We measured and have used the Poopuri several times with no head injuries! ?
Marilyn says
What a difference! Lokks great!
Elena says
Dear Melissa!
You are such an inspiration for me! The transformation is amazing! It proved my belief that sometimes one doesn’t need to spend a fortune to make a living space lovely, this post proved how a loving touch made a huge difference.
Thank you for sharing how with a little bit of effort, but lots of imagination and skills one can change the atmosphere of the room without bruising Visa at all.
I always wished I had the sense of what the room needs during the transformation to become warm and cozy, but I think there is hope for me when learning from people like you.
I am just contemplating changes in our new house after the winter is over (we still are enjoying the snowstorms), so you’ll have a faithful follower for quite a while. Thank you for your generosity sharing the tips and ideas, it is greatly appreciated.
Melissa George says
I’m so happy to hear that Elena! I hoped this post would do exactly what you said – inspire that you can make a lovely space with just a little time and money versus taking on debt and months of work! Thanks for following, and if you haven’t yet joined my email list – The Insiders – I think you’d enjoy weekly Friday morning emails as well!
Ankita says
Dear Melissa,
I got to your blog through your office decor link. And am I blown away!!!
I was really looking for exactly a makeover ideas like this without having to spend a lot.
Can you please explain how I get this done at my Lowes
“cut a single piece of 8″ wide wood into three 30″ shelves”
I am really going to inculcate lots of diy’s from your bag of creative, useful and beautiful space..
Melissa George says
Hi Ankita, If you go to the lumber section in Lowes, you’ll find a giant saw and a button to call for assistance. The wood we found was 8″ x 96″(8 foot) so we just took it to the saw and asked them to cut the length into 3 pieces of 30″ and then you can either take the 6″ scrap with you or they’ll dispose of it. If you can’t find what you think would work, just tell them you need 3 8″ x 30″ shelves and they can help!